Sharing repositories online#
Objectives
We get a feeling for remote repositories (more later).
We are able to publish a repository on the web.
We are able to fetch and track a repository from the web.
Instructor note
30 min demonstration/type-along
From our laptops to the web#
We have seen that creating Git repositories and moving them around is simple and that is great.
So far everything was local and all snapshots, branches, and tags are saved under .git.
If we remove .git, we remove all Git history of a project.
Discussion
What if the hard disk fails?
What if somebody steals my laptop?
How can we collaborate with others across the web?
Remotes#
We will learn how to work with remote repositories in detail in the collaborative distributed version control lesson.
In this section we only want to get a taste to prepare us for other lessons where we will employ GitHub. Our goal is to publish our guacamole recipe on the web. Don’t worry, you will be able to remove it afterwards.
To store your git data on another server, you use remotes. A remote is a repository on its own, with its own branches We can push changes to the remote and pull from the remote.
You might use remotes to:
Back up your own work.
To collaborate with other people.
There are different types of remotes:
If you have a server you can ssh to, you can use that as a remote.
GitHub is a popular, closed-source commercial site.
GitLab is a popular, open-core commercial site. Many universities have their own private GitLab servers set up.
Bitbucket is yet another popular commercial site.
Another option is NotABug
We also operate a Nordic research software repository platform. This is GitLab, free for researchers and allows private, cross-university sharing.
Type-along: Create a new repository on GitHub#
We need SSH keys configured for this part to work
To try this part during exercise or type-along, you need SSH keys configured and the public key deposited on GitHub (see our installation instructions).
If you do not have these configured, please watch as we do this episode and you can prepare before the collaborative Git lesson, where we will need this set up.
For the rest of this page, we will make a new repository for our guacamole recipe on GitHub (here we motivate why we demonstrate this with GitHub), send our code to it, and then see how others can get the code from it.
If you don’t have the recipe repository from previous episodes
Maybe you joined the workshop later or got stuck somewhere? No problem!
If you don’t have the recipe repository from previous episodes, you can clone our version of the repository using (please skip this if you have the recipe repository on your computer already):
$ git clone https://github.com/coderefinery/recipe-before-merge.git recipe
$ cd recipe
$ git remote remove origin
Now you have a repository called recipe on your computer with a couple of
commits. Further down we will also clarify what git clone does.
Make sure that you are logged into GitHub.
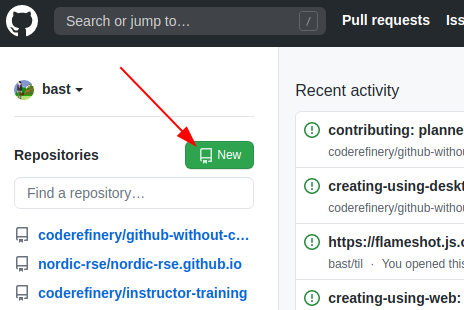
To create a repository we either click the green button “New” (top left corner).#
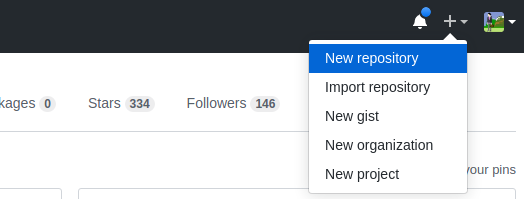
Or if you see your profile page, there is a “+” menu (top right corner).#
Yet another way to create a new repository is to visit new directly.
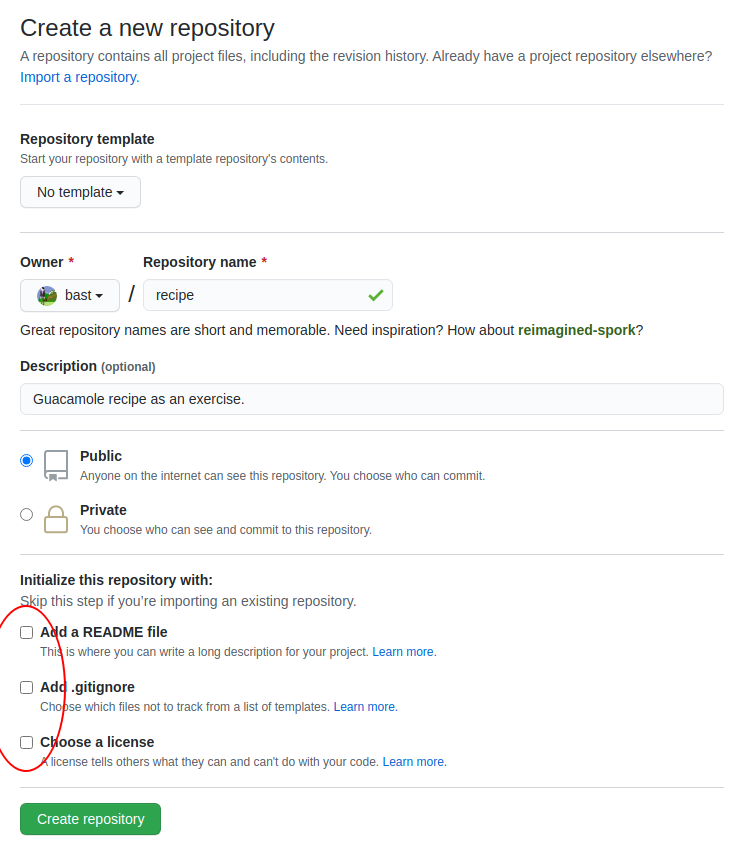
On this page choose a project name. For the sake of this exercise do not select “Initialize this repository with a README” (what will happen if you do?):
Once you click the green “Create repository”, you will see a page similar to:
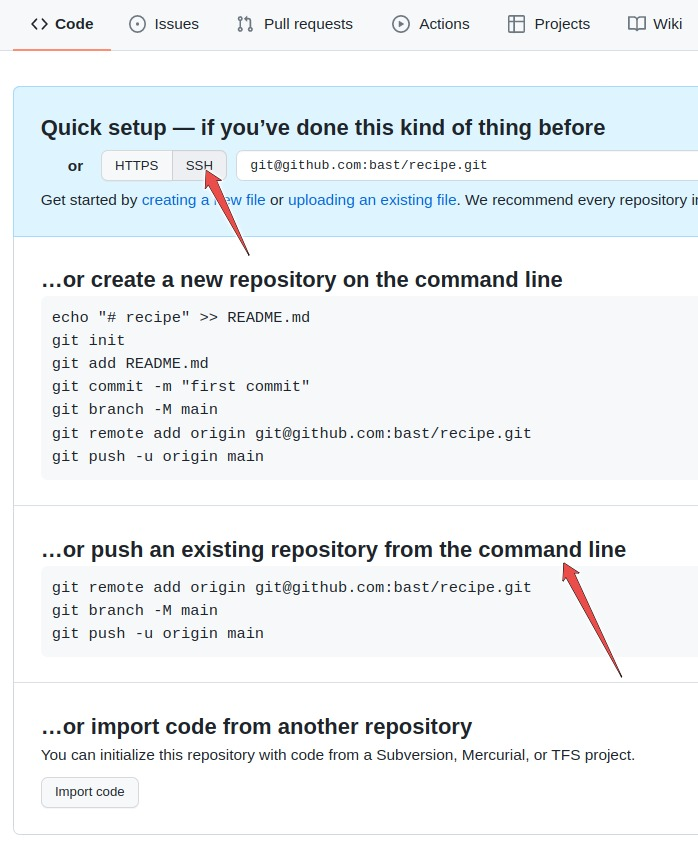
What this means is that we have now an empty project with either an HTTPS or an SSH address: click on the HTTPS and SSH buttons to see what happens.
Pushing our guacamole recipe repository to GitHub#
To push changes to the project please select SSH. For this to work you will need your SSH keys configured.
We now want to try the second option that GitHub suggests:
… or push an existing repository from the command line
Now go to your guacamole repository on your computer.
Check that you are in the right place with
git status.Copy paste the three lines to the terminal and execute those, in my case (you need to replace the “user” part and possibly also the repository name):
$ git remote add origin git@github.com:user/recipe.git
$ git branch -M main
$ git push -u origin main
The meaning of the above lines:
Add a remote reference with the name “origin”
Rename current branch to “main”
Push branch “main” to “origin”
You should now see:
Enumerating objects: 3, done.
Counting objects: 100% (3/3), done.
Writing objects: 100% (3/3), 221 bytes | 221.00 KiB/s, done.
Total 3 (delta 0), reused 0 (delta 0), pack-reused 0
To github.com:user/recipe.git
 * [new branch]      main -> main
Branch 'main' set up to track remote branch 'main' from 'origin'.
Exercise: Push your guacamole recipe to GitHub#
Push-1: Push your guacamole recipe to GitHub
Go to your recipe directory on your computer.
Check that you are in the right place with
git status.Define the remote with
git remote add origin git@github.com:user/recipe.git.Rename the current branch to “main”, if needed:
git branch -M main.Push the local branch “main” to the remote:
git push -u origin main.
Reload your GitHub project website and - taa-daa - your commits should now be online!
What just happened? Think of publishing a repository as uploading the .git part online.
Note
We could have pushed the master branch using $ git push origin master,
without renaming it to main. Here we chose to rename the branch to main to
closely follow the instructions from the GitHub web interface.
Cloning a repository#
Now other people can clone this repository and contribute changes. In the collaborative distributed version control lesson we will learn how this works.
At this point only a brief demo - if you copy the SSH or HTTPS address, you can clone repositories like this (again adapt the “namespace/repository.git” part):
$ git clone git@github.com:user/recipe.git
This creates a directory called “recipe” unless it already exists. You can also specify the target directory on your computer:
$ git clone git@github.com:user/recipe.git myrecipe
What just happened? Think of cloning as downloading the .git part to your
computer. After downloading the .git part the branch pointed to by HEAD is
automatically checked out.
Keypoints
A repository can have one or multiple remotes (we will revisit these later).
Local branches often track remote branches.
A remote serves as a full backup of your work.
We’ll properly learn how to use these in the Collaborative Git lesson.