Overview
Exercises: 25 min
- How can generate outputs in different formats?
- What tools can I use?
- Learn to about nbconvert, jupyter-book
In this episode, we will learn how to generate different support to document/publish our research results.
Discussion (5mn)
This discussion exercise is to be done in small groups (2-3 persons per group):
- How do you document your research (inline with the code, jupyter notebooks, etc.)?
- Where do you store your documents?
- Do you share all your documents?
- What tools/formats do you use (Word, LaTeX, Markdown, etc.)?
JupyterLab can also be used to write and document your research to keep our research work. Let’s have a quick overview of these possibilities.
Start a new project
Let’s imagine we have a new research idea (funded project or not) and have decided to make our research reproducible and share/ collaborate from the start of the project, following Open Science principles.
First step is to start our project and to keep it simple, we start creating a folder called osbd_workshop either from the command line:
# change directory to user HOME area
cd $HOME
# Create folder
mkdir osbd_workshop

# change directory to this newly created folder
cd osbd_workshop
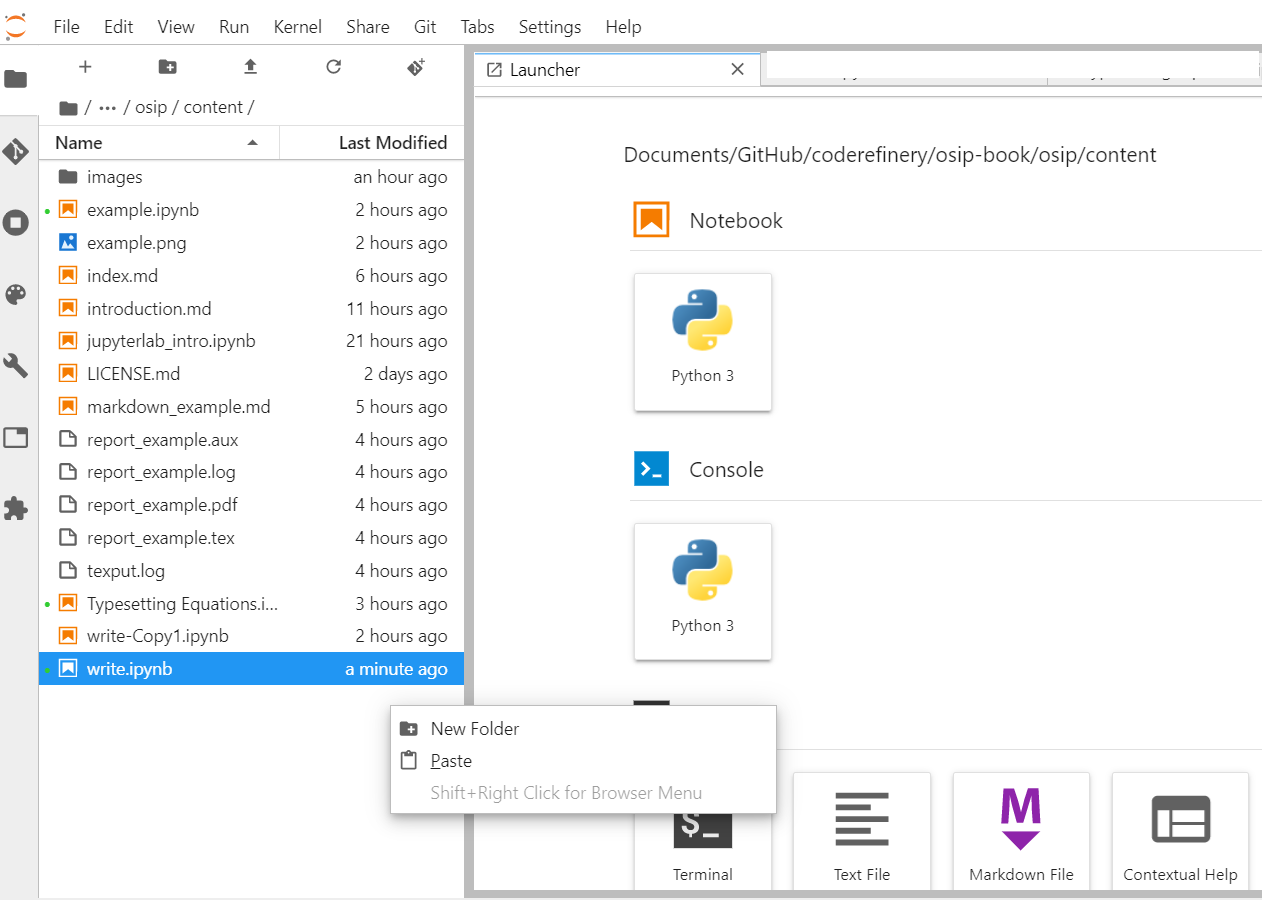
or using JupyterLab File explorer (right click in the JupyterLab file explorer and select New Folder):
Then name it (osbd_workshop) and double click on its name to change directory.
Tips
One of the first thing we should think about when creating a new project is:
- Create a README file to explain wht your project is about.
- Choose a license These need to be done at the very beginning, before you share anything.
Live editing of Markdown documents
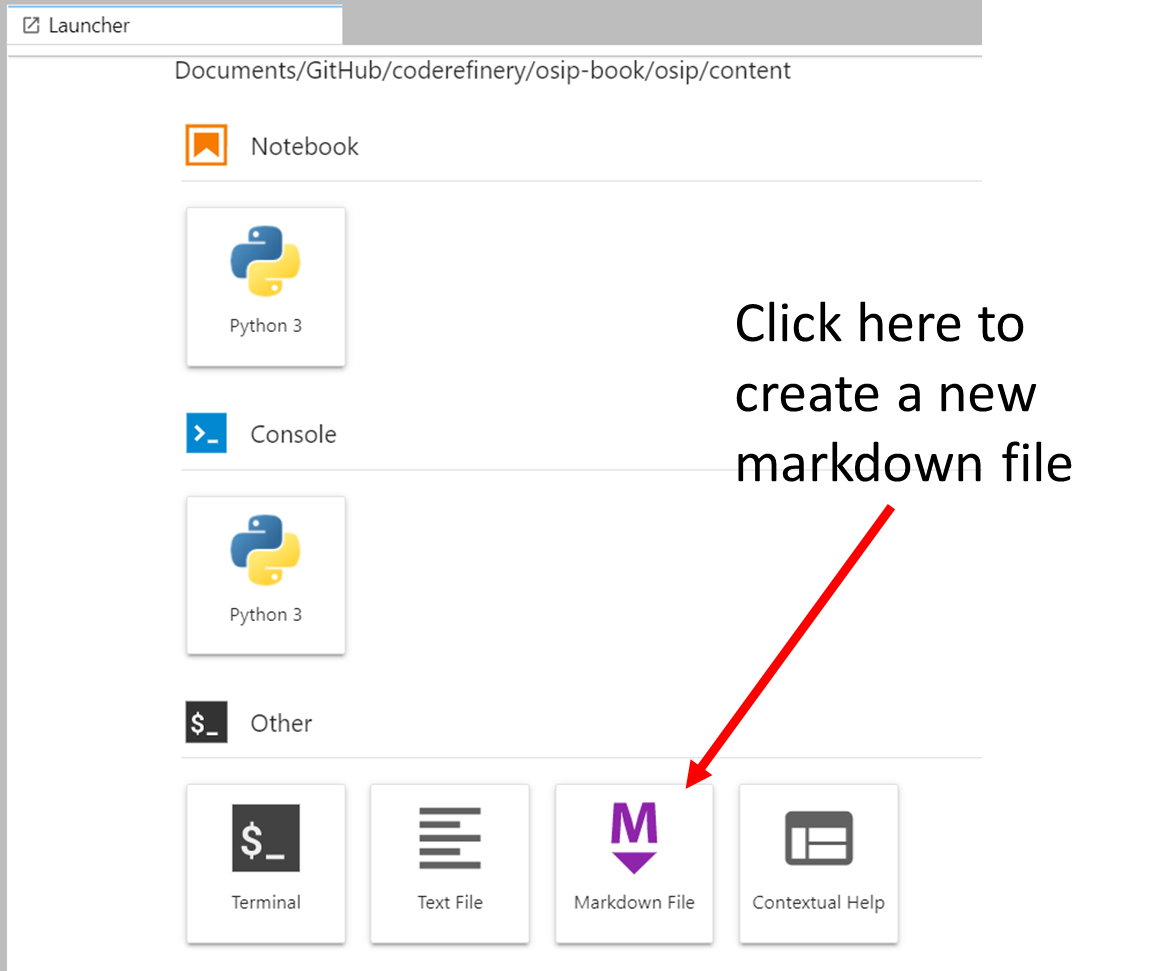
Create a new markdown file (make sure the file is created in osbd_project):
And rename it to index.md.
If you have an old version of JupyterLab, this Markdown icon may not be available; Then use the Text icon instead and rename your file (for instance index.md). Live editing of Mardkown documents is anyway available:
Find short online guide for mastering markdown
Markdown language is often used to format readme files and these files are “nicely” rendered by Github.
Where can I learn Markdown?
You already know a large part of markdown as the key aspect of the markdown language is that you can write plain text.
If you plan to use Markdown for commenting/publishing your research work on github, an online guide for mastering markdonw
Let’s take an example (copy-paste in your newly markdown file):
## Heading

# h1 Heading
## h2 Heading
### h3 Heading
#### h4 Heading
##### h5 Heading
###### h6 Heading

## Emphasis

**This is bold text**

__This is bold text__

*This is italic text*

_This is italic text_

~~Strikethrough~~

## Lists

### Unordered

+ Create a list by starting a line with `+`, `-`, or `*`
+ Sub-lists are made by indenting 2 spaces:
  - sub-list-1
    - sub-list-2
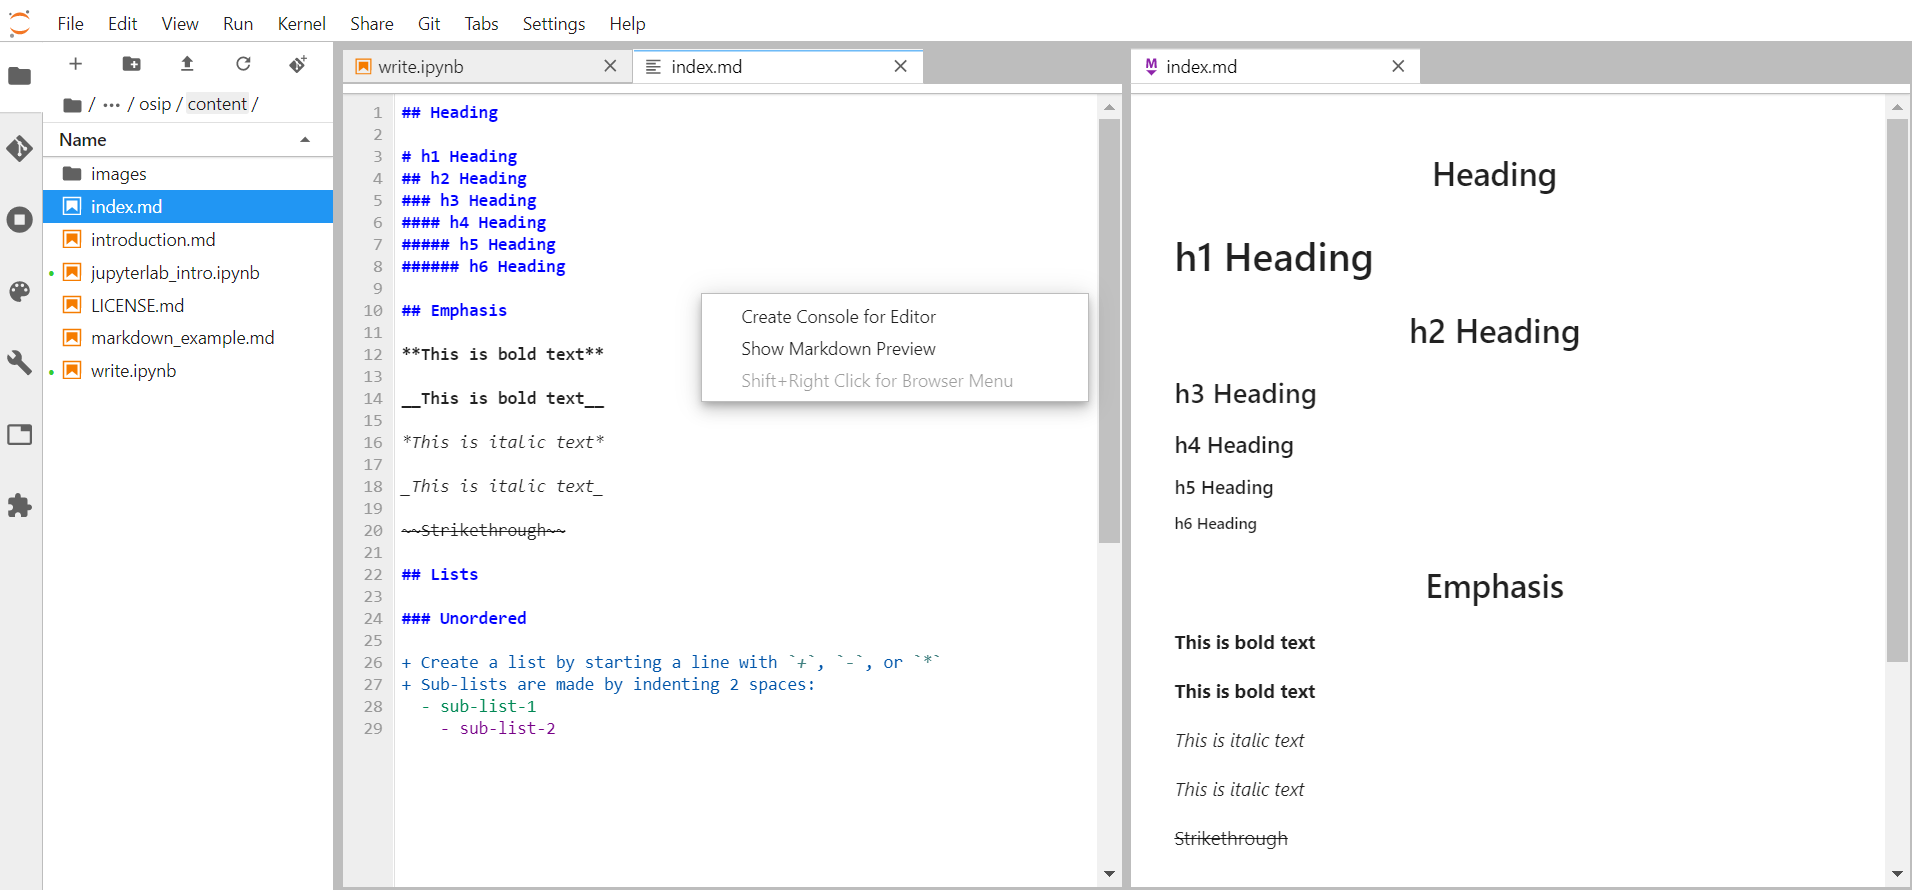
To render it in Jupyterlab, right click and select “Show Markdown Preview”. Then the rendered page should appear as shown on the figure below:
Create website on Github
Github gives you the opportunity to host webpages and for getting this functionality you need:
- Create a new Github repository named
osbd_workshopbut do NOT initialize your repository (no license and no README)- Set up git if you have not done it yet:
git config --global user.name "Vlad Dracula"
git config --global user.email "vlad@tran.sylvan.ia"
git config --global core.autocrlf input
Where you should put your own name and email!
- Follow the instructions given online (after you created your empty repo) and push your markdown files in a Github repository and make sure you name the main file
index.mdgit remote add origin https://github.com/USER/osbd_workshop.git git push -u origin masterAlways change USER by your github username. You will have to authenticate yourself to push your changes.
- Choose and add a licence
- Enable Github pages for your repository:
Your website is now online at
http://USER.github.io/osbd_workshop(Change USER to your github username) More information can be found here
Equations within Markdown documents
If you need to write equations, you can use LaTeX mathematics notations (work both for markdown files and jupyter notebook markdown cells):
$x^2 * x^2$
Would render: $x^2 * x^2$
You can find a few other examples at Notebook motivating examples.
So if you are using LaTeX for the ease of writing equations, markdown language may be a good solution for you! We will learn more about LaTeX but for now we will learn to combine Mardown files and Jupyter Notebooks to create online “books”.
Create online Jupyter book
Convert Jupyter notebooks to Markdown
Any Jupyter notebook can be converted to a simple markdown file.
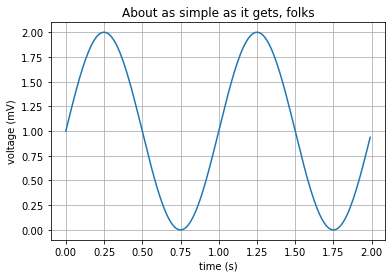
Let’s create a new python jupyter notebook and rename it to example.ipynb (the same example could be done with any other available kernels) and make a plot (see matplotlib gallery for examples):
%matplotlib inline
import matplotlib
import matplotlib.pyplot as plt
import numpy as np

# Data for plotting
t = np.arange(0.0, 2.0, 0.01)
s = 1 + np.sin(2 * np.pi * t)

fig, ax = plt.subplots()
ax.plot(t, s)

ax.set(xlabel='time (s)', ylabel='voltage (mV)',
        title='About as simple as it gets, folks')
ax.grid()

fig.savefig("example.png")
plt.show()
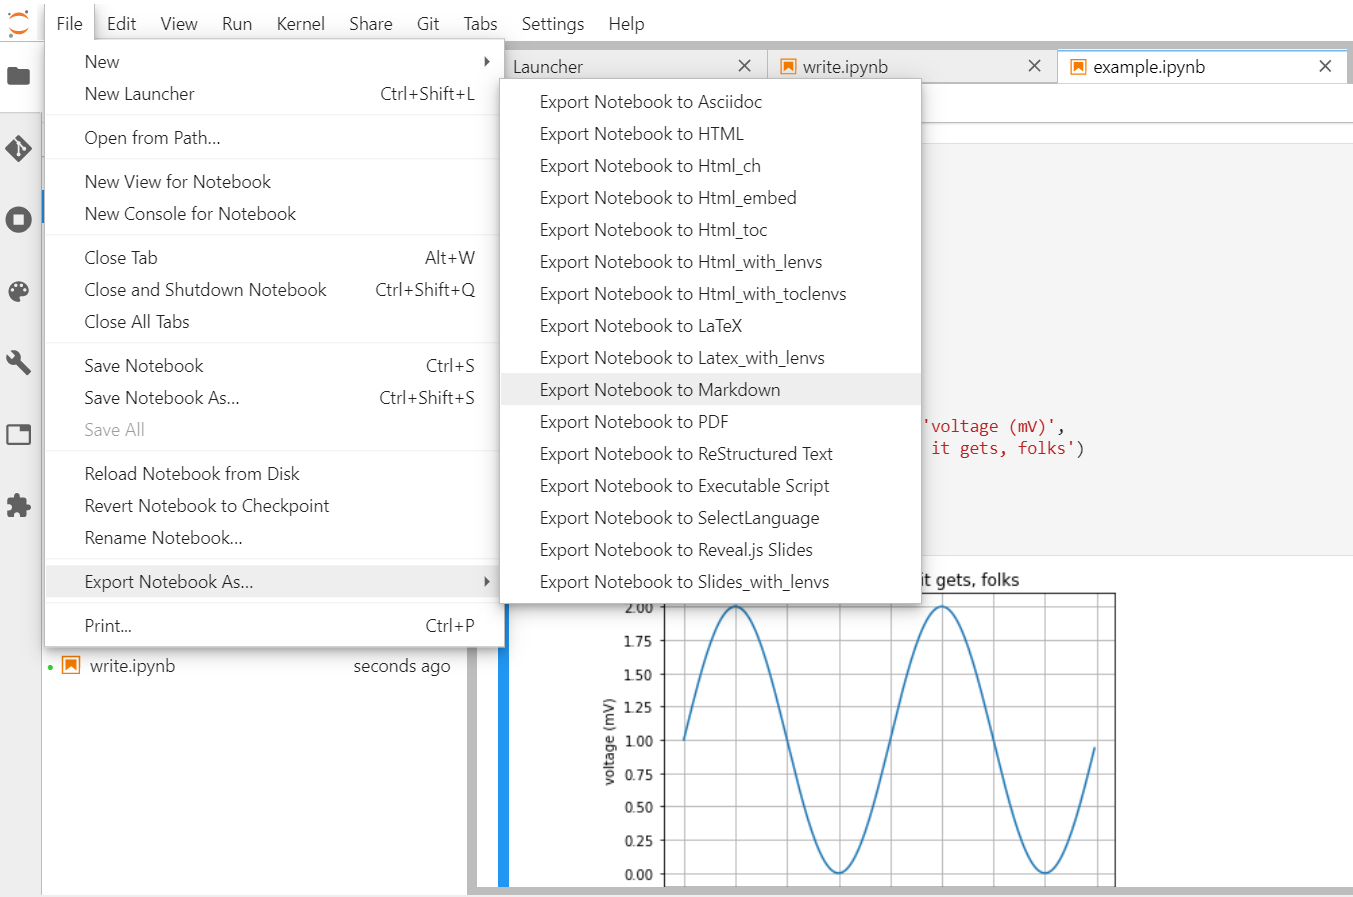
- Then browse the File menu and select Export Notebook As… and Export Notebook to Markdown.
An archive (zip/tarball) is created and contains all the converted files (one for the markdown and one file per image/pictures).
Remarks
- The utility nbconvert is used behind the scene.
- Export Notebook As… allows you to convert your notebook in different formats (HTML, LaTeX, pdf, etc.) but some of these options may need to be configured to work properly.
Converting jupyter notebooks to markdown can be useful to create live documents on the web (for instance by pushing them on Github).
Note
Jupyter notebooks are rendered automatically by Github too without having to convert them to markdown. However, it makes it difficult when using jupyter widgets or any interactive notebooks.
Jupyter book
For a given research project, you could easily have several Jupyter notebooks and markdown files detailing your research workflow. To be usable, it is often necessary to give additional information at least for instance the order in which markdown files and jupyter notebooks need to be read (some kind of table of content / index file). jupyter-book can be used to build an online book using a collection of Jupyter Notebooks and Markdown files.
In this section, we will be using jupyter-book to create an online book served by Github. We will follow the online jupyter-book tutorial.
jupyter-book command line is not available by default and needs to be installed with pip:
Open a Terminal and check the availability of jupyter-book (accessible from the Launcher):
jupyter-book --help
If you get an error message such as:
bash: jupyter-book: command not found
Then you need to install jupyter-book:
pip install jupyter-book
Once installed, we can start creating a new book:
- check the current working directory:
pwd
Move to the parent directory of osbd_workshop e.g. you should see osbd_workshop from the current directory:
ls osbd_workshop
If the command above returns an error, change the current directory; for instance:
cd $HOME
The command above assumes osbd_workshop folder has been created from your HOME folder. Then we create a new jupyter book (osbd_workshop contains all the files we would like to have in our book):
jupyter-book create osip_project --content osbd_workshop
The command above returns:
Copying new book to: ./osip_project
Copying over your content folder...
TOC written to: ./osip_project/_data/toc.yml
Updating template configuration file with the values in /C/users/annefou/appdata/local/continuum/anaconda3/envs/osip2019/lib/site-packages/jupyter_book/minimal/_config.yml

================================================================================

Finished creating a new book at `./osip_project`
- Your content is in `./osip_project/content`

- A Table of Contents file is at `./osip_project/_data/toc.yml`.
  You should check its contents, make sure it references your
  content correctly, and ensure it has the correct order.

- Your configuration file is at `./osip_project/_config.yml`.
  You should check its contents and double-check that the values  are correct for your site.

Notes
=====
- Check your Table of Contents file (`_data/toc.yml`). Because you specified a content foler
  but no Table of Conents (`--toc`), we auto-generated a TOC file file using folder and file
  names. You should check its contents and clean it up so that it has the structure you want!

- We've added a CC-BY-SA license for you in ./osip_project/content/LICENSE.md
  This is a reasonable license for most book content, though feel free
  to change it if you like!

================================================================================
A new folder osip_project is created. It contains many files but we will first check the files listed by jupyter-book command:
osip_project/_data/toc.ymlosip_project/_config.yml
Please note that on Windows, you would see a baskslash character instead of a slash for folder separator.
License
A CC-BY-SA license has been automatically added in osip_project\content\LICENSE.md but feel free to update it.
Now we will be working in our book so we will change directory to osip_project:
cd osip_project
Check the table of content _data/toc.yml:
- Files do not contain any extensions (neither
.ipynbnor.md). - by default files are listed by alphabetical order (feel free to update it).
Customize your book
- Edit _config.yml and update the title, author and description
The content of your book is in the content folder.
If you change any of the files in the content folder, you need to re-generate our new jupyter book:
jupyter-book build .
Your Jupyter Book is in _build/ and we are now ready to publish it on github.
Publish your book online with GitHub Pages
- Create a new git repository (make sure you are in
osip_projectfolder):
git init
git add .
git commit -m "Publish my research project book"
- Create a new empty repository (name it
osip_project) on Github (make sure you do not add any README or license file)-

- Push your local repository to Github
>  git remote add origin https://github.com/USER/osip_project.git
>  git push -u origin master
Warning
Make sure you replace USER by your own github username.
- Enable GitHub site building for your repository
Once enabled, your book is online and available at https://USER.github.io/osip_project.
Warning
- Make sure you replace
USERby your own github username.- It may take a few minutes to get your book online.
Interact link settings (optional)
We have not fully configured our jupyter book yet, in particular to enable code interaction.
Edit _config.yml and update it:
- configure your repository:
baseurl: /osip         # the subpath of your site, e.g. /blog. If there is no subpath for your site, use an empty string ""
url: http://USER.github.io   # the base hostname & protocol for your site, e.g. http://example.com
Make sure you replace USER by your own github username.
- enable jupyterlab:
# General interact settings
use_jupyterlab: true
- Configure binder
# Binder link settings
use_binder_button: true                 # If 'true', add a binder button for interactive links
binderhub_url: https://mybinder.org                        # The URL for your BinderHub. If no URL, use ""
binder_repo_base: https://github.com/                     # The site on which the textbook repository is hosted
binder_repo_org: USER                     # The username or organization that owns this repository
binder_repo_name: osip_project                        # The name of the repository on the web
binder_repo_branch: master                   # The branch on which your textbook is hosted.
binderhub_interact_text: Interact              # The text that interact buttons will contain.
Make sure you replace USER by your own github username.
Update requirements.txt:
numpy
matplotlib
- Enable thebelab:
# Thebelab settings
use_thebelab_button: true                # If 'true', display a button to allow in-page r
Then rebuild your jupyter book:
jupyter-book rebuild .
And push the modified files to github:
git add _config.yml
git commit -m "configure interact settings"
git push origin master
Then check again your jupyter book online and execute code part using either Thebelab or Interact buttons:

Remark
Instead of having a unique
requirements.txtfile for binder, you can create a new folder calledbinder(see binder user documentation for more information).
Live editing of LaTeX documents
LaTeX is very popular in many scientific community for writing publications.
JupyterLab extension for live editing of LaTeX documents
To be able to compile LaTeX files, you would need to install a LaTeX compiler (and have commands such as pdflatex, xelatex)
on your system to generate LaTeX documents.
If you don’t you can still follow this section by clicking at the top on Interact button.
Installation of LaTeX on Windows
On Windows, we recommend the usage of MikTeX; Please note that MikTeX is available as a conda package too. In that case, the setting is much easier because all the LaTeX commands will be available from JupyterLab. It can also be installed on Linux or Mac-OSX system.
The JupyterLab LaTeX extension is not available by default and needs to be installed. In case, you need to set it up on your laptop, follow instructions given here.
Create a new LaTeX document
- Create a new empty file
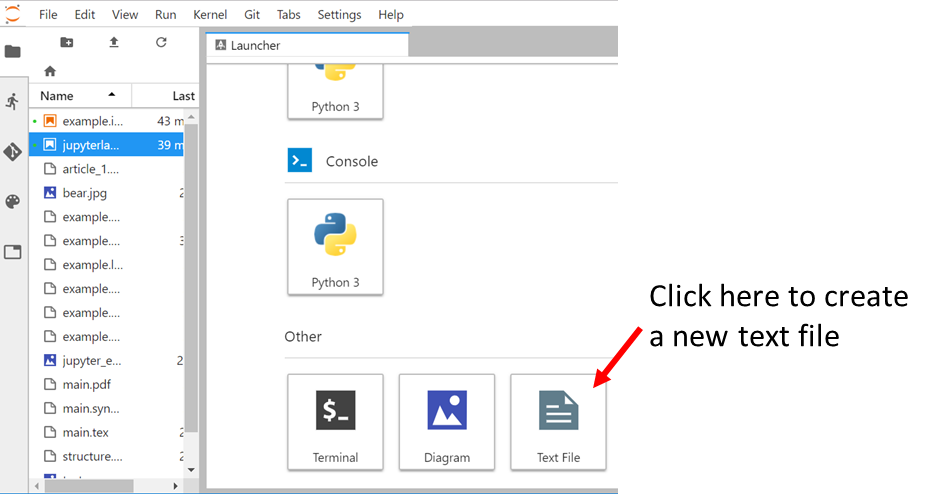
-
Rename it to
report_example.tex(do not forget to change the file extension fromtxttotex -
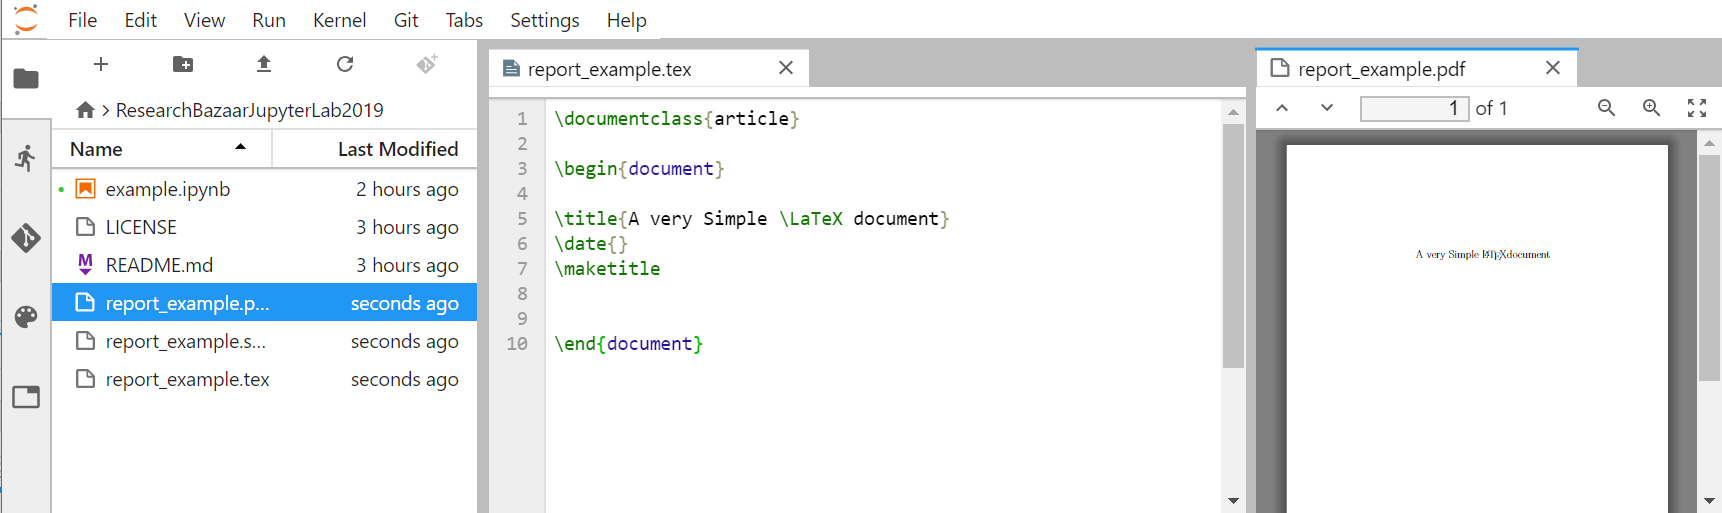
Then we will create a very simple LaTeX document and check it out with the JupyterLab:
\documentclass{article}

\begin{document}

\title{A very Simple \LaTeX document}
\date{}
\maketitle


\end{document}
- Save it and then right click to select “Show LaTeX preview” as shown in the figure below:

The pdf preview of your document will appear on the right hand side of JupyterLab:
Update your LaTeX document
Add new sections in your LaTeX document. What happens?
Solution
The pdf document is automatically updated!
Add a bibliography (BibTeX)
Create a new bibtex file with at least one reference and reference it in
report_example.texSolution
In
report_example.bib:@article{einstein, author = "Albert Einstein", title = "{Zur Elektrodynamik bewegter K{\"o}rper}. ({German}) [{On} the electrodynamics of moving bodies]", journal = "Annalen der Physik", volume = "322", number = "10", pages = "891--921", year = "1905", DOI = "http://dx.doi.org/10.1002/andp.19053221004" }And in
report_example.tex:\documentclass{article} \begin{document} \title{A very Simple \LaTeX document} \date{} \maketitle \section{introduction} This document shows how to use BibTeX references. To cite the Einstein journal paper use \cite{einstein}. \medskip \bibliographystyle{unsrt} \bibliography{report_example} \end{document}See https://fr.overleaf.com/learn/latex/Bibliography_management_with_bibtex to get more examples.
Generate LaTeX from our jupyter notebooks
Being able to create LaTeX live documents with JupyterLab is great but we also need to make use of our jupyter notebooks so we can create a reproducible research work, share it and publish it.
- Close
report_example.texandreport_example.pdfand open a new python 3 jupyter notebook (rename itexample.ipynb).
You can export your notebook into LaTeX:
- Select File –> Export Notebook As… –> Export Notebook to LaTeX.
Information
You can also generate pdf file from your notebook according you have installed LaTeX locally
Key points
Generate different documents from a set of notebooks.