List of exercises
Full list
This is a list of all exercises and solutions in this lesson, mainly as a reference for helpers and instructors. This list is automatically generated from all of the other pages in the lesson. Any single teaching event will probably cover only a subset of these, depending on their interests.
Recording computational steps
Solution
The advantage of this solution compared to processing one by one is more automation: We can generate all. This is not only easier, it is also less error-prone.
Yes, the scripted solution can be reproducible. But could you easily run it, e.g., on a Windows computer?
If we had more steps and once steps start to be time-consuming, a limitation of a scripted solution is that it tries to run all steps always. Rerunning only part of the steps or only part of the input data requires us to outcomment or change lines in our script in between runs which can again become tedious and error-prone.
Workflow-1: Workflow solution using Snakemake
Somebody wrote a Snakemake solution in the Snakefile:
# a list of all the books we are analyzing
DATA = glob_wildcards('data/{book}.txt').book

rule all:
    input:
        expand('statistics/{book}.data', book=DATA),
        expand('plot/{book}.png', book=DATA)

# count words in one of our books
rule count_words:
    input:
        script='code/count.py',
        book='data/{file}.txt'
    output: 'statistics/{file}.data'
    shell: 'python {input.script} {input.book} > {output}'

# create a plot for each book
rule make_plot:
    input:
        script='code/plot.py',
        book='statistics/{file}.data'
    output: 'plot/{file}.png'
    shell: 'python {input.script} --data-file {input.book} --plot-file {output}'
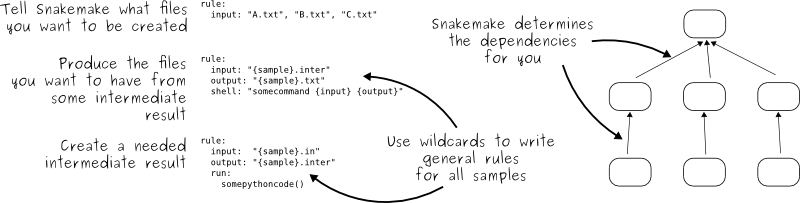
We can see that Snakemake uses declarative style:
Snakefiles contain rules that relate targets (output) to dependencies
(input) and commands (shell).
Steps:
Clone the example to your computer:
$ git clone https://github.com/coderefinery/word-count.gitStudy the Snakefile. How does it know what to do first and what to do then?
Try to run it. Since version 5.11 one needs to specify number of cores (or jobs) using
-j,--jobsor--cores:$ snakemake --delete-all-output -j 1 $ snakemake -j 1
The
--delete-all-outputpart makes sure that we remove all generated files before we start.Try running
snakemakeagain and observe that and discuss why it refused to rerun all steps:$ snakemake -j 1 Building DAG of jobs... Nothing to be done (all requested files are present and up to date).
Make a tiny modification to the plot.py script and run
$ snakemake -j 1again and observe how it will only re-run the plot steps.Make a tiny modification to one of the books and run
$ snakemake -j 1again and observe how it only regenerates files for this book.Discuss possible advantages compared to a scripted solution.
Question for R developers: Imagine you want to rewrite the two Python scripts and use R instead. Which lines in the Snakefile would you have to modify so that it uses your R code?
If you make changes to the Snakefile, validate it using
$ snakemake --lint.
Solution
2: Start with “all” and look what it depends on. Now search for rules that have these as output. Look for their inputs and search where they are produced. In other words, search backwards and build a graph of dependencies. This is what Snakemake does.
4: It can see that outputs are newer than inputs. It will only regenerate outputs if they are not there or if the inputs or scripts have changed.
7: It only generates steps and outputs that are missing or outdated. The workflow does not run everything every time. In other words if you notice a problem or update information “half way” in the analysis, it will only re-run what needs to be re-run. Nothing more, nothing less. Another advantage is that it can distribute tasks to multiple cores, off-load work to supercomputers, offers more fine-grained control over environments, and more.
8: Probably only the two lines containing “shell”.
Recording dependencies
Dependencies-1: Time-capsule of dependencies
Situation: 5 students (A, B, C, D, E) wrote a code that depends on a couple of libraries. They uploaded their projects to GitHub. We now travel 3 years into the future and find their GitHub repositories and try to re-run their code before adapting it.
Answer in the collaborative document:
Which version do you expect to be easiest to re-run? Why?
What problems do you anticipate in each solution?
A: You find a couple of library imports across the code but that’s it.
B: The README file lists which libraries were used but does not mention any versions.
C: You find a
environment.ymlfile with:name: student-project channels: - conda-forge dependencies: - scipy - numpy - sympy - click - python - pip - pip: - git+https://github.com/someuser/someproject.git@master - git+https://github.com/anotheruser/anotherproject.git@master
D: You find a
environment.ymlfile with:name: student-project channels: - conda-forge dependencies: - scipy=1.3.1 - numpy=1.16.4 - sympy=1.4 - click=7.0 - python=3.8 - pip - pip: - git+https://github.com/someuser/someproject.git@d7b2c7e - git+https://github.com/anotheruser/anotherproject.git@sometag
E: You find a
environment.ymlfile with:name: student-project channels: - conda-forge dependencies: - scipy=1.3.1 - numpy=1.16.4 - sympy=1.4 - click=7.0 - python=3.8 - someproject=1.2.3 - anotherproject=2.3.4
A: You find a couple of library imports across the code but that’s it.
B: The README file lists which libraries were used but does not mention any versions.
C: You find a
requirements.txtfile with:scipy numpy sympy click python git+https://github.com/someuser/someproject.git@master git+https://github.com/anotheruser/anotherproject.git@master
D: You find a
requirements.txtfile with:scipy==1.3.1 numpy==1.16.4 sympy==1.4 click==7.0 python==3.8 git+https://github.com/someuser/someproject.git@d7b2c7e git+https://github.com/anotheruser/anotherproject.git@sometag
E: You find a
requirements.txtfile with:scipy==1.3.1 numpy==1.16.4 sympy==1.4 click==7.0 python==3.8 someproject==1.2.3 anotherproject==2.3.4
A: You find a couple of
library()orrequire()calls across the code but that’s it.B: The README file lists which libraries were used but does not mention any versions.
C: You find a DESCRIPTION file which contains:
Imports:
    dplyr,
    tidyr
In addition you find these:
remotes::install_github("someuser/someproject@master")
remotes::install_github("anotheruser/anotherproject@master")
D: You find a DESCRIPTION file which contains:
Imports:
    dplyr (== 1.0.0),
    tidyr (== 1.1.0)
In addition you find these:
remotes::install_github("someuser/someproject@d7b2c7e")
remotes::install_github("anotheruser/anotherproject@sometag")
E: You find a DESCRIPTION file which contains:
Imports:
    dplyr (== 1.0.0),
    tidyr (== 1.1.0),
    someproject (== 1.2.3),
    anotherproject (== 2.3.4)
Can you please contribute an example?
Solution
A: It will be tedious to collect the dependencies one by one. And after the tedious process you will still not know which versions they have used.
B: If there is no standard file to look for and look at, it might become very difficult to create the software environment required to run the software. At least we know the list of libraries, but we don’t know the versions.
C: Having a standard file listing dependencies is definitely better than nothing. However, if the versions are not specified, you or someone else might run into problems with dependencies, deprecated features, changes in package APIs, etc.
D and E: In both of these cases exact versions of all dependencies are specified and one can recreate the software environment required for the project. One problem with the dependencies that come from GitHub is that they might have disappeared (what if their authors deleted these repositories?).
E is slightly preferable because version numbers are easier to understand than Git commit hashes or Git tags.
Dependencies-2: Create a time-capsule for the future
Now we will demo creating our own time-capsule and share it with the future world. If we asked you now which dependencies your project is using, what would you answer? How would you find out? And how would you communicate this information?
We start from an existing conda environment. Try this either with your own project or inside the “coderefinery” conda environment. For demonstration purposes, you can also create an environment with:
$ conda env create -f myenv.yml
Where the file myenv.yml could have some python libraries with unspecified versions:
name: myenv
channels:
  - conda-forge
  - defaults
dependencies:
  - python=3.10
  - numpy
  - pandas
  - seaborn
After creating the environment we can activate it with
conda activate myenv
Now we can freeze the environment into a new YAML file with:
$ conda env export > environment.yml
Have a look at the generated file and discuss what you see.
Some things to note
Can you find all packages you installed directly? Which versions were installed?
What other packages were installed? -> Dependencies of dependencies
Besides the version you can also see the build channel
Sometimes the build includes an operating system or an architecture
Using this environment file might therefore not work/ not result in an identical setup on other computers
In the future — or on a different computer — we can re-create this environment with:
$ conda env create -f environment.yml
You may use conda or mamba interchangeably for this step; mamba may solve the dependencies a bit faster.
What happens instead when you run the following command?
$ conda env export --from-history > environment_fromhistory.yml
Some things to note
Everything is listed as you installed it; with or without specified versions
Using this environment file a few days/weeks later will likely not result in the same environment
This can be a good starting point for a reproducible environment as you may add your current version numbers to it (check for example with
conda list | grep "packagename")
In daily use you may not always use an environment.yml file to create the full environment, but create a base environment and then add new packages with conda install packagename as you go. Also those packages will be listed in the environment files created with either of the approaches above.
More information: https://docs.conda.io/en/latest/ and https://github.com/mamba-org/mamba
Try this in your own project:
$ pip freeze > requirements.txt
Have a look at the generated file and discuss what you see.
In future you can re-create this environment with:
$ pip install -r requirements.txt
More information: https://docs.python.org/3/tutorial/venv.html
This example uses renv.
Try to “save” and “load” the state of your project library using
renv::snapshot() and renv::restore().
See also: https://rstudio.github.io/renv/articles/renv.html#reproducibility
More information: https://rstudio.github.io/renv/articles/renv.html
Can you please contribute an example?
Some things to note
Can you find all packages you installed directly? Which versions were installed?
What other packages were installed? -> Dependencies of dependencies
Besides the version you can also see the build channel
Sometimes the build includes an operating system or an architecture
Using this environment file might therefore not work/ not result in an identical setup on other computers
Some things to note
Everything is listed as you installed it; with or without specified versions
Using this environment file a few days/weeks later will likely not result in the same environment
This can be a good starting point for a reproducible environment as you may add your current version numbers to it (check for example with
conda list | grep "packagename")
Recording environments
Containers-1: Time travel
Scenario: A researcher has written and published their research code which requires a number of libraries and system dependencies. They ran their code on a Linux computer (Ubuntu). One very nice thing they did was to publish also a container image with all dependencies included, as well as the definition file (below) to create the container image.
Now we travel 3 years into the future and want to reuse their work and adapt it for our data. The container registry where they uploaded the container image however no longer exists. But luckily we still have the definition file (below)! From this we should be able to create a new container image.
Can you anticipate problems using the definitions file 3 years after its creation? Which possible problems can you point out?
Discuss possible take-aways for creating more reusable containers.
 1Bootstrap: docker
 2From: ubuntu:latest
 3
 4%post
 5    # Set environment variables
 6    export VIRTUAL_ENV=/app/venv
 7
 8    # Install system dependencies and Python 3
 9    apt-get update && \
10    apt-get install -y --no-install-recommends \
11        gcc \
12        libgomp1 \
13        python3 \
14        python3-venv \
15        python3-distutils \
16        python3-pip && \
17    apt-get clean && \
18    rm -rf /var/lib/apt/lists/*
19
20    # Set up the virtual environment
21    python3 -m venv $VIRTUAL_ENV
22    . $VIRTUAL_ENV/bin/activate
23
24    # Install Python libraries
25    pip install --no-cache-dir --upgrade pip && \
26    pip install --no-cache-dir -r /app/requirements.txt
27
28%files
29    # Copy project files
30    ./requirements.txt /app/requirements.txt
31    ./app.py /app/app.py
32    # Copy data
33    /home/myself/data /app/data
34    # Workaround to fix dependency on fancylib
35    /home/myself/fancylib /usr/lib/fancylib
36
37%environment
38    # Set the environment variables
39    export LANG=C.UTF-8 LC_ALL=C.UTF-8
40    export VIRTUAL_ENV=/app/venv
41
42%runscript
43    # Activate the virtual environment
44    . $VIRTUAL_ENV/bin/activate
45    # Run the application
46    python /app/app.py
Solution
Line 2: “ubuntu:latest” will mean something different 3 years into the future.
Lines 11-12: The compiler gcc and the library libgomp1 will have evolved.
Line 30: The container uses requirements.txt to build the virtual environment but we don’t see here what libraries the code depends on.
Line 33: Data is copied in from the hard disk of the person who created it. Hopefully we can find the data somewhere.
Line 35: The library fancylib has been built outside the container and copied in but we don’t see here how it was done.
The Python version will be different and hopefully the code still runs.
Singularity/Apptainer will have also evolved by then. Hopefully this definition file still works.
No contact address to ask more questions about this file.
(Can you find more? Please contribute more points.)
Work in progress: Please contribute a corresponding example which demonstrates this in the context of R and renv.
Solution
Line 2: “ubuntu:latest” will mean something different 3 years into the future.
Lines 11-12: The compiler gcc and the library libgomp1 will have evolved.
Line 30: The container uses requirements.txt to build the virtual environment but we don’t see here what libraries the code depends on.
Line 33: Data is copied in from the hard disk of the person who created it. Hopefully we can find the data somewhere.
Line 35: The library fancylib has been built outside the container and copied in but we don’t see here how it was done.
The Python version will be different and hopefully the code still runs.
Singularity/Apptainer will have also evolved by then. Hopefully this definition file still works.
No contact address to ask more questions about this file.
(Can you find more? Please contribute more points.)
(optional) Containers-2: Installing the impossible.
When you are missing privileges for installing certain software tools, containers can come handy.
Here we build a Singularity/Apptainer container for installing the cowsay and lolcat Linux programs.
Make sure you have apptainer installed:
$ apptainer --version
Make sure you set the apptainer cache and temporary folders.
$ mkdir ./cache/
$ mkdir ./temp/
$ export APPTAINER_CACHEDIR="./cache/"
$ export APPTAINER_TMPDIR="./temp/"
Build the container from the container recipe file introduced above.
apptainer build cowsay.sif cowsay.defLet’s test the container by entering into it with a shell terminal:
$ apptainer shell cowsay.sif
We can verify the installation.
$ cowsay "Hello world!"|lolcat
(optional) Containers-3: Explore two really useful Docker images
You can try the below if you have Docker installed. If you have Singularity/Apptainer and not Docker, the goal of the exercise can be to run the Docker containers through Singularity/Apptainer.
Run a specific version of Rstudio:
$ docker run --rm -p 8787:8787 -e PASSWORD=yourpasswordhere rocker/rstudio
Then open your browser to http://localhost:8787 with login rstudio and password “yourpasswordhere” used in the previous command.
If you want to try an older version you can check the tags at https://hub.docker.com/r/rocker/rstudio/tags and run for example:
$ docker run --rm -p 8787:8787 -e PASSWORD=yourpasswordhere rocker/rstudio:3.3
Run a specific version of Anaconda3 from https://hub.docker.com/r/continuumio/anaconda3:
$ docker run -i -t continuumio/anaconda3 /bin/bash