Collaborating within the same repository
Objectives
Understand how to collaborate using a centralized workflow.
Understand the difference between local branch, origin/branch, and remote branch.
Instructor note
30 min teaching
30 min exercises
Meaning of “central” in a distributed version control
In this episode, we will explore the usage of a centralized workflow for collaborating online on a project within one repository on GitHub. This means that everyone has access to that central repository - convenient (but doesn’t scale to a huge project).
In the next section, we will see that Git is distributed version control. This means that any type of repository links that you can think of can be implemented - not just “everything connects to one central server”.
Centralized layout

Centralized layout. Red is the repository on GitHub. Blue is where all contributors work on their own computers.
Features:
Typically all developers have both read and write permissions (double-headed arrows).
Suited for cases where all developers are in the same group or organization or project.
Everybody who wants to contribute needs write access.
Good idea to write-protect the main branch (typically
mainormaster).
Real life examples:
Within the CodeRefinery team we mostly use this approach: https://github.com/coderefinery
Exercise
We are working on combining the steps into one exercise.
Exercise preparation
In this exercise we will practice collaborative centralized workflow in groups (but you can also collaborate with us as individual). One person (maintainer) will create the exercise repository, and collaborators will contribute to it. We’ll discuss how this leads to code review and discuss a number of typical pitfalls.
Exercise preparation
Form not too large groups (4-5 persons).
Each group needs to appoint someone who will host the shared GitHub repository: the maintainer. This is typically the exercise lead (if available). Everyone else is a collaborator.
The maintainer (one person per group) generates a new repository from the template https://github.com/coderefinery/template-centralized-workflow-exercise called
centralized-workflow-exercise(There is no need to tick “Include all branches” for this exercise):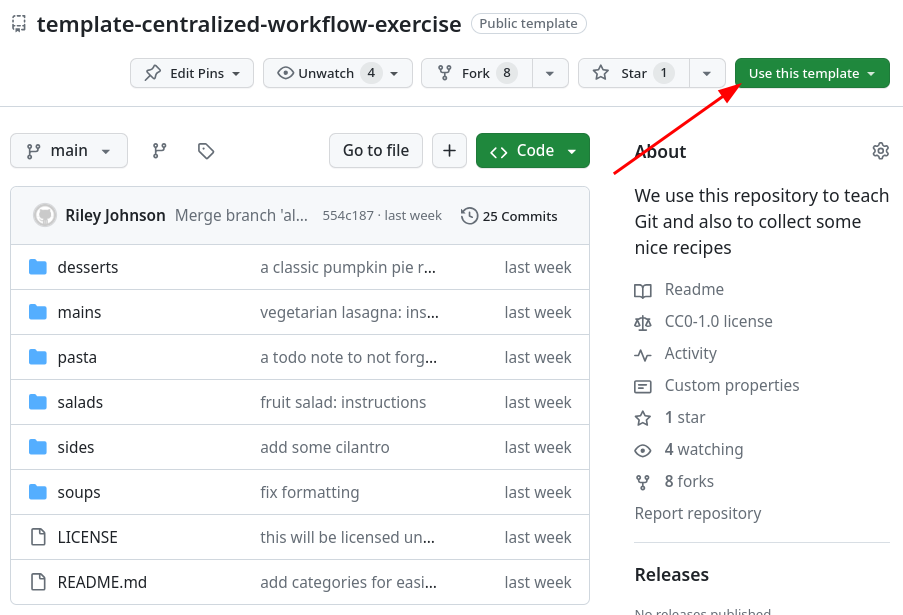
Then everyone in your group needs their GitHub account to be added as collaborator to the exercise repository:
Collaborators give their GitHub usernames to their chosen maintainer.
Maintainer gives the other group members the newly created GitHub repository URL.
Maintainer adds participants as collaborators to their project (Settings → Manage Access → Invite a collaborator).
The instructors are the maintainers. All watchers are collaborators. This exercise is only possible during our livestream courses. The preparation typically happens already the day before.
If you have not requested access (we email about it typically the day before this lesson)
If you have not yet requested access, could you please open an issue in this repository. Wait a minute for staff to add you, then wait for the invite email to arrive and accept the invitation from the email and “unwatch” repositories (below).
Choose only one to work with (you must have requested access already, see above)
Not recorded: https://github.com/cr-workshop-exercises/centralized-workflow-exercise (this will not be shown on stream or recorded in our videos, but is public on the internet until it is deleted)
Recorded: https://github.com/cr-workshop-exercises/centralized-workflow-exercise-recorded (this will be shown on stream and recorded, your username and comments may appear in the recorded video on YouTube)
Don’t forget to accept the invitation
Alternatively check the inbox for the email account you registered with GitHub. GitHub emails you an invitation link, but if you don’t receive it you can go to your GitHub notifications in the top right corner. The maintainer can also “copy invite link” and share it within the group.
Watching and unwatching repositories
Now that you are a collaborator, you get notified about new issues and pull requests via email.
If you do not wish this, you can “unwatch” a repository (top of the project page).
However, we recommend watching repositories you are interested in. You can learn things from experts just by watching the activity that come through a popular project.
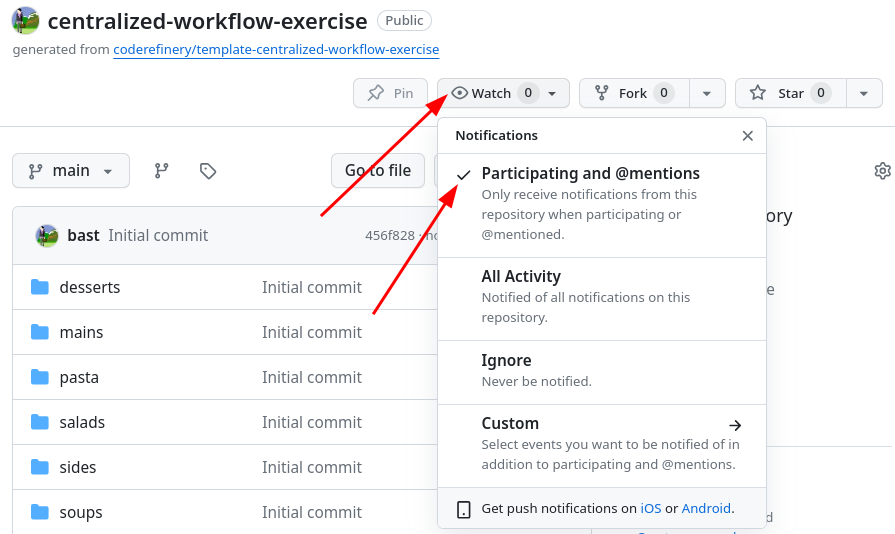
Unwatch a repository by clicking “Unwatch” in the repository view, then “Participating and @mentions” - this way, you will get notifications about your own interactions.
Exercise: Part 1 - creating a pull request
Centralized-1: Clone a repository, add a file, push changes as a branch, and create a pull request
Before we start with the exercise, instructor points to the preparation (above).
Then work on steps A-H.
There are also optional exercises.
Before and after each action you take, run the following informational commands:
git graph- almost every timegit status- when you modify files
Hint for breakout rooms
If the helper in the room is the one who sets up the central repository, they cannot easily demostrate the steps via screen-sharing as the repository’s maintainer. A good alternative is to have one of the learners screen-share and get advice on the steps from other learners and helpers!
Step A. Clone your maintainer’s group repository
$ git clone REPOSITORY-URL centralized-workflow-exercise
Where REPOSITORY-URL is the repository created by the exercise
maintainer.
Clone using the SSH path you get from the webpage (the one that starts with
git@github.com:), not the one that starts with https://github.com.
Otherwise, you won’t be able to push later.
Representation of what happens when you clone

remote or central

local
Here and in what follows, “c1” is a commit, “b1” etc. are commits on side branches and “m1” is a merge commit.
We clone the entire history, all branches, all commits. In our case, we have one branch (we did not include all branches when creating our repository from template) and we have only one commit (initial commit).
git clonecreates pointersorigin/mainso you can see the branches of the origin.originrefers to where we cloned from.originis a shortcut for the full URL.origin/mainis a read-only pointer.The branches starting with
origin/only move duringgit pullorgit fetchorgit push.Only
git pullorgit fetchorgit pushrequire network.All other operations are local operations.
Step B. Change directory into the newly created directory
$ cd centralized-workflow-exercise
Try to find out where this repository was cloned from using git remote -v.
Step C. Create a branch yourname-somefeature pointing at your commit
Create a branch from the current main. Also adapt “yourname-somefeature” to a better name:
$ git branch yourname-somefeature main
$ git switch yourname-somefeature
The yourname- prefix has no special meaning here (not like origin/): it is just part of a
branch name to indicate who made it.
Step D. Create a file with a unique name, e.g.: yourusername.txt
In this file share your favourite cooking recipe or haiku or Git trick or whatever (we will push soon to a public repository so don’t share something you don’t want to become public for the duration of the exercise).
Step E. Stage and commit the change
$ git add yourusername.txt
$ git commit
Step F. Push your change as a new branch
$ git push origin -u yourname-somefeature
If you get a password request for https://github.com when you try to push
Probably you cloned with the HTTPS URL (see git remote -v to
confirm). You can change this to SSH by going to the repository page,
clicking “Code”, copying the SSH URL (starts with git@github.com:),
and then updating the URL with:
$ git remote set-url origin SSH-REPOSITORY-URL
Now the commit also exists on the remote repository

remote or central (read figure left to right)

local (read figure left to right)
Meaning of -u
The -u or --set-upstream will connect the local branch with the newly created upstream/remote branch
and track it. This has the following advantages:
If you from here on only type
git pushorgit pullwithout branchname, Git will know what branch you refer to (depending also on your Git configuration). However, we still recommend to explicitly type where you want to push/pull to/from and which branch explicitly.When you type
git status, Git will inform you whether your local branch is ahead or behind the upstream branch that it tracks.
However, also without the -u this step and the rest of the exercise will
work. The fact that the local and remote branch are not connected is not a
problem if you explicitly type out the remote and branch name every time.
Step G. Browse the network of branches and commits
After you have pushed your branch and other participants have too, browse the network of branches and commits (on GitHub click on Insights -> Network) and discuss what you see.
Step H. Submit a pull request
Submit a pull request from your branch towards the main branch.
Do this through the web interface.
Meaning of a pull request: think of it as change proposal. In a popular project, it means that anyone can contribute with almost no work on the maintainer’s side - a big win.
There are several options to open a pull request:
Follow the link printed to terminal output when git-pushing a branch to GitHub/GitLab
Visit the GitHub repository in the browser after pushing the branch and click on the green button “Compare & pull request”
Click on “Pull requests” on top of the GitHub repository and either “Compare & pull request” or “New pull request”
Click on “Branches” and then “New pull request” from the respective branch
Exercise: Part 2 - code review and merging changes
Centralized-2: Merge the pull requests (together)
We do step 2A and 2B together (instructor demonstrates, and everybody follows along in their repositories).
Instructor note
At this stage it might be good to show how to submit and how to review a pull request.
When co-teaching change roles and switch screenshares also.
Discuss what you look at when submitting.
Discuss what you look at when reviewing.
Step 2A. Discuss and accept pull requests
We do this step together on the main screen (in the main room) or on stream. The instructor shows a submitted pull request, discusses what features to look at, and how to discuss and review.
At the same time, helpers can review open pull requests from their exercises groups.
Finally also discuss the “network” on GitHub.
Instructor note
At this stage demonstrate how to suggest small changes to pull/merge requests:
Discussion
Naming
In GitLab or BitBucket these are named merge requests, not pull requests.
Which one do you feel is more appropriate and in which context? (The name pull request may make more sense in the forking workflow: next episode).
It can be useful to think of them as change proposals.
Pull requests can be used for code review
We recommend that pull requests are reviewed by someone else in your group.
Collaborative learning
OK if students and junior researchers review senior researchers
In our example everyone has write access to the “central” repository.
Pull requests are from branch to branch
They originate from a source branch and are directed towards a branch.
Not from commit to branch.
Pull requests create new commits on the target branch.
They do not create new branches.
Protected branches
A good setting for large projects is to make the
mainbranch protected and all changes to it have to go through code review.Centralized workflow with protected branches is a good setup for many projects.
Read more
This is a great resource: Practical git PRs for small teams
Step 2B. Update your local copy
Your branch yourname-somefeature is not needed anymore but more importantly,
you need to sync your local copy: Everybody needs to do this step in their
exercise repository but we do this together in the main room so that we can
discuss this step and ask questions.
$ git switch main
$ git pull origin main

remote or central

local
Optional exercises
(optional) Centralized-3: Cross-referencing issues using “#N”
We will submit another change by a pull request but this time we will first create an issue.
Open an issue on GitHub and describe your idea for a change. This gives others the chance to give feedback/suggestions. Note the issue number, you will need it in step 3.
Create a new branch and switch to it.
On the new branch create a commit and in the commit message write what you did, but also add that this “closes #N” (replace N by the actual issue number from step 1).
Push the branch and open a new pull request. If you forgot to refer to the issue number in step 3, you can still refer to it in the pull request form (add a “closes #N” to the title or description).
Note how now commits, pull requests, and issues can be cross-referenced by including
#N.Notice how after the pull request is merged, the issue gets automatically closed. This only happens for certain keywords like
closesorfix.Discuss the value of cross-referencing them and of auto-closing issues with commits or pull requests.
See also the GitHub documentation for more examples.
(optional) Centralized-4: Why did we create a feature branch “yourname-somefeature”? (exercise/discussion)
Pushing directly to the main branch is perfectly fine for simple personal projects - the pull-request workflows covered here are for larger projects or for collaborative development. Guidelines for simpler workflows are given in the how much Git is necessary? episode of the git-intro lesson.
In collaborative development, whenever we update our repository we create a new branch and create a pull-request. Let’s now imagine that everyone in your group (or one person on two different clones) makes a new change (create a new file) but without creating a new branch.
You all create a new file in the main branch, stage and commit your change locally.
Try to push the change to the upstream repository:
$ git push origin main
You probably see something like this:
$ git push

To https://github.com/user/repo.git
 ! [rejected]        main -> main (non-fast-forward)
error: failed to push some refs to 'https://github.com/user/repo.git'
To prevent you from losing history, non-fast-forward updates were rejected
Merge the remote changes (e.g. 'git pull') before pushing again.  See the
'Note about fast-forwards' section of 'git push --help' for details.
The push only worked for one participant (one clone).
Discuss why push for everybody else in this group was rejected?
Solution
The push for everyone except one person fails because they are missing one commit in their local repository that exists on the remote. They will first need to pull the remote changes before pushing their own, which will usually result in a merge commit.
Discussion: How to make changes to remote branches
If there is a remote branch somefeature, we can create a local branch and start tracking origin/somefeature like this:
$ git switch somefeature
Once we track a remote branch, we can pull from it and push to it:
$ git pull origin somefeature
$ git push origin somefeature
We can also delete remote branches:
$ git push origin --delete somefeature
Creating pull requests from the command line
There are several possibilties:
How you can find out in which repositories you are a collaborator
Visit https://github.com/settings/repositories where you will see an overview of all repositories you have write access to.
GitHub/GitLab organizations
Projects often start under a personal namespace.
If you want the project to live beyond the interest or work time of one person, one can share projects under an “organization”.
You can then invite collaborators to an organization.
This is what we do in the CodeRefinery project: https://github.com/coderefinery
Keypoints
Centralized workflow is often used for remote collaborative work.
originrefers to where you cloned from (but you can relocate it).origin/mybranchis a read-only pointer to branchmybranchonorigin.These read-only pointers only move when you
git fetch/git pullorgit push.