CodeRefinery operation manuals
This site contains various manuals about CodeRefinery workshops and teaching/lesson development in general.
These pages document past history, but they don’t dictate future. They are a starting point: feel free to be adventurous.
Attending an livestream workshop
We are glad you would like to attend an livestream workshop. This page will help you prepare and get the most out of the workshop and take advantage of the diverse ways to attend.
Even though it’s a one-to-many livestream, the course is still interactive. In fact, it’s more interactive, since everyone can Q&A at the same time via Notes Doc. Since we can record without privacy risk, you are better able to catch up and review. Read on to learn more.
You might register to Zoom breakout rooms, which are interactive.
Notes allows you to ask questions anonymously - even better than a normal workshop! Once we have a few tens of people in any workshop, people don’t ask voice questions anyway.
In some workshops, you can register for breakout rooms to get interactive assistance during the exercise/breakout sessions.
How it works
You open the livestream in a web browser. This is the “TV”, it is always on (but sometimes silent).
If you are part of an exercise/breakout group, be with them. The stream will tell you when the exercise/collaboration times are, and you go to there.
If you are attending Zoom exercise session, open this at the beginning. Leave it minimized when it’s not active.
If you are with an in-person group, be together. When the stream is quiet, you can interact freely.
The livestream is a portrait screenshare, so that it will only take up half of your screen (and the other half is for you to work). (If you are in a physical meeting room with a projector or second monitor, it can be half the livestream and half the Notes - this will make sense when you see it).
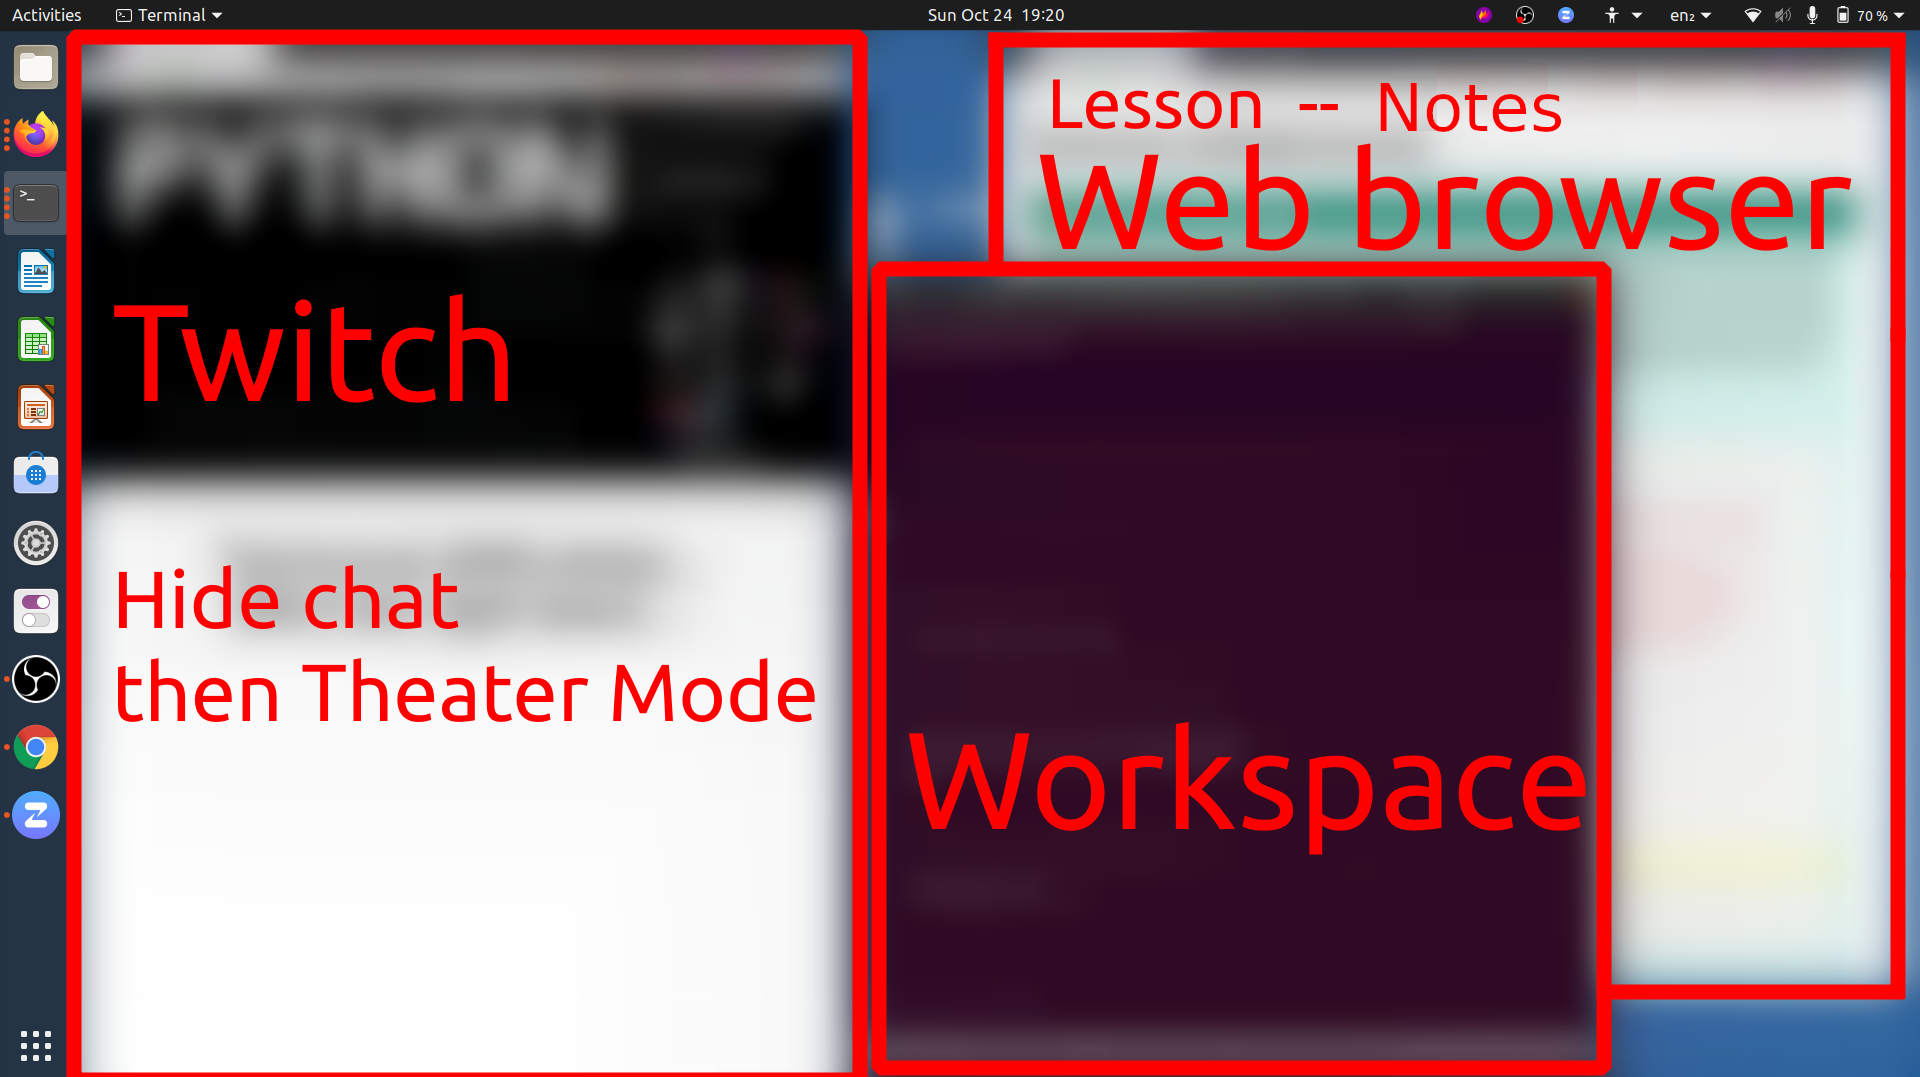
Screen layout with livestream on one side and workshop on the other.
General prerequisites, software installation, etc.
Check your workshop page for the general setup specific to that workshop.
Often, there is something to install on your own computer. (We usually ask you to set up your own computer, so you can continue working independently later.)
There may be some basic skills, such as the command line shell, to review in advance.
Do the installation and configuration in advance, and double check it. Our instructions are standard enough that someone local should be able to help you, if some central install help isn’t provided. The livestream can’t wait for individual people (but a local group can provide live support).
Take the workshop seriously
It’s easy to think “it’s just online, it’s easy to passively watch”. And that is OK! We’d rather have someone watch in case it might be useful, than exclude people who don’t have time. Our material is available for later. In this case, please don’t register for our Zoom/in-person sessions, since that can take a spot from others.
However, we design the workshops to be interactive, and there is a lot of time scheduled for hands-on work and Q&A. Reading this page and preparing will help you to make the most of it: don’t do multiple meetings, reserve the entire timeslots on your calendar, attend every session, do the preparation.
Workspace
Get a good, quiet workspace. Make sure it is comfortable enough to stay at for a while.
An extra monitor is useful but not required, since there is a lot of stuff to follow: the stream itself, the lesson webpage, and the window where you are doing the assignment. You could also use a second device to watch the stream. However, we do design things to fit on one computer.
If you have registered to attend breakout rooms, you’ll be expected to talk at some times and take part, not simply be quiet and listen all the time. Try to be in a place where you can speak without disturbing others. By the same token, you’ll be listening for a long time, and your ears may get tired of headphones. If you have good enough external speakers, be somewhere that you can use them (perhaps only sometimes - when it doesn’t interfere with your microphone.)
If you work in a large office, consider attending from home or in a meeting room so that you can speak and listen more freely. If you need and extra monitor or more comfortable seating space and don’t have that at home, consider working at your office. Yes, these are conflicting ideas, you need to find what works best for you.
Time management
Paying attention to something requires time, whether it is online or in-person.
Don’t schedule overlapping meetings, reserve the entire timeslots, minimize distractions. It’s easy to think you can do multiple things at once when doing it online, but really it’s a trap.
Plan to join the stream 10 minutes early to get ready - we start with icebreakers and discussion then.
There will be breaks, but even long ones go by very fast, and this gives you limited time to make coffee, eat, etc. We try to limit ourselves to half-days because of this, but consider preparing food, coffee, etc. in advance.
Make sure you take the breaks, walk around some, etc.
Accessibility
We believe that livestream workshops offer a wide variety of tools which are useful to allow everyone to succeed. Consider how you want to attend to make it the best for you:
Our material is provided in writing (lesson websites), by voice, and by demo. You don’t have to strictly follow along at the speed we teach.
We record videos and post the notes so you can review at your own pace later on. Videos don’t include audience voice or video, so you don’t have to be afraid to interact.
Notes Q&A allows anyone to ask questions anonymously and asynchronously, without interrupting others. On the other hand, there are a lot of questions, so don’t watch too closely if it is distracting. We continue answering questions for a little bit after each day ends, so you can ask even if you can’t write the question on time.
Lesson websites/Notes use standard web technologies, so that browser accessibility plugins can be used (for example making the font more accessible, check browser extensions).
Twitch can be live-captioned using the Google Chrome browser. Our videos on YouTube provide automatic captions immediately, since videos are released immediately they don’t come too late for you. Other standard browser extensions can also provide other video accessibility services without asking us.
You can follow along without providing any personal data (registration, Twitch works with cookies blocked) - though registration helps our reporting.
Communication
Most communication goes through Notes. Make sure that you open it and try it out during the icebreakers - it will become obvious then. There will be an absolute flood of information there, so watch strategically and don’t let yourself get overloaded.
Notes is much better than chat, since you can ask anonymously, you can ask at the same time as others, and multiple people can answer, and we fix it up and publish it at the end.
Final notes
Join the stream 10 minutes in advance. There is some advance icebreakers and discussion you can take part in, and you get to breath before we start.
There is usually discussion after the workshop. If you want, stick around and give us immediate feedback and ask more questions.
Sign up on the notify me list to hear about what comes next.
Attending a Zoom workshop
We are glad you would like to attend an online workshop. This page will help you mentally and physically prepare.
Our workshops are interactive and hands-on, and you will get the most out of them if you can take part in all exercises, unlike a normal academic lecture where you mainly listen. Thus, please read this and come prepared!
General prerequisites, software installation, etc.
Check your workshop page for the general setup specific to that workshop.
Often, there is something to install. We usually ask you to install things so that your computer is set up to do work later.
There may be some basic skills, such as the command line shell, to review in advance.
Do the installation and configuration in advance, and double check it. In real workshops, problems here slow us down a lot, and if you don’t prepare, you will immediately fall behind. If there is a pre-workshop session for installation, go there if needed.
If all else fails, join the workshop well in advance and ask for help then. Usually, there will be enough time to get ready for the day.
Take the workshop seriously
It’s easy to think “it’s just online, it’s easy to passively watch”. However, for an interactive workshop you do need to take part to get the most of out it, and our workshops are targeted to that. If you read this page and the workshop prerequisites, you should be OK.
Don’t do multiple meetings, reserve the entire timeslots on your calendar, attend every session, do the preparation.
Workspace
Get a good, quiet workspace. Make sure it is comfortable enough to stay at for a while.
An extra monitor is useful but not required, since there is a lot of stuff to follow: the stream itself, the lesson webpage, and the window where you are doing the assignment. You could also use a second device to watch the stream (but if you do, see the Zoom page for info about screen sharing).
You’ll be expected to talk at some times and take part, not simply be quiet and listen all the time. Try to be in a place where you can speak without disturbing others. By the same token, you’ll be listening for a long time, and your ears may get tired of headphones. If you have good enough external speakers, be somewhere that you can use them (perhaps only sometimes - when it doesn’t interfere with your microphone.)
If you work in a large office, consider attending from home or in a meeting room so that you can speak and listen more freely. If you need and extra monitor or more comfortable seating space and don’t have that at home, consider working at your office. Yes, these are conflicting ideas, you need to find what works best for you.
Time management
Despite what most people think, attending things online can be harder than in-person.
Don’t schedule overlapping meetings, reserve the entire timeslots, minimze distractions. It’s easy to think you can do multiple things at once when doing it online, but really it’s a trap.
Join the workshop 10 minutes early to get ready.
There will be breaks, but even long ones go by very fast, and this gives you limited time to make coffee, eat, etc. We try to limit ourselves to half-days because of this, but consider preparing food, coffee, etc. in advance.
Make sure you take the breaks, walk around some, etc.
Live streaming
If the workshop is also streamed, see Live streaming for how to attend that way.
Final notes
Join the stream 10 minutes in advance. There is some advance icebreakers and discussion you can take part in, and you get to breath before we start.
There is usually discussion after the workshop. If you want, stick around and give us immediate feedback and ask more questions.
Sign up on the notify me list to hear about what comes next.
Attending an in-person workshop
We are glad you would like to attend an in-person workshop. This page will help you mentally and physically prepare.
Our workshops are interactive and hands-on, and you will get the most out of them if you can take part in all exercises, unlike a normal academic lecture where you mainly listen. Thus, please read this and come prepared!
General prerequisites, software installation, etc.
Check your workshop page for the general setup specific to that workshop.
Often, there is something to install. We usually ask you to install things so that your computer is set up to do work later.
There may be some basic skills, such as the command line shell, to review in advance.
If all else fails, join the workshop well in advance and ask for help then. Usually, there will be enough time to get ready for the day.
Take the workshop seriously
It’s easy to think “it’s just a class, it’s easy to passively watch”. However, for an interactive workshop you do need to take part to get the most of out it, and our workshops are targeted to that. If you read this page and the workshop prerequisites, you should be OK.
Computer and equipment
Bring your laptop and charger, of course. If you use external mice, etc, it would be good to bring them too. You’ll be on your device a lot.
Usually, you’ll need to look at both the lesson webpage and the window where you are doing the exercises at the same time. Consider how you can arrange windows to do this best.
Time management
Try your very best to attend the whole workshops; at least don’t miss the early sessions. Later sessions depend on earlier ones, and it’s easy to get behind. Tell others this is important so that you can free your schedule.
Arrive 10 minutes early to get ready.
Final notes
Arrive 10 minutes in advance to get set-up. There is some advance icebreakers and discussion you can take part in, and you get to breath before we start.
There is usually discussion after the workshop. If you want, stick around and give us immediate feedback and ask more questions.
Sign up on the notify me list to hear about what comes next.
Zoom mechanics and controls
Basics
Most Zoom controls are probably well known by now, but if not, view Zoom’s basic guide
Mute and unmute yourself from the buttons on bottom.
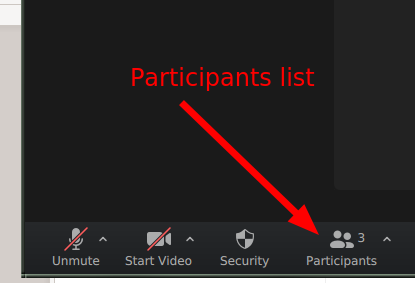
You can rename yourself from the participants list (hover over your name.
We don’t use Zoom chat for typical questions: use HackMD instead.
Chat OK for administrative questions.
When joining, please use the name you used to register for the course.
Audio/video on or off?
Main room: Stay muted, video off, unless you want to speak up.
Breakout rooms: Try to leave on for most interactive atmosphere.
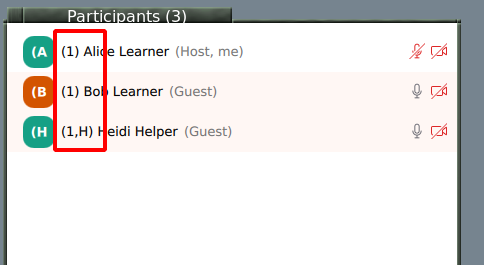
Workshops with teams: your name should indicate your breakout room
You will be told if this section is relevant to you.
Have your breakout room number in your name:
(number) Your Name
(number,H) The Name for helpers
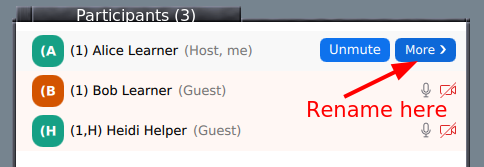
Rename yourself in a meeting by starting participants list:
Rename is found if you hover your name and click “more”
Breakout rooms
Click the “breakout rooms” button at bottom and you can join a room.
You can click “Join” to join your breakout room by yourself.
If you are joined via web, make sure your name is correct (see above) and use Zoom chat to ask host to assign you to the room.
Return to main room: “Leave” button at bottom has an option for “Return to main room”.
Reactions
We watch the participant list and can see these reactions (in the application):
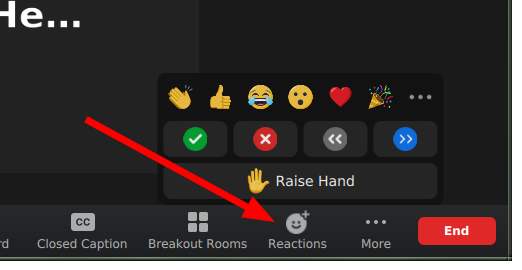
Task completed: Green check
Technical problem: Red X
Need more time: Slower “<<”
You can signal go faster and go slower
You can Raise your hand
Other settings
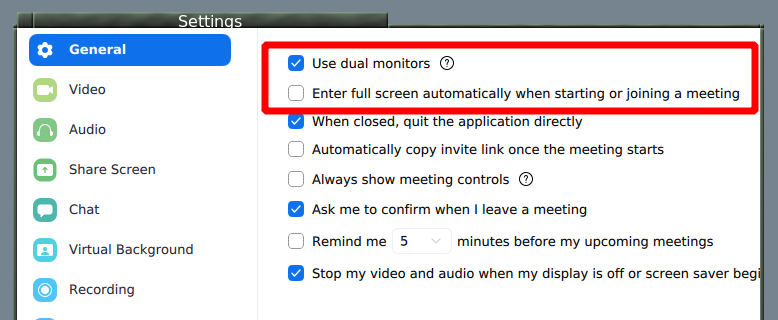
Automatic fullscreen when screenshare starts can be turned off
Dual monitor mode makes separate windows for screenshare and participants
See also
The old version of this document is available at Zoom mechanics and controls.
This is licensed under CC-BY and we encourage and appreciate reuse, modifications, and contributions.
Collaborative document mechanics and controls
Hackmd or HedgeDoc are real-time text editors online. We use it to:
As a threaded chat, to answer questions and provide other information without interrupting the main flow of the room.
provide everyone with a more equal opportunity to ask questions.
create notes which will be archived, for your later reference.
You do not need to login/create an account to be able to edit the document.
Basic controls
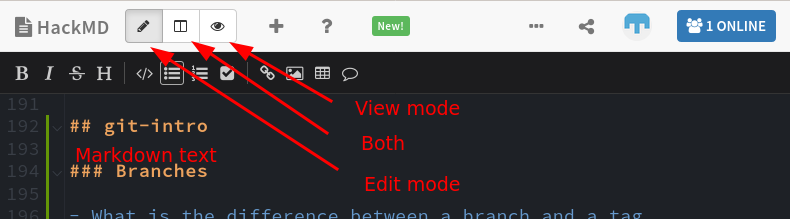
This may look slightly different on mobile devices and small windows.
At the top (left or right), you can switch between view, edit, and split view and edit modes.
You write in markdown here. Don’t worry about the syntax, just see what others do and try to be like that! Someone will come and fix any problems there may be.
Please go back to view mode if you think you won’t edit for a while - it will still live update.
Asking questions
Always ask questions and add new sections at the very bottom. You can also answer and comment on older questions, too.
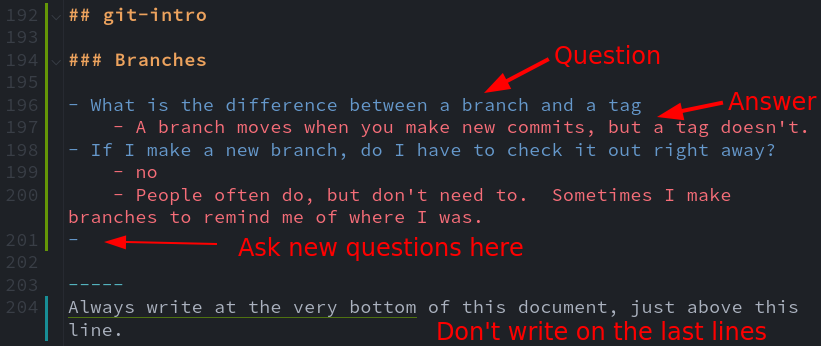
Questions and answers in bullet points
Since we plan to publish the questions and answers later as part
of the workshop page, we recommend to not use any names. You can indicate
your own name to make it easier to discuss more during the workshop, but
then always use this form: [name=Myname]. This makes it easier for
us to automatically remove all names before publishing the notes.
Other hints:
Use
+1to agree with a statement or question (we are more likely to comment on it).Please leave some blank lines at the bottom
NOTE: Please don’t “select all”, it highlights for everyone and adds a risk of losing data (there are periodic backups, but not instant).
It can be quite demanding to follow the collaborative document closely. Keep an eye on it, but consider how distracted you may get from the course. For things beyond the scope of the course, we may come back and answer later.
Don’t get overwhelmed
There can be a flood of information on the collaborative document. Scan for what is important, then if you would like come back later. But it is important to keep checking it.
Privacy
Assume the collaborative document is public and published: you never need to put your name there.
The collaborative document will be published on the website afterwards. We will remove all non-instructors’ names, but it’s easier if you don’t add it there in the first place.
Please keep the link private during the workshop, since security is “editable by those who have the link”.
You can use
[name=YOURNAME], to name yourself. We will remove all names (but not the comments) before archiving the notes (use this format to make it easy for us).
Roles overview
CodeRefinery has been able to scale online workshops while maintaining an interactive feeling. This page describes the roles that we use in our workshops.
Despite the many different roles documented here, in practice many of them are occupied by the same people. Best practices below tells more about what tends to happen. One of the advantages of our large workshops is that we have many more staff on hand (often 10-15), thus allowing much more specialization than small workshop can have (thus, the large number of roles below). Many of our instructors give feedback such as “this is so much easier: we only show up and teach!”
A common pathway goes (Learner/team leader) → (Expert helper/Instructor) → (More specialized roles). Note that thanks to our team teaching or “co-teaching”, it is really easy to join as an instructor!
You can also find the common tasks in checklist-format under each roles section in the Workshop playbook.
Workshop roles
Learner
Comes and learns.
Does necessary preparation and attends the workshop
More info: Learners section
Team leader
Team leaders are only a small step above learners. They aren’t expected to know everything, but mainly keep their breakout rooms on track - they could even be a slightly more confident learner.
Leads a breakout room
keeps on track
makes welcoming community
answers some questions
ask for more help when needed
Attends a one-hour team leader preparation / onboarding session.
More info: Team leaders (Helpers, Exercise leaders)
Instructor
Obviously, instructors teach. Uniquely in our system, they have a lot of support and generally can focus on the teaching part.
Prepares lesson and “just teaches” without worrying about other workshop matters
Team teaching, you are not alone
Attend instructor preparation calls
Usually receives one-on-one mentoring in advance
Other times during the workshop, usually serves as an expert helper
More info: (Co-)Instructors
Expert helper
Expert helpers are generalists who don’t have other assigned roles.
All-around generalist who assists wherever is needed
Answers questions in notes document
Supports team leaders
Identifies important issues and raises them to the instructors, “voice of the audience”
More info: Expert helpers
Behind the scenes
Notes manager
The notes manager closely watches notes document to keep it organized and by reading it in detail, can serve as the “voice of the audience” to the instructors.
Ensures everything gets some answer quickly
Even if it is “will be answered later”
Can raise issues to instructors immediately if needed.
In general serves as the instructors’ “ear on the ground”
Maintenance during the workshop
Copies old information to archive notes document if too much traffic
Organizes sections and questions
Notes break and exercise times
Processes and archives notes after the course.
More info: Notes manager
Host
The Host serves as the manager of learners during the course.
Learner Zoom meeting host (often). Often the registration coordinator.
Helps learners with organizational issues during the course
Ensures that everyone is welcomed and knows what is going on
Assign learners to breakout rooms
Answers technical questions about the course itself
Often the same person as the registration coordinator.
More info: Zoom Host
Director
The director manages the flow of the course: preparing and cueing instructors, switching the livestream scenes, announcing schedule, adjusting schedule as needed.
Instructor Zoom meeting host (often). Often the instructor coordinator.
Cues the sessions, makes sure they flow together well.
Adjusts the flow when things do not go according to schedule.
Has sufficient knowledge of the tech setup to do the scene switching.
More info: Director
Broadcaster (livestream)
The broadcaster is responsible for the livestreaming tech.
Only needed in livestream courses
Installs and manages OBS control for livestreams
Ideally is not teaching in the first session
Is around in case of problems, otherwise the director does most of the scene switching.
Makes sure videos get processed and to Youtube in a timely manner, or at least saves them where someone else can do it.
More info: Broadcaster
Registration coordinator
Oversees registration and generally everything on the participant side.
Communicate with participants
Organize installation help session
Contact person for learners
Collect feedback
Provide participation certificates
More info: Registration coordinator)
Instructor coordinator
Find instructors
Coordinate the schedule and instructors for each event
Organize instructor onboarding
Collect feedback
More info : (Co-)Instructors.
Outreach and marketing coordinator
Makes sure workshop gets advertised in different places
You can find a list of commonly advertised places in the bottom of the Workshop checklist template.
Team leader / Exercise coordinator
Communicate with all team leaders, contact person for them
Makes sure all exercises are ready and commicated before and during the workshop
Organize the team leader onboarding session
Usually attends as an expert helper to generally be available and support all leaders.
Collect feedback from team leaders
More info: Exercise coordinator
Video editor
Watches videos and prepares for YouTube upload
Uses ffmpeg-editlist to process videos after the Broadcaster has made them available.
Work should be done the day/evening of of the course
Best practices
Roles that are often combined:
Registration coordinator and Host
Instructor coordinator and Director
Expert helper and anything
Instructor and any other role (but not Host)
Roles that should not be combined:
Registration coordinator and Instructor coordinator (these two together tend to form the “core team”)
Broadcaster/Director and Instructor on the first sessions of each day.
Notes manager and other roles (so delegate notes editing while you do something else! this is OK.)
Host and any active teaching (in big workshops at least - learner management keeps you busy)
Other notes:
Notes manager can rotate between different people on different days.
Expert helpers can replace team leaders if they cannot join the full workshop
Coordinators delegate
Team leaders (Helpers, Exercise leaders)
We use this page during team leader onboarding.
The minimum to mention/read when preparing:
The summary
Code of conduct
What can I do to prepare for the workshop?
What we want to avoid
Thanks for being a team leader! Without you, these large online workshops would not be possible.
TL;DR (Summary of this page)
Everyone watches the CodeRefinery stream (how to attend via livestream)
All communication, questions, and feedback happen via collaborative document (Collaborative document mechanics)
Exercises can be done individually or in a pre-formed team, online or in person
Team leaders are an important link between the instructors and learners. Please:
In the collaborative document let us know about progress of the team and any issues
Be available for learners to ask their questions and lead discussions
Please write questions that you cannot answer in the collaborative document (then others will answer)
If idle, check the collaborative document for open questions and try to answer them
If you have questions before the workshop, write to support@coderefinery.org or you can join the
CodeRefinery chat (we recommend the #coderefinery-tools-workshop channel,
and if you can’t find it then #general is good).
If you have fun being a team leader for the workshop, please visit our contributing page page, to find out about further volunteering possibilities within CodeRefinery.
Code of Conduct
We follow a code of conduct for all our sessions before, during, and after workshops.
We’ve designed the workshop so that it is very hard for one person to ruin it for everyone. Within your team, you will need to take on the role of ensuring a good environment.
If you see anything that is not supporting an positive learning environment, please let us know.
If it’s a general issue that can be mentioned publicly, write it immediately in the collaborative document.
Send a message to support@coderefinery.org if it is private and can be handled asynchronously.
CodeRefinery project
We teach all the essential tools which are usually skipped in academic education so everyone can make full use of software, computing, and data. We don’t just give courses, but we are a training network that you can join to share the effort and bring better courses to your community.
..and you?
Shortly introduce yourself in the collaborative document of the onboarding session:
Who are you?
What do you do?
Where are you connecting from?
What is needed to be a team leader?
Most importantly, you do not have to know everything (we don’t, either). If you aren’t sure if you can be a team leader: you probably can be one!
This is what we expect:
Have been to a CodeRefinery before and used Git some since then, OR have some general experience with Git (branching, pull requests) and command line work, OR be able to generally follow the path of the exercises that we have laid out.
Be present in your teams physical/virtual room at least during exercise sessions of the workshop.
Show a positive, motivating attitude to learners.
Keep exercises going and let us know when there are difficult questions!
Who is joining this workshop?
Be aware of the different
Career stages (students, postdoc, researcher, professor, industry),
Backgrounds (computer scientist, IT, domain scientist, coding beginners,…),
Infrastructure (operating system, access restrictions, preferences on graphical vs command line interfaces, …) and
Preferred programming languages (Python, R, Matlab, Julia, Fortran, …) of your learners.
There is also usually a great variety of pre- knowledge on the different topics of the workshop.
Overview from the pre-workshop survey
What will happen during workshop?
The workshop schedule on the main workshop page contains links to lesson material, including lists of exercises.
The best analogy is watching a popular sporting event on TV. There are periods of lots of activity, and clear periods of breaks where you do your own thing.
Everyone follows stream during lessons - lessons, demos, exercise intros, going over solutions, etc.
For questions and instructions we use a collaborative document (more below).
Exercises during the lessons are done individually or in teams and there is many ways to do this:
Watch and work alone
Watch together and interact during exercises/breaks (in-person or online)
Reviewing/doing exercises later
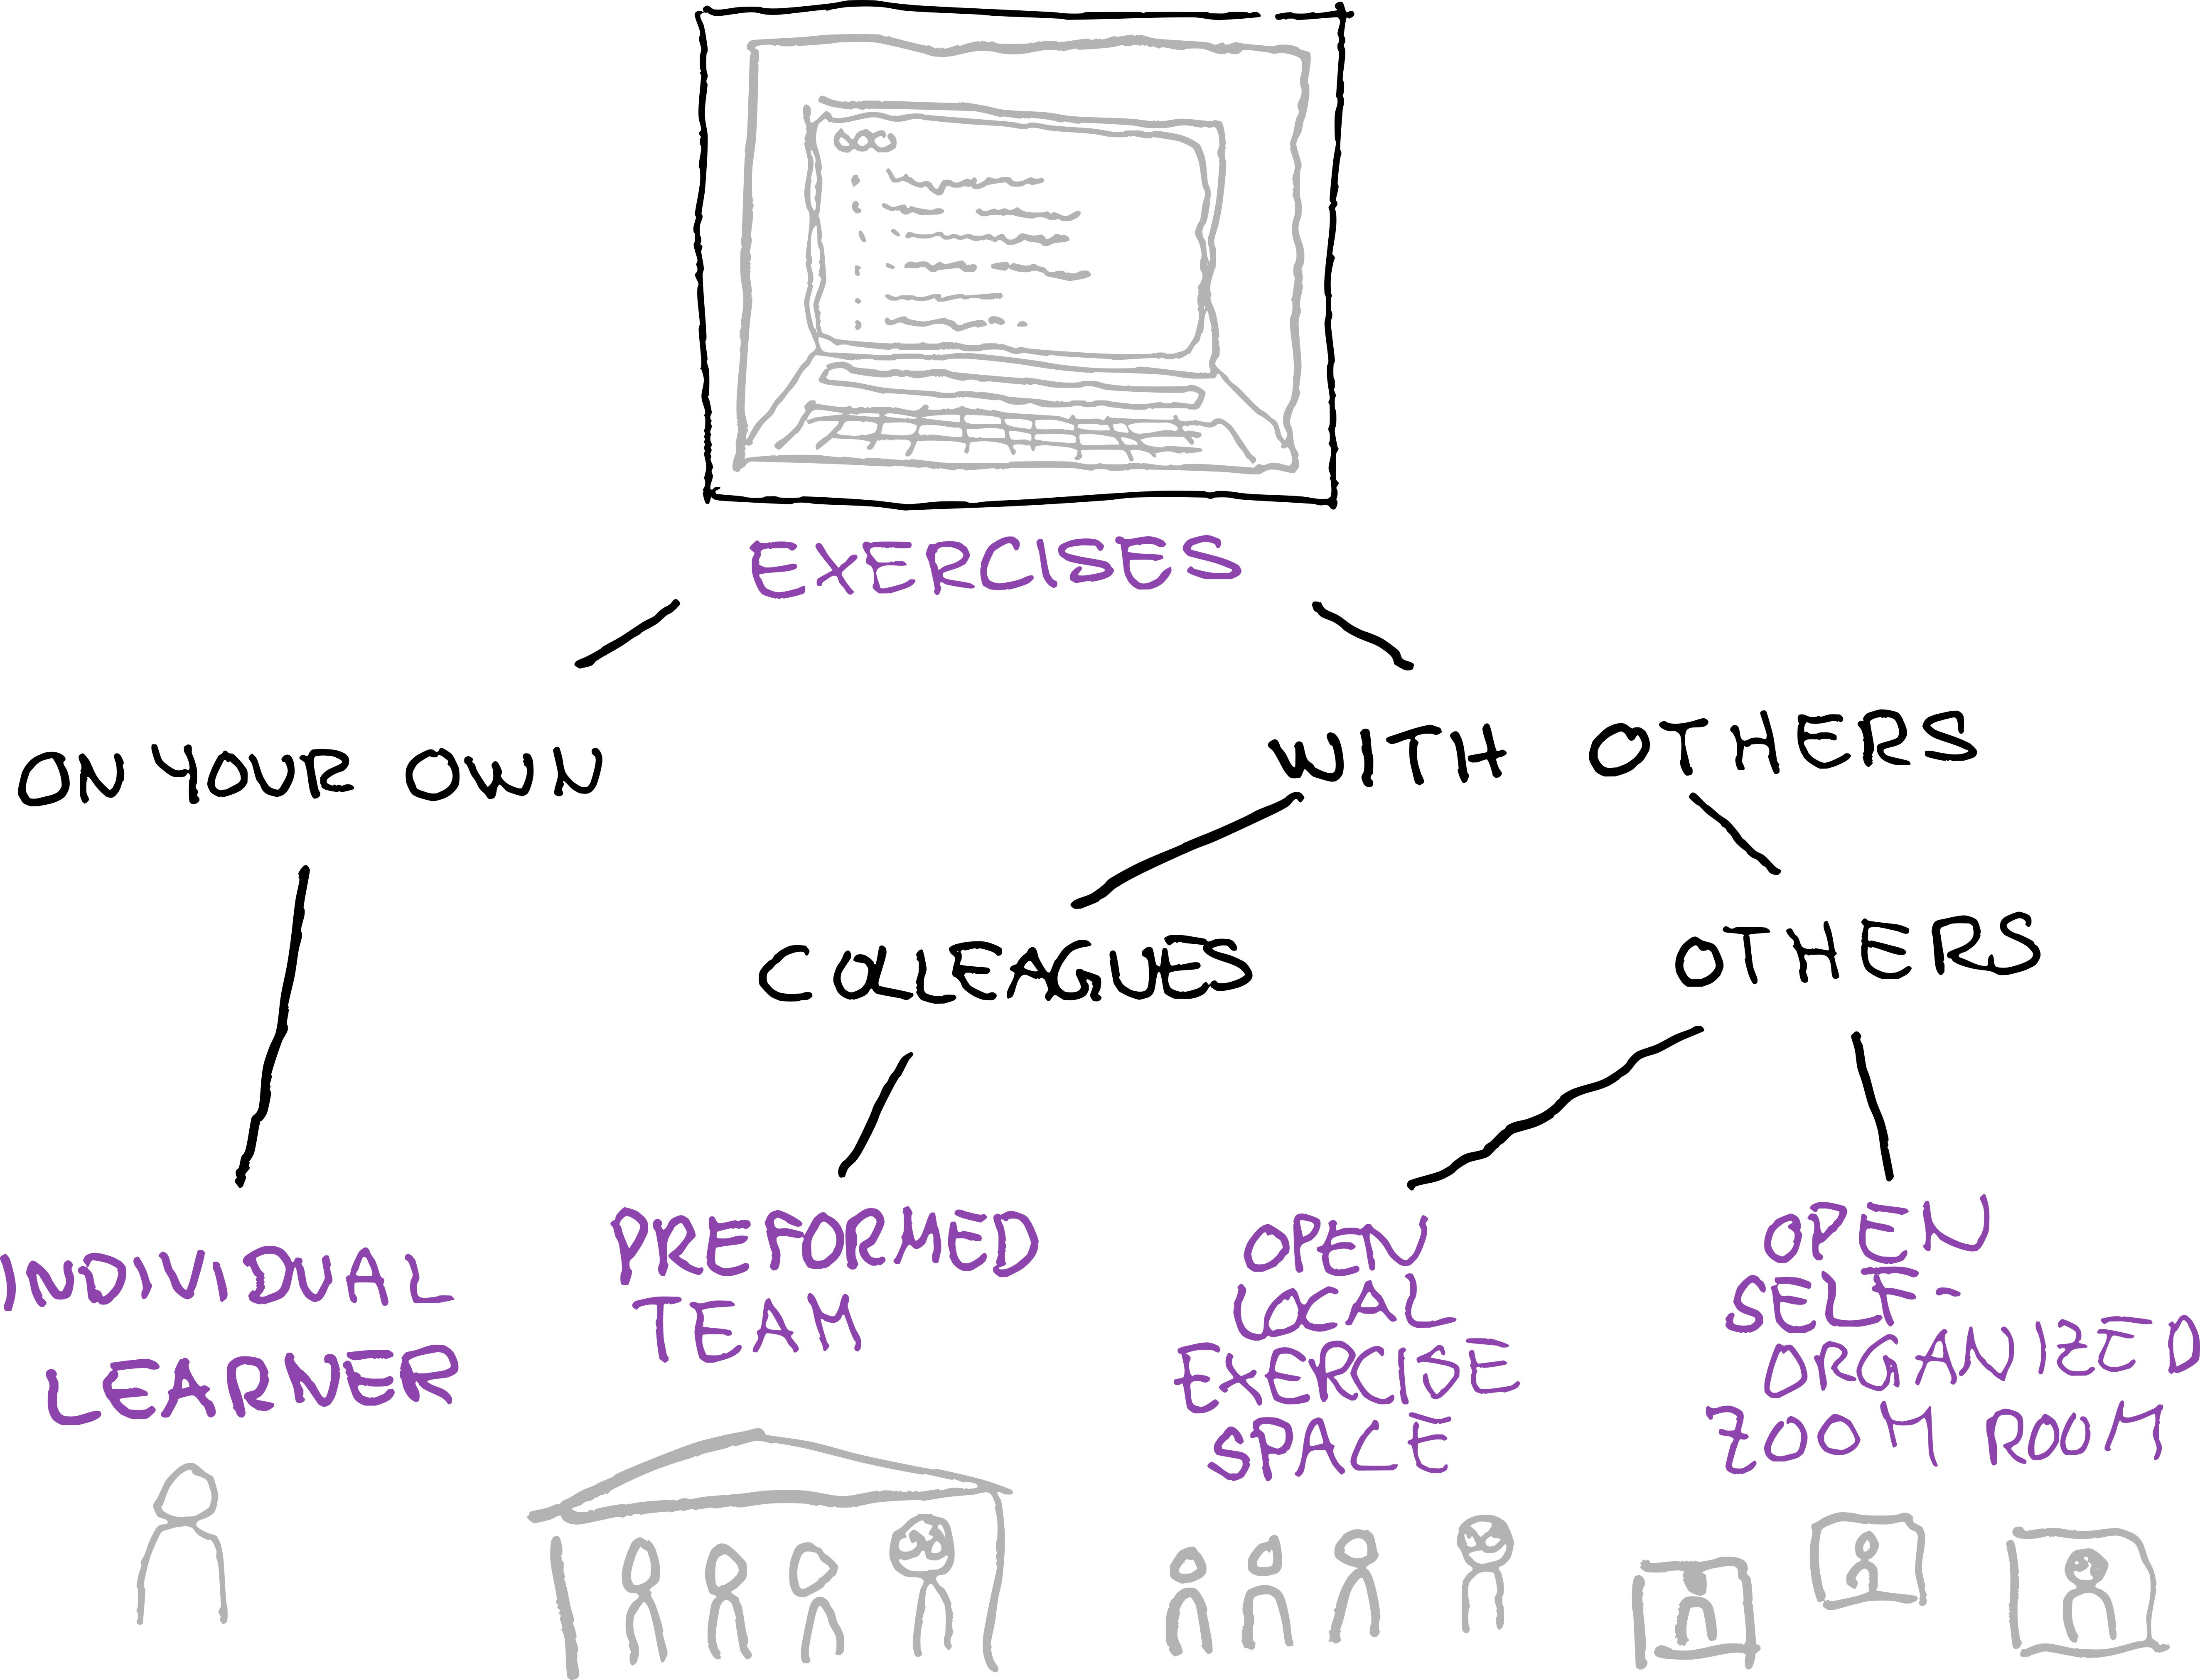
Overview of the different options of doing the exercises individually or in a team.
Exercise sessions
We try our best to be very explicit about what is going on. Your first goal should be to make sure the learners are engaged and no one is left behind.
The instructors should clearly tell which exercises and for how long (we try to make all exercise sessions at least 20 minutes long). If anything is unclear please ask via collaborative document, you are our safety net.
Make it easy for learners to ask for help:
Make sure your group knows your name and that you are their team lead.
Always start by greeting people and ask how the lesson is going; report back if there is something instructors should be aware of.
Encourage your team to also put answered questions in the collaborative document, someone else might be wondering the same thing.
Want extra help?
It is OK to not know something!
Use the collaborative document if there is questions that you cannot answer. Our instructors and expert helpers are watching it and try to answer every question.
Major problems?
Exercise time is limited, watch the time and keep things moving.
If some debugging takes to long, it’s reasonable to describe the problem in the collaborative document. An expert helper may have seen the problem before.
If any one problem takes too long, it’s OK to say “we don’t have time, let’s come back”
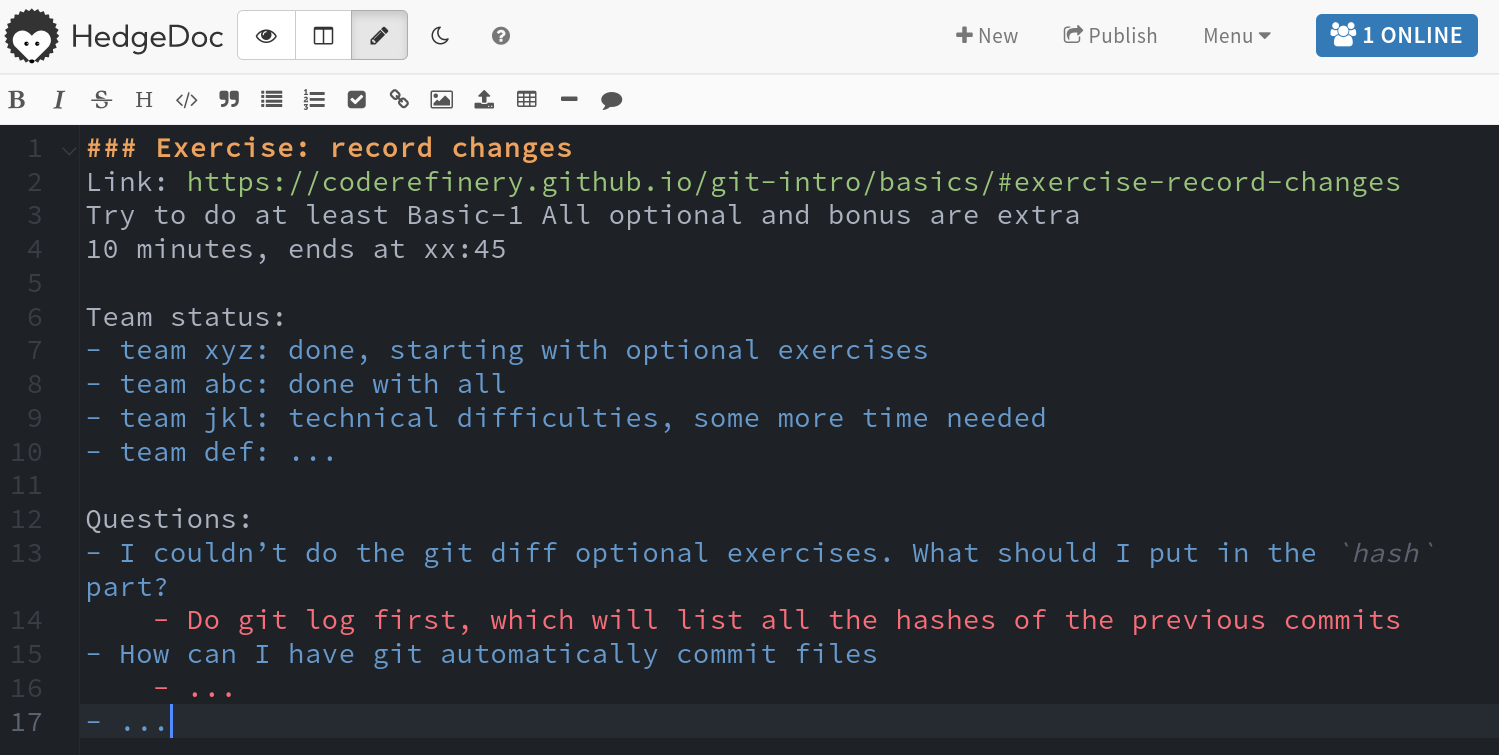
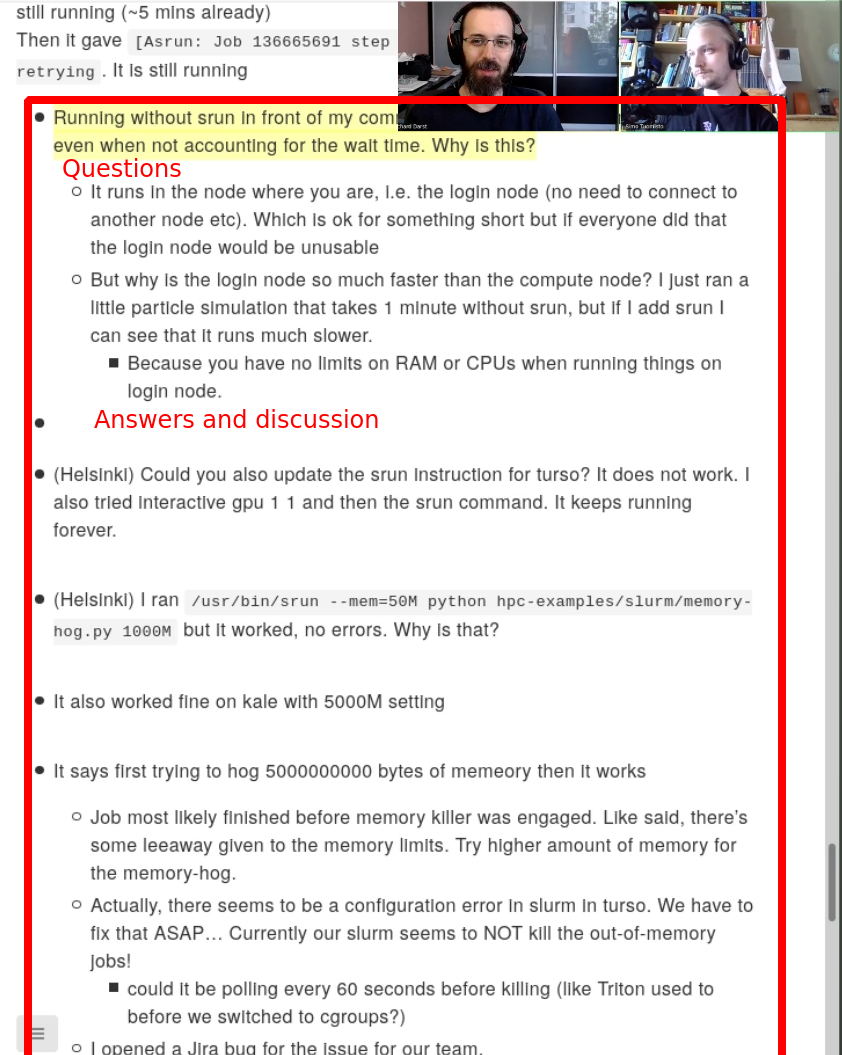
Example of collaborative document during an exercise session. a) clear description of topics of the exercises. b) team status. c) as always, questions at the bottom.
What can I do to prepare for the workshop?
As a team leader, we do not expect you to know all our CodeRefinery training material, but if you have time:
Take a look at the exercises in advance of each day (the exercise plan is on the workshop page. Lessons have an “exercise list” page that shows everything), check that you understand the general point of each of them.
Often we only manage to adjust exercises and lessons shortly before the workshop. Thank you for your understanding and patience.
If you are interested, also read through the instructor guides for the lessons (there is a link at the top or sidebar of each lesson).
Use GitHub issues on the lesson GitHub pages to point out issues with exercises and the materials.
How to create a positive learning environment?
As a team leader, you have a crucial role during workshops:
You are between the learners and the organizers and instructors, please use the collaborative document to communicate.
Encourage learners to learn from each other.
Acknowledge that some of the material can be difficult and that people in your team will learn more working together.
Acknowledge when learners are confused and raise it to the instructors. Understanding why learners are confused provides useful feedback for instructors. You are our eyes and ears.
As we said, you don’t have to know everything, just like learners don’t necessarily know everything (we don’t know everything, either). It’s more important to be responsive and work together.
If you meet virtually: Turn on your camera, and encourage everyone else to do so as well. Have an introductory round in the first exercise session, to get to know your group. Whichever strategy you choose for your team, be present and encourage learners to ask questions.
In an in-person workshop: Stand up and walk around, try to make rounds by everyone. If you are convenient, students will ask. If you are sitting in the back, student’s won’t. Students rarely try to get your attention from across the room if you don’t look ready.
What we want to avoid
Take over the learner’s keyboard (neither physically nor remotely). Instead, try to have a sticky note pad and pen / use the collaborative document and write the commands that they should type.
Criticize certain programs, operating systems, or GUI applications, or learners who use them. (Excel, Windows, etc.)
Talk contemptuously or with scorn about any tool. Regardless of its shortcomings, many of your learners may be using that tool. Convincing someone to change their practices is much harder when they think you disdain them.
Dive into complex or detailed technical discussion with the one or two people in the audience/team who have advanced knowledge and may not actually need to be at the workshop.
Pretend to know more than you do. People will actually trust you more if you are frank about the limitations of your knowledge, and will be more likely to ask questions and seek help.
Use “just”, “easy”, “simply”, or other demotivating words. These signal to the learner that the instructor thinks their problem is trivial and by extension that they therefore must be stupid for not being able to figure it out.
Feign surprise at learners not knowing something. “You’ve really never heard of (sometool)?” signals to the learner that they do not have some required pre-knowledge of the material you are teaching, that they don’t belong at the workshop, and it may prevent them from asking questions in the future.
Strategies for leading a team
There are several strategies you can use to run your team, no matter if you meet in a physical or virtual room (Physical room would need a larger screen for every one to see though):
Strategy 1:
Everyone does the exercises themselves until someone has a question
Encourage learners to ask multiple times; if necessary share your/learners screen and discuss.
If everyone is active, this can be good, but there is a risk that the barrier for disturbing the silence is too big.
Strategy 2:
To start things off, team leader can share the screen.
Do not try to hide mistakes (they make good learning opportunities, “can you spot my mistake?”) and discuss your solutions.
It might be good to give learners some lead first, and use this only if no one volunteers.
Strategy 2:
Team leader asks someone to share the screen and go through the exercise.
You can encourage the others to guide the one who is sharing the screen. Or let the person go on her/his own pace.
If no one dares at first, you can also start sharing your screen and let the room tell you what to write.
That way they see how it can go and the barrier shrinks.
Try to alternate who is sharing the screen for each session.
When someone has an issue, it is a good idea to switch screen share to them and maybe even continue from there
You don’t actually have to do the exercises. You could apply lesson material to your own team’s work, review what was just said, have a free-form discussion, etc. - if those are more valuable. You can always come back to exercises later, or let learners do them as homework.
How to solve common problems in teams?
One learner asks very many questions, ends up monopolizing all of the time. Other learners are left without help, and the whole group may not get the exercises done
Encourage them to ask in the collaborative document
It can be very hard to say “no”, but it’s more important to have balance than answer every question you are asked. If you need to say no, you can try things such as “I’m sorry, but in order to finish we need to go on now. We can keep working on it later - would you like to watch?”
There is some sort of problem that ends up taking a lot of time
Work on it for a minute or two.
Encourage to describe the problem in the collaborative document. Our expert helpers may be able to help. Nothing wrong with this, because there is no deadline or time limit.
No one asks any questions
Make sure people know that you are there for them if they need help
Some exercises are easier than others and people really may not need any help with some of them
Remind that the recording can also be watched later, if people cannot keep up
Use your time answering questions the collaborative document
Any questions?
Send us an email to support@coderefinery.org
If you want to, sign up for our Zulip chat to ask us anything, anytime. Use
#coderefinery-tools-workshopduring the workshop itself (you need to join the stream, it is not default for new chat members).During the workshop, please use the collaborative document.
Path ahead
Would you like to
become an instructor?
help organizing a workshop?
contribute to lesson material?
have any other ideas to contribute?
community calls: see https://coderefinery.org/organization/meetings/
See our website and Contributing to CodeRefinery. Best way to get started is to join the Zulip chat.
More background about scaling workshops
Traditionally, a workshop has instructors and team leaders/helpers, but the capacity is limited by instructors, so we are limited to ~30-40 people at most. Then, we tried to scale to larger numbers: even up to and beyond 100 people. For this, we have to rely on team leaders . A team leader does not have to be an expert in the material, but should be able to keep things flowing.
Team leaders are an essential part of the CodeRefinery workshop team and allow CodeRefinery to scale to many more people than we could otherwise handle. Team leaders will guide their team through the course, keep time, and let us know when more help/time is needed during the exercise sessions. Instructors and expert helpers are always available via the collaborative document. It is very likely that you’ll grow as a mentor and learn how to be a more efficient teacher.
More background about teams
A team could be for example a group of colleagues/friends where one of the team members has a bit of knowledge on the tools presented in the workshop. This person can act as team leader for the workshop, but may still learn a thing or two themselves. In that way you can work with people you know and the barrier for asking questions and discuss together may be a bit lower than in a group of strangers.
Sometimes we also allow learners to register as individual learner with interest in being in a team. We then try to arrange those people in teams which stay together for all exercise sessions on all days and provide a zoom breakout room with a team/exercise leader. Since this is dependent on our team leader capacities, we cannot accept infinite amount of learners. Being assigned a team as a learner allows people to form a bond and get the rooms started sooner. We will try to keep you in the same team room as long as we can, but we give no promises and will rearrange as needed when people can’t attend.
See also
Carpentries instructor training
Teaching Tech Together chapters 8, 9, 10.
(Co-)Instructors
Instructors are the ones who “lecture” in the workshops - but of course there are many other roles which are helping with the teaching, most notably team leaders and other helpers.
This page links guides on various aspects of being an instructor.
Join the #coderefinery-tools-workshop and #events channel in the coderefinery Zulip chat and see what workshops are planned.
Below a few things that might be of interest if you want to teach with us:
Responsibilities of an instructor
Review, triage, and work on lesson issues
Define exercises
Communicate exercise list to Exercise coordinator
Set up and test a quality screen share
Coordinate with co-instructor
Communicate software requirements to Instructor coordinator
Communicate timing adjustments to Instructor coordinator
After planning/editing the lesson: Do a dry run (prefereably with someone “new” to the topic)
Why co-teaching?
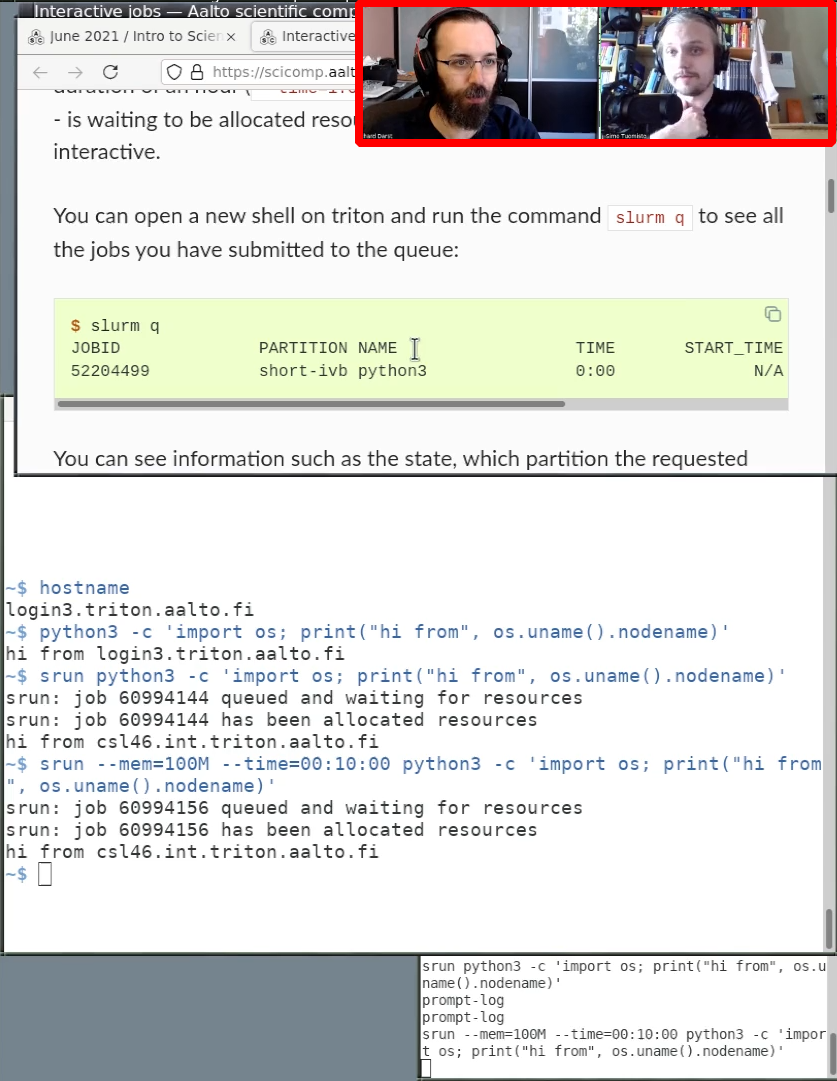
Demo of team teaching. Two people are speaking, in this case one is typing and giving the small point of view, and one is explaining the big point of view.
The dream of interactive teaching is hard to achieve: most audiences are very quiet and even if someone does speak up, it is a small fraction of the audience. We have found a better way: Build the interaction straight in to the course by co-teaching. Instead of trying to have a conversation with students, we have a conversation among co-instructors.
Co-teaching provides other benefits, such as easier preparation and easier presentation.
From team leader/helper to more
Here is one possible pathway from learner to (whatever else). This is an idea for a pathway but by no means a requirement - you can join at whatever step you like, and steps don’t have to happen in order. Maybe you are interested in some or the other. There are also roles completely outside of this pathway.
After being a learner, you come back as an team leader/helper.
When you have a solid understanding of all materials, you may join as an expert helper.
You begin co-teaching episodes with someone else
We find that co-teaching is a good way to start. In this, there are two people, one person assumes the big-picture discussion, and the other the typing and explaining what they are doing. By making the lesson a discussion instead of a lecture, it’s more dynamic.
Eventually, you get confident enough to teach yourself (though really we should always be co-teaching…)
Somewhere in there (before or after instructor, depending on your interests), you may want to try to be a HackMD helper or Zoom host. These are more about coordinating all the other people involved in the workshop.
Let’s emphasize again: this is one pathway, but you should do what you want.
Preparing for your first time
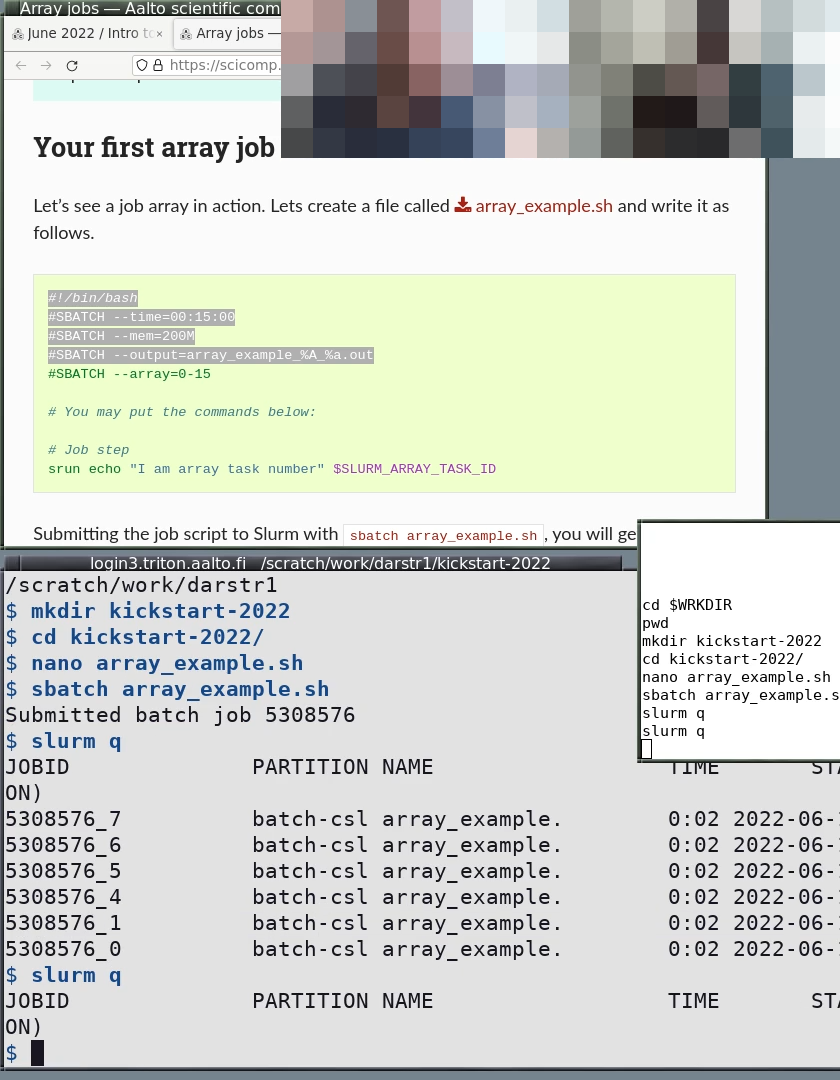
An example of a beautiful screenshare. Note the portrait orientation (you have half the screen free for notes and HackMD, learners have half the screen free to do their own work). The terminal is dark-on-light, a minimal prompt, no other fancy shell distractions, there is a shell history visible, and slightly distinct colors between the web browser and the terminal.
There is some generic technical setup for your own computer - make a clean environment that matches learners, make a good prompt, and so on. See Instructor computer setup.
Watch the Demo of CodeRefinery livestream teaching (read the description for an explanation).
Talk and plan with your co-instructors: decide which model of co-teaching you will give.
Plan the material, try to go through all of the exercises and type-along.
Do a run-through of the lesson, practicing what each person says. This can be relatively quick (remember, most of the time in an actual lesson is learners doing exercises alone).
Also check the technical setup - make sure that it looks good on screen.
Lesson maintainer
Many people contribute to lesson and thus are “maintainers” The lesson maintainer refers to the person managing all the contributions, like the editor of a edited volume.
Everyone may “maintain lessons”, including merging pull requests and
pushing directly, when it’s appropriate. There are plenty of simple
improvements that can be done without some “permission”. See the left
sidebar, especially :doc:lesson-review.
How lesson development and maintenance usually works
Our lessons are quite battle-tested, and teaching isn’t expected to require major edits. At most, there may be minor updates with respect to software/Github/etc. that has changed.
Minor updates are done as needed, usually right before the lesson is taught.
Github Issues with bigger ideas accumulate over time. Sometimes these are done quickly, but often they pile up.
Through this time, the lesson maintainer keeps an eye on things and can advise on contributions.
Every so often, there is a time for a big update. This might happen, for example, at an in-person CodeRefinery meetup or similar.
People get together and think about the big structure, making bigger changes to the lesson topics.
It’s usually rough at first, but over time it gets better refined.
Responsibilities
This person is not expected to work on the lesson alone, or even do changes all the time. They are not expected to always teach it, but it’s good if they can stay hands-on with the teaching some.
Keep the long-term vision of the lesson and ensure the different contributions remain consistent with this.
Be very aware of the main trade-offs of CodeRefinery lessons: we have to teach something that’s achievable for the common learner, not necessarily what we would do ourselves. This is a delicate balance, and lesson maintainers are on the front line.
Avoid too much feature creep or thing becoming too complex. Instead, it’s OK to have sections with advanced material that aren’t usually taught.
Manage cycles of major development. Many ideas may pile up over time, and at some point there are bigger changes. The curator should managing this process. (Or maybe, when it’s time for a big change, a new curator comes in manages the rearrangement/restructuring/rewrite, and takes over as the maintainer)
Talking with new instructors of the lesson and briefing them on the spirit of the lesson and common pitfalls. (You aren’t expected to always be the instructor, but if you can sometimes, great)
Keeping the instructor guide up to date.
Can be around for at least a few years.
Qualifications
Don’t take these qualifications too seriously. Basically, we’d like whoever has the most experience with the lesson and who can give long-term advice. If we don’t have anyone available with a lot of lesson experience, that just means we’ll have more rapid evolution. Lessons need that sometimes.
Ideally, has taught the lesson a few times so understands the flow and what usually goes right and wrong. Also ideally they’ve taught a few other lessons for a broader perspective.
Ideally has been around CodeRefinery for a while, so they have seen a wide variety of teaching.
Any pedagogy experience is good, but it’s OK to read our guidelines.
Resources
Everything under “lesson development” in the left sidebar.
Carpentries, lesson maintainers handbook
Carpentries, lesson developer handbook
Notes manager
The “Notes” are the way we communicate in the workshop. We have a manager for them. This isn’t the only person that should edit and answer, but hopefully one person can focus on it each day of the workshop. They make sure it stays up to date when others may be too busy managing other things.
“Notes” used to be called “HackMD” (or “collaborative document”). To be consistent, please call it “Notes”.
Below, (*) = important.
Before the workshop
Create a blank notes document and fill it with the template.
Create a archive place on HackMD to store the overflow. This should be writeable only by owners.
Make sure that editing is enabled for anyone without login
Add workshop information, links to the workshop page and material and an example question and answer to the top of the hackmd (see below)
General practices (for everyone)
A live demo of Notes during a Q&A time. The two instructors are discussing some of the import answers. Multiple learners have asked questions, multiple answers, and some remaining to be answered
Keep it looking good so that it’s easy to post after the course and consistent:
Remove all names or at least tag them with
[name=XXX](so they can be found and removed later), and remove other personal data.Add in information on exercises, breaks, etc (new section for them, link, end time, what to accomplish)
Make a logical section structure (
#for title,##for lessons,###for episodes, etc. - or what makes sense)
Keep it formatted well:
(*) Tag names you see with
[name=XXX]so that we can remove it later.Heading level
#is only the page titleAdd a new
##heading when a new lesson or similar thing is started (introduction, icebreaker, break between lessons, etc)Add a new
###heading when a new episode, exercise, break (within exercise session)Ensure people are asking questions at the bottom, direct them there if they aren’t.
(*) Ensure each question is a bullet point. Each answer or follow-up should be a bullet point below.
Should you use more deeply nested bullet points, or have only one level below the initial question? It depends on the context, but if a conversation goes on too long, try not to let it go too deep.
If using numbered questions, leave a blank line between numbers (so that pushing enter after a line doesn’t increment following numbers).
Update with meta-talk, so that learners can follow along easily:
Add Icebreaker and introductory material of the day. Try to talk to people as they joined to get them to open the Notes and answer.
Anything important for following along should not be only said via voice. It needs to be in the Notes, too.
New lessons or episodes, with links to them.
For exercises, link to exercise and add the duration, end time, goals. If these are unclear, bring it up to the instructor by voice.
Add a status display about breaks.
Screenshare it when necessary:
During breaks and other times, share the Notes (including the notification about break, and when it ends).
It is nice if the arrangement allows some of the latest questions to be seen, so people are reminded to ask there.
Someone else may do this, but should make sure it happens.
Answer questions:
If there is an question that should be answered by the instructor by voice, bring it up (by voice) to the instructor immediately.
During breakout sessions, watch for Notes notifications about breakout rooms that need help and direct someone to that room.
How soon do you answer questions? Two points of view:
Answer questions right away: can be really intense to follow.
Wait some so that we don’t overload learners: reduces the info flow. But then do people need to check back more often.
You need to find your own balance. Maybe a quick answer right away, and more detailed later. Or delay answers during the most important parts of the lecture.
Avoid wall-of-text answers. If reading an answer takes too long, it puts the person (and other people who even try to read it) behind even more by taking up valuable mental energy. If an answer needs a wall of text, consider these alternatives:
Progressive bullet points getting more detailed (first ones useful alone for basic cases)
Don’t be worried to say “don’t worry about this now, let’s talk later.”
Figure out the root problem instead of answering every possible interpretation
Declare it advanced and that you will come back later.
Archive if it gets too long:
If it gets too long, the interaction starts lagging. In this case, copy old material (generally everything before the current episode/lesson and possibly the previous one) to the archive document. Make sure it’s linked at the top.
Ensure it can be posted quickly:
Notes gets posted to the workshop webpage. For this, it needs some minimal amount of formatting (it doesn’t need to be perfect, just not horrible).
All names and private information needs to be stripped. This is why you should rigorously remove or tag all names with
[name=XXX]so they can be removed (see above).Learner names can be completely removed. CR staff names can be
[name=CR]or something similar.There may be other private URLs (e.g. Github repo links).
If possible, send the PR adding the Notes to the workshop webpage (though others can do this, too).
Notes format example
# Workshop, day 1


## Lesson name
https://coderefinery.github.io/lesson/

### Episode name
https://coderefinery.github.io/01-episode/

- This is a question
  - Anwser
  - More detailed answer
- question
  - answer

### Exercises:
https://link-to-exercise/.../.../#section
20 minutes, until xx:45
Try to accomplish all of points 1-3.  Parts 4-5 are optional.

Breakout room status:
- room 2, need help with Linux permissions
- room 5, done

### Break
:::danger
We are on a 10 minute break until xx:10
:::


## Lesson 2
https://coderefinery.github.io/lesson-2/
Posting Notes to website
Notes should be posted sooner rather than later, and hopefully the steps above will make it easy to do so quickly. You could wait a few hours, to allow any remaining questions to be asked an answered.
Download as markdown
Remove any private links at the top
Adjust headings so that they are reasonable
Look for private info and remove it
Search document for
[name=???](change to[name=staff]or[name=learner])Any names not tagged with
[name=]usernames in URLs
private links
Feedback template
## Feedback, day N

:::info
### News for day N+1
- .
- .
:::

### Today was (multi-answer):
- too fast:
- just right:
- too slow:
- too easy:
- right level:
- too advanced:
- I would recommend this course to others:
- Exercises were good:
- I would recommend today to others:
- I wouldn't recommend today:

### One good thing about today:
- ...
- ...

### One thing to be improved for next time:
- ...
- ...

### Any other comments:
- ...
- ...
Expert helpers
We mainly have expert helpers for large workshops that have teams. Each team has a team leader, and “expert helper” is the name for a staff person who goes between rooms helping the team leaders.
As an expert helper, your main job is to move between different groups and make sure that groups are doing well.
You might be summoned to a group whose helper needs extra help, or take the place of a helper if a group doesn’t have one.
Watch Notes/Zulip for this, though requests might come in from other channels, too.
No one is expected to know everything, but an expert helper should be able to find a person who can answer, or confident enough to say they should move on.
Make sure you have a new (newer than 15 october 2020) Zoom client, so that you can join arbitrary breakout rooms.
If you don’t, then you have to ask to be put into some room, and then you can swap to any other room.
Report an overview of the pulse of the breakout rooms in zulipchat (or Notes). Is everyone behind? People finishing early? Big differences between them? Questions which we should bring up in the main room?
Monitor if any team leaders need extra help or training. Should we improve our team leader training?
Tasks
There’s not much difference between a team leader and expert helper, but we envision this role standing by and jumping into rooms when there’s a difficult problem.
Sometimes, you wait around for a problem that needs your attention. But it’s better to be proactive and go into the rooms yourself and check them out. Talk to the organizers/instructors to see which you should do.
You aren’t assigned to particular breakout room, but you can switch between them (but it’s not obvious how):
To do this, you do get assigned into one room initially. Join that room. After you are in the room, click on “Breakout Rooms”, and then
Jointo switch to a different room of your choice.You also always have the option “Leave breakout room” (if in a room) or “Join your assigned room” (if in main room and assigned one).
Your role is to switch between breakout rooms and check up on them.
e.g. join room 1, take a look/ask how it is, then join room 2, then 3, then back to 1, and repeat.
Of course, stay in one longer, if it’s needed.
Make a note of any important questions to be asked in the main room afterwards.
Try to divide up the breakout rooms between the staff, and try to join and catch up with the same rooms (this promotes familiarity).
E.g. A rotates between rooms 1-3, B gets rooms 4-7, C gets rooms 8-11.
Make sure to watch the Notes for expert helper requests, this could help you decide which room to jump to next. Comment when you are heading there.
Concrete example for an expert helper’s time:
I join breakout room 5 randomly. I spend 15 seconds watching, then ask if things are going OK. If everything is good, I move on within a minute since I am not needed (if there is a good break, I’ll ask “everything OK? good, see you around.”). If there are questions that I can help with, I answer them. If they seem to be struggling, then I will make a note in the Notes and stay a while longer and watch/help.
Common issues and solutions
A room is very slow, the person sharing the screen is working quite slowly.
Kindly suggest that you or someone else take over and go through it faster
Yes, this is hard to say nicely
No one wants to take initiative and screen share
If you think everyone is confident enough, this can be OK
But especially at the beginning of the workshops, you can share your own screen and go along with people.
Someone is having trouble installing software
“Perhaps we can take a look at this after the workshop? We try to make sure everything is installed beforehand, but “
Other reference:
Team leaders (Helpers, Exercise leaders): important reference
Notes manager: You may spend a lot of time watching the Notes.
Zoom Host
This role exists in Zoom workshops, where there is one person in charge of managing Zoom. It is most important when there are teams in breakout rooms - those teams take a lot of time to manage.
WARNING: page out of date, Zoom has been improved so that all co-hosts can do many things on this page.
Make all of other staff and expert helpers co-hosts.
Take attendance in spreadsheet, if we do that.
TODO: provide sample spreadsheet
It might be easiest to take attendance all at once, in the middle of the session, after everyone has been assigned to breakout rooms.
Breakout rooms
Rename people to include breakout room number (other co-hosts should help and hopefully do most of this work too), though. (this is a continuous process as people drop out and rejoin)
Assign people to breakout rooms (this is a continuous process)
Merge breakout rooms as necessary, to try to keep them balanced well
Constantly watch for new people joining, rename them, and assign them to breakout rooms.
Note, you might have merged the room they were originally in, so they might end up in an empty room!
Plan for the future: how many helpers might be missing, which rooms need to be merged. Can you keep the merging somewhat consistent over time?
Recording
Recording workshops provides a way for learners to get an instant review of what was covered, increasing learning. We don’t currently intend for workshop recordings to be useful to new people learning later, but they could be.
Record the workshop or give permission for others to record.
If you are recording, you can’t go to other breakout rooms.
Perhaps a separate computer could record?
Spotlight the current speaker
dual monitor mode?
ensure that screen is always being shared?
stay in speaker view (not gallery view)
start and stop recording
rename recording immediately
dayN-lessonname-zoom.mp4and upload to google drive.
Streaming
(Zoom provided a way to do streaming directly from it, but we don’t use it anymore.)
All of the steps needed to record mean that you can stream, too. In fact, you could look at streaming as a side-effect of recording (or a way to record).
spotlight speaker
start streaming
dual monitor mode?
ensure that screen is always being shared?
stay in speaker view (not gallery view)
have stream feed open. If you see it change to gallery view, fix it immediately.
stop streaming
download recording from twitch, rename to
dayN-lessonname-twitch.mp4and upload to google drive.
Registration coordinator
The registration coordinator is responsible for the Indico registration page and the workshop homepage. Usually the registration coordinator has the best position for sending emails. Drafting can be collaborated with outreach and marketing coordinator. They keep and eye on the Helpdesk before, during and after every workshop and make sure everyone is registered and knows where to go. After the workshop, they make sure the CodeRefinery webpage is up-to-date and all changes needed in the planning HackMD are ported to the template. The registration coordinator also has the overview over statistics for reporting and adds those to the webpage after the workshop.
Exercise coordinator
Also called team leader coordinator.
The exercise coordinator makes sure that the hands-on idea of the workshop is preserved. They remind the instructors to check and report their exercises before the workshop. They are also the contact person for the team leaders and organize the team leader onboarding before the workshop.
If wished, they can also host the exercise Zoom room and support the registration coordinator with building the teams for the breakout rooms in Zoom.
Workshop marketing
The workshop marketing and outreach coordinator makes sure (by delegation) that the workshops are advertised in all known channels. They also coordinate mass communications with all entities of the workshop.
Some thoughts on target groups that should be tried to be reached:
Learners (many sub-categories with different time vs need trade-offs: students, junior researchers, senior researchers, lifelong learning) (join a workshop)
team leaders (bring your friends, join to learn more and lead groups)
Research leaders (people who can tell their students they need to attend CR)
University staff (Computing, open sci, etc.) (people who can serve as local organizers and serve as local helpers)
Potential instructors (teach, etc.)
High-level management (provide us funding)
You can find a list of commonly advertised places in the bottom of the Workshop checklist template.
Director
The director manages the flow of the course, and in particular the flow when things do not go according to plan. During livestream courses, the director also manages the stream scene/audio selection.
Gives introductions and wrap-ups (to the days, sessions, and instructors), or at least ensures someone does them.
Ensures the learenrs know all they need to know to take part.
Thinks and presents all the other “extra things”, like other relevant courses and organizations, reminders to follow-up by asking us for help, and so on. (things that instructors could do, but are too busy to do).
Ensures good flow of the course overall
Is aware enough of the schedule so that they can decisively adjust it when needed.
Keeps time, ensures breaks
Actively discusses with and preps the instructors about these practical arrangements (e.g. negotiating best break times)
(livestreaming) Flips the livestream scenes when necessary, cues instructors.
Managing the schedule
The director manages the overall flow: making sure the instructors are ready, icebreakers happen, transitions are smooth, people are introduced, breaks happen, HackMD is shared at the appropriate times, and so on.
During large courses, there are many different instructors and certain exercises/lessons may randomly take longer (no matter how much preparation there is). The audience expects this, and in practice decisively accepting and adjusting the schedule (or deciding not to) makes things smooth.
The Director is usually the instructor coordinator, so knows the schedule well. The instructor should be empowered to decide (after checking chat, HackMD, and other instructors) what to do, and can directly announce the new schedule. This takes confidence, but don’t worry: you have plenty of people to consult with, ask advice from those around and then make your choice.
You should also make sure that HackMD is updated with breaks, exercises, and so on. You will probably be the one sharing HackMD during the breaks.
Switching scenes and audio
During a livestream course, various video inputs are mixed (screenshare, instructor gallery, title card, HackMD) and broadcasted. This gives one extra level of management that is needed: yes, it is more overhead, but the advantages are that the instructors can mute the livestream and have a private discussion. This is great for breaks and exercise times, and really helps with the flow a lot.
So, for example:
Start the course on the “title card”
Switch to gallery view for introduction
Switch to screenshare (and adjust PiP size) during teaching
Share Notes during the break and then make PiP size zero
Repeat for next courses.
The available controls include:
Audio: the audio capture can be turned on and off:
“Instructors”: the capture of the Zoom
“Mic”: this is the local microphone of the capture computer and should not normally be adjusted.
Scene selection: there is a button to select among these scenes
“Title”: graphics used before learners arrive
“Gallery”: instructors
“SS portrait”: capture of a portrait
“SS crop”: capture of a landscape screenshare, but crop only a portrait view out of it.
“SS landscape”: shrink a full landscape screenshare down to share it.
“Notes”: just what it says
Picture in Picture display: adjust size and layout of this
The size can be adjusted to fit the screen
To turn it off, make the size zero
The cropping can be adjusted based on the number of people in the Zoom display.
OBS remote control
The broadcaster will provide you with a URL to go to the remote control. TODO: picture
Go to the URL. It will allow you to adjust the stream. Getting trained to do this is not documented here yet.
See also
(none yet)
Broadcaster
This page explains the setup and how-to guide for the OBS broadcaster. This person manages the technical setup of OBS and thus the streaming. This person often is, but does not have to be, the Director who switches the scenes and manages the broadcast after it has started.
Role of the broadcaster
As the broadcaster, you manage the OBS application that captures Zoom and sends it to the world. This is different from:
The Director manages the scenes and the overall flow of the workshop (switches scenes, cues instructors when to start talking, shares HackMD during the breaks). This person is often the broadcaster, but for clarity we use more precise terms.
The Host is the interface between the instructors and the audience: e.g. announcing instructors, keeping to the schedule, etc.). They are very often the same as the Director.
The Instructors connect to Zoom and teach. If there is no designated director, at least one instructor needs to know a bit about that.
The broadcaster has a lot of preparation work to do the first time they get set up (future courses aren’t so bad). They should expect some panicked fixing of stuff right before each course starts. During the courses themselves, the broadcaster is mainly sitting back making sure nothing breaks.
Initial setup
Prerequisites:
A somewhat powerful computer dedicated for broadcasting (not used for teaching as an instructor, the broadcaster can use an instructor computer, but that is much more complicated).
Stable internet connection (speed is not too important these days).
20/5 download/upload Mbps is probably plenty good. 100/10 Mbps is far more than is needed.
Wired connections, rather than wireless, are better (WiFi, non-cellular uplink). However, you probably know your overall stability the best: you want a continuous, smooth connection without much jitter. However, OBS settings can be tuned to have a larger buffer to handle this (but that introduces latency in the broadcast).
Software installation:
Install OBS (Linux, Mac, Windows - this is a mass market product so there is good support)
Zoom (but you likely already have that)
Zoom setup:
Install Zoom. There’s not much you need to do differently.
Some Zoom settings:
General → Use dual monitors → yes. Despite the name, this gives Zoom two windows: one for the gallery view, one for the screenshare (or active speaker if there is no screenshare). You need two monitors plugged in, though, otherwise the mode doesn’t work.
General → Enter full screen automatically when starting or joining a meeting → false
Screen Share → Enter full screen when a participant shares screen → false (important)
Screen Share → Scale to fit shared content to Zoom window → true.
OBS setup:
Clone the obs-config repository. This contains some pre-made scenes which will set your OBS up for teaching nicely.
Import the latest TeachingStreaming profile (Profile → Import →
obs-config/profiles/TeachingStreaming-v*). This contains things like audio and encoder settingsTODO: this may need adjustment for your particular situation. At least things like file paths will need to be adjusted. Look at the obs-scenes readme for more information.
Most importantly, this sets it to 840 horizontal × 1080 vertical (portrait mode).
Import the Teaching_Streaming_ZoomCapture scene collection (Scene Collection → Import →
obs-scenes/scenes/TeachingStreaming-v*).You now need to configure some window captures, for example, you need to tell OBS which window has the gallery of all instructors in it. From the “Scenes”
In one of the scenes like
Screenshare, change the sourcesZoomMeetingCaptureto the window named ZoomMeeting, and the sourceZoomCaptureto the window named Zoom.In the scene scene
Notes, change theHackMDCapturesource to the notes window you are capturing(optional) In the scene scene
BroadcasterScreen: configure your local desktop capture.
Configure the audio
Settings → Audio → Desktop Audio → “Default” (or if you want, select an explicit device). This is what will capture Zoom by monitoring your speakers/headphones.
Note: prevent audio feedback! Be careful if you set this to speakers, and you have a separate computer which you use for teaching with a microphone that would hear those speakers: you would get feedback.
Settings → Audio → Mic/Aux Audio → “Default” (or whatever device you want). This would capture that computer’s local microphone, if you use it. (More likely, you would join the meeting as an instructor, and thus use a separate computer to speak to people)
From the main OBS scene, rename the audio devices:
Bottom panel → Audio mixer → one of the devices → gear icon → Rename →
Desktop capture to “Instructors”
Mic to “BroadcasterMic”
Configure obs-websocket (set the listening socket + authentication).
Tools → Websocket server settings → {Enable websockets server=true, Server port=4455, Enable authentication=true, Password=something}.
Begin the websocket proxy. This accepts incoming connections with SSL, filters to only allow known safe requests, and then forwards the connection to OBS. The password authentication is proxied to OBS, so there isn’t a separate password set here.
python3
obs_cr/websocket_proxy.py 127.0.0.1:4456 [other options]
Allow outside connections. On of these two:
Use ngrok to forward the connection (including SSL). Read more from the obs-websocket documentation: https://github.com/obsproject/obs-websocket/blob/4.x-current/SSL-TUNNELLING.md . Note that the free plan limits to 4 simultaneous connections and the connection information will change every time you restart, which is not great.
Configure your router/firewall to allow incoming connections to you IP address, on the port configured above. (it is this external IP address that you need to share with other instructors.
Verify the obs-tablet-remote connection (see TODO director-setup).
Share your IP address, server port, and password with your other instructors.
Before each day checklist
Set Twitch stream data: stream title, stream description, channel about page.
Configure and check streams
Test everything
Basic information private message:
* zoom info:
* zoom link:
* attendee hackmd:
* notes hackmd:
* live preview:
* control panel:
Before each broadcast checklist
Ensure anything from the above is done (obs-tablet-remote connection, scene layout, etc).
Ensure Zoom scenes are correctly captured, flip through them to verify.
Wait for first instructors to join.
Zoom: Disable sound on participants joining
In zoom, right click on a participant without video and “Hide non-video participants”. You may need three participants in order to do this: if you have fewer, join through a browser or something.
Make other instructors co-hosts in the Zoom so that they can share screen without the other person stopping.
(rkdarst, with controller): synchronize button lights with zoom/OBS controls
Start recording / start streaming ~20-30 minutes in advance, with audio muted and on the title card scene. Start recording at the same time as streaming so you don’t forget it!
Hand it off to the director (possible yourself) to flip the audio and scene once icebreakers start.
During the broadcast
You can not share screen with Zoom (it messes up the windows: screenshare becomes gallery, the old gallery window disappears).
Instead, there is a separate OBS scene for local screenshare.
But we recommend using a separate computer for broadcasting and instructing, to avoid this problem.
For the most part, the director does the scene switching (and you might be the director)
You don’t need to always be in front of the broadcasting computer, but be available in case there are emergencies.
Common problems
Internet connection goes down
OBS crashes While this happens somewhat often during testing, during live productions, when the settings are not being changed, it has never been observed. Set all settings in advance, and maybe quit and restart right before starting the broadcast.
Audio is capturing the wrong inputs, or audio quality is bad
So once when broadcasting, the audio quality was horrible. It turned out that the sound system got confused and the desktop audio capture (zoom capture) was actually capturing the microphone. This was not reflected in the OBS settings.
To solve this, go to the OBS settings (you can adjust most, but not all, settings while a stream/recording is ongoing). Flip the audio devices to “disabled”, then back to what it should be (possibly you need to save in between?).
It’s possible there are other times you need to adjust the audio.
I have HackMD open in view mode (to share) and HackMD open in edit mode (to edit), but OBS keeps switching to share the editable one. OBS seems to go by window title. Try this: Use a different browser, or run one of them in private mode (so that the title is different).
Broadcaster practice
Start OBS and import the scenes
Start Zoom and configure OBS to capture the Zoom windows.
Now we try to get the control panel working.
a. Clone obs-cr a. Run obs_cr/websocket_proxy.py with the right arguments
Get the local headless client working (this listens to signals and does stuff like run the xdotool command to resize windows or scroll notes.)
obs_cr/headless.py
Practice switching scenes
Practice making scene presets and switching to them
Practice scrolling the notes
Use your headphones to monitor the sound (audio advanced settings)
Include the music/jingle in the recorded video. Now remove it from the recorded video. (I found it’s better to leave it out because it affects transcription.)
See also
There is plenty about OBS and streaming online, since it is a big business now. You can find answers to most questions once you know the basic theory.
Video editor
The video editor takes the raw recorded files from the broadcaster, processes them, and uploads them to YouTube (or whatever).
Overall priorities
No learner (or anyone not staff) video, audio, names, etc. are present in the recordings.
Good descriptions.
Removing breaks and other dead time.
Splitting videos into useful chunks (e.g. per-episode), perhaps equal with the next one:
Good Table of Contents information so learners can jump to the right spots (this also helps with “good description”.)
Modern: livestream method
See also
The train-the-trainer course has a page giving a tutorial on video processing.
Modern livestream courses produce videos without any learners in
them. In this case, using
https://github.com/coderefinery/ffmpeg-editlist is sufficient. Look
at that repo for instructions. As an example, check out
https://github.com/AaltoSciComp/video-editlists-asc for some past
workshops. For example, kickstart-2022-winter.yaml is a
reasonable starting point to copy.
It’s our standard to have these videos on YouTube by the same evening the course is held. It may be hard, but it’s better to reduce the quality to make it happen quickly than wait a while to get it perfect (otherwise it might not happen at all).
The steps you should take:
Decide the total amount of time you will spend. Probably no more than 2hr per half-day of teaching, and even 1hr or 30 min is enough.
Acquire the raw video files. These aren’t usually made public, even though there’s not supposed to be anything private in it. The brodcaster will tell you how to access it. You can put the raw video file next to the .srt file to play the video along with the captions.
Open the .srt file. (it’s a text file, but using a subtitle editor is probably worth it)
It is usually in the video-processing repository.
You don’t need to make it look perfect. It should look useful. Grammar/spelling doesn’t matter that much. The times when Whisper stops including punctuation don’t matter so much.
I usually correct unix commands (search dash, hyphen, minus, dollar, space) for example. A learner is likely to try to read or copy these from the subtitles, even if they are in the video itself.
All names should be replaced with [name] (including instructor names). This is probably done before you got the .srt file, but you can check.
Push it to git.
Create the editlist in the .yaml file.
The .yaml file should be pre-created and is usually in the course website repository or video-processing repository.
If it’s not pre-created, see [ffmpeg-editlist](https://github.com/coderefinery/ffmpeg-editlist/) and [this example editlist.yaml file](https://github.com/coderefinery/video-processing/blob/master/python-for-scicomp-2024/python-for-scicomp-2024.yaml).
Make sure the session is there and has proper descriptions
Set the overall cut points for each session, break, and exercise (these are relatively easy to find)
Set timestamps for each new episode/section
Set timestamps for other important things learners may want to quickly find (important configuration, introducing exercises, etc.)
If you want, you can try generating the final videos yourself. But the video uploader is likely to do this themselves anyway. Some commands below:
First, arrange files: compared to
$PWD, raw files are inraw/*{.mkv,.srt}, and output gets written toout/. The .yaml editlist file can be in$PWDor somewhere else.First, run in check mode (
-c) and limit to outputs matching day1 (-l). This will report any major errors. If this passes, it’s good enough For me to take over. Look at .info.txt files to see if the description looks OK.$ ffmpeg-editlist ~/git/2025-03-25-workshop/video-editlist.yaml $PWD -c -l day1 --srt
You can run and generate .mkv files, but don’t re-encode (first few seconds are messed up). You can see if .mkv looks roughly correct:
$ ffmpeg-editlist ~/git/2025-03-25-workshop/video-editlist.yaml $PWD -l day1 --srt
When it’s all done, run with
--reencodeto create final files (you don’t need to upload, video producer will regen):$ ffmpeg-editlist ~/git/2025-03-25-workshop/video-editlist.yaml $PWD -l day5 --srt --reencode
Push the .yaml to git and push the new .srt file via git.
Tell the main video manager it’s done and they will check, encode, and upload to the respective places.
If the learner Zoom is recorded
If learners may be in the recordings, they need detailed checking before they can be posted. See Video checking OLD for the preparation work and Video editing OLD for the processing work.
In practice, if things are recorded this way, they are almost never released because it is too much work and it never gets done.
Editing hints
https://mpv.io is a command-line video player.
Hotkey
O(capital letter O) to turn on time display permanentlySeek with left/right (~10 sec) or up/down (~ 1 minute)
Run with
--hr-seekto seek exactly, not to keyframes
https://github.com/Kr4is/mpv-copy-time - mpv script that lets you copy video times with a hotkey. You might want to edit the hotkey by editing the script.
How to run ffmpeg-editlist:
first with –check
then with no other
then –reencode
Tips for transcript editing
The transcript doesn’t have to be perfect, just useful. Gramatical errors don’t really matter much, but things like command line commands that are off might be useful to fix. These are ideas to search for that may give you ideas for what to edit, so you can avoid reading everything:
Any names
dash, dollar, hyphen, minus, slash
Workshop organizers
Everyone can be part of the workshop organizing team. But we are mostly looking for help from the community for team leads, expert helpers and instructors.
If you want to help ‘in the background’, join the #workshops and
#coderefinery-tools-workshop channels in the coderefinery Zulip
chat and see what is planned.
There is a lot of roles to fill already before the actual workshop, as well as after:
Our latest best practice is to use this Workshop organizer plan / “cheatsheet to track who teaches when and where. Make a copy for the course and share with everyone, expect everyone to keep it up to date as their preparation progresses.
See also
Instructor introduction
This page gives general instructor information: the starting point on your journey.
What’s it like as an instructor?
We teach online, livestream, and with co-teaching. That means the lesson is a conversation between two instructors, instead of one person alone and many students. It’s especially easy to get started this way: co teach with someone experienced!
You can see a demo of what livestream co-teaching is like here: https://youtu.be/WjmttAniZX8?t=3 (15 min, many different scenes).
Starting materials
Read the material in the left sidebar, especially under “Instructor tools and practices”.
Reading elsewhere:
Practice session:
The instructor experience
Most of our workshops are very collaborative arrangements: you are rarely alone. This is one way of looking at it:
Divide up the lessons. There is a primary (overall makes sure it happens) and secondary (equally active, but not with “ultimate responsibility”) assigned to each lesson. We try to have at least one person experienced with the lesson.
Have a chat with someone else (probably another instructor or expert helper) before teaching. We encourage this for everyone, even experienced instructors, to better transfer knowledge among each other and stay up to date with the latest developments.
Install the CodeRefinery software environment (so you can test the same way as learners).
Go over the lesson: read everything, and do all the examples. Hopefully, this is relatively fast (remember, learners at at least 5x slower than you, so you can’t teach that much).
Most importantly, update any examples that don’t work with the CodeRefinery environment. Common problems include: Github or software changing something.
Make anyy other changes that are needed. See the hints in the lesson development section, but in general want minimal changes: most things exist for a reason. It’s a big try to try add in more stuff that is missing: there is hardly time for everything in there already, stuff is usually left out for a reason.
It usually helps to do one full run-through with your co-instructor. (In fact, if you do one run-through, that’s usually all you need!)
Do a livestream practice session, if this is new to you.
Teach together! It won’t be perfect, but that will help to keep the attention and make it seem like a “thing”. Adapt as needed - we are around.
Main vs breakout sessions
As an instructor, when preparing your lesson you first need to decide how to balance between the main room and breakout sessions.
Clearly say when a learner watches, when they type along, when they should work on something independently as an exercise.
CodeRefinery is traditionally a hands-on workshop, so exercise sessions should be a large part of the workshop. Usually, it’s good to try to minimize talking and let people get to the exercise sessions as soon as possible. The written material should support this.
We usually keep the main room mostly for general discussions. Small exercises or polls can also be done in the main room, for all hands-on exercises we divide the learners into breakout-rooms each with one team leader.
To give you an idea about how the work in the exercise sessions is going, monitor the Notes closely and if time allows try to visit a few breakout rooms to see how it is going and if needed adjust the timing.
Preparing for the breakouts (in the main room)
As an instructor, you need to clearly define what the tasks of each exercise session is (even if it is just “explore and discuss”). Online courses need more “meta talk” about how you expect things to go, since it’s not as easy to read the room or fill in expectations later (distractions, hard to communicate to breakout rooms after opened).
Clearly say what the tasks of the breakout session will be.
Put that task and a link to the part of the lesson in the hackmd.
Clearly say how long each breakout session will be (make sure it’s long enough and adjust during the exercise session if needed)
Clearly say if things in the future will depend on this exercise (is someone completely lost if they don’t make it to the end. Halfway?)
Try to make breakout sessions longer:
imagine a 5 minute overhead for each session, getting people there, deciding who does what, acquainted with what they need to do, and debugging problems.
10 minutes is quite short (5 min figuring out what to do + 5 min doing), so 20 minutes is best.
Can you say less and let people discover it for themselves?
As a team leader, if anything is unclear to you, it is very unclear to others. Comment/Ask in the HackMD or speak up and ask!
Top issues new instructors face
An example of a beautiful screenshare. Note the portrait orientation (you have half the screen free for notes and HackMD, learners have half the screen free to do their own work). The terminal is dark-on-light, a minimal prompt, no other fancy shell distractions, there is a shell history visible, and slightly distinct colors between the web browser and the terminal.
Breaks are not negotiable, minimum 10 minutes.
Breakout sessions too short. Make them as long as possible, don’t expect to come back for new intro, then go back.
People will accomplish less than you expect. Expect learners to be 5 times slower than you, at best!
All the other tools and stuff will go wrong. Try to not bring in a dependency when you don’t need it.
Trying to accomplish too much: it’s OK to cut out and adapt to the audience. Have a reserve session at the end you prepare, but are ready to skip.
Not clearly separating (in the learner’s mind, by meta-talk), the differences between demo, type-along, and exercise/exercise-prep.
Demo and type-along are hard to do at the same time: they are very different types of focus
Type-along and exercise of the same thing are not good to combine, leads to duplication
Explaining how, but not why.
Running out of time to making your environment match the learner’s.
Running out of time to set up good screen sharing practices (terminal history, portion of screen, remote history) in advance.
Assuming learners remember what they have already learned, or know the prerequisites. Or have stuff installed and configured.
Not managing expectations: learners think that you will accomplish everything, and feel sad when you don’t. Instead, say explicitly what everyone should follow along, what you might want to watch, what is only a demo.
Following the lesson as written at all costs.
For livestream courses:
Worrying too much (forgetting that there is a co-teacher and break time where you can discuss and plan your next step).
Speaking like learners should be able to speak up with voice, instead of “answer in HackMD or discuss within your groups.”
Forgetting to save time for Q&A: there is more Q&A because of HackMD. You might take a few minutes to screenshare HackMD and after each exercise session, after each break, after each episode, and at the end of each day.
“Stop screenshare” instead of letting the other person start and take it from you. Or, the broadcaster switching the scene. Never do “stop screenshare”.
Forgetting to screenshare the HackMD during Q&A time (this is the most important way learners know it is active, and thus feel a connection to the course).
Forgetting there are multiple ways to attend: not everyone is in a breakout room, not everyone has helpers nearby. Instead, use phrasing such as “for those of you in breakout rooms, go there now. Everyone, remember to ask any questions in the HackMD, even if you are alone.”
Planning to do a demo during team breakout sessions (teams will still hear your voice, if they mute the stream it’s hard to bring them back).
Not planning screenshare in advance.
Showing non-creative-commons material on the stream.
Instructor kickstart program
This page describes the instructor kickstart program, if you are a brand new co-instructor wants to jump straight in. The material is in the left sidebar.
Other background information
The CodeRefinery instructor training is a longer version of this that is more about the philosophy and has less concrete practice. You don’t need to read this right now. This page has the basic sessions that new instructors should do to prepare.
Session 1: General motivation (1hr + 2-3 day follow-up)
This happens well before the course, as early as practical. It’s the broad introduction to the instructor experience and motivate you for the rest, and will start you off with steps to prepare
Who should attend: brand new teachers who haven’t taught before, and anyone who wants to come support them. Attendance not mandatory.
Preparation: Generally have an idea about the CodeRefinery teaching style (have watched a course before, or maybe seen this 15-minute video with examples.
We will:
A motivational meeting about what it’s like to be an instructor. Here the inside story from someone who’s done it.
Go over the various material that you should read yourself (hear at least one person’s own opinion on it)
Q&A and discussion about what happens on your path to being an instructor.
Follow-up:
Read everything in the instructor section of the manuals (left sidebar of this site).
Read the lesson review checklist material (left sidebar).
The workshop coordinators will help find the co-instructor teams for each lesson.
Begin working with your co-instructor on preparing the lesson, deciding how you want to teach, etc. Team teaching, Teaching plan. (If this is your first time, hopefully your co-instructor takes the lead on any possible lesson changes. Try to avoid changes though!)
Ask your co-instructor for their advice on becoming a new instructor and to mentor you.
Meeting 2: Team teaching practice (2hr + 2-3 day follow-up)
This happens a few weeks before the course. This is focused on introducing exact team teaching mechanics, getting used to team teaching, and preparing a lesson for teaching (teaching plan, lesson maintenance). There will be some roleplay about the teaching, which will make the teaching smooth and remove your stress.
Who should attend: Anyone new to CodeRefinery teaching (and I’d recommend each instructor attend this multiple times, if nothing else to help practice with new teachers). New instructors really should come (“mandatory”) for your first two workshops: Experienced instructors: optional but you will help mentor new instructors if you come.
Preparation:
Read Team teaching (important)
Read Teaching plan (less important)
More optionally, read Teaching via livestream and Instructor screenshare.
We will:
Go through the team teaching practice exercises.
The purpose is to practice with a co-instructor and go through the basic mechanics.
Most practice is with very simple toy problems (e.g. “make a git repo”), so extensive lesson preparation isn’t needed.
It may or may not include some livestream practice (usually not).
Discuss, now that things are coming close, how to divide up a lesson for co-teaching.
Talk about how the prep is going in general.
Follow-up:
Finish all the lesson preparation. Hopefully it’s more clear how team teaching can work.
Practice team teaching with your co-instructor (ideally a full run-through).
Get all the instructor tech setup done (everything from the sidebar, in particular see Instructor checklists).
Ask the instructor trainer (or anyone else) advice on the lessons.
Meeting 3: Livestream practice and final check (1-2hr)
This is the “final check” for livestreaming, and answering any final questions about procedures.
Who should attend: All instructors should attend one of the “final prep” events, unless you are beyond sure that you and your co-instructor are ready and you discuss with the instructor coordinators. Attendance to one of the options is mandatory for all instructors (but ask and we can arrange an alternative time for you).
This happens a few days before the teaching, usually one before week one and one before week two.
Preparation: Make sure all the instructor technical setup is done (computer setup, audio, screenshare), so you can get final feedback on your exact setup. All the final checklist stuff.
We will:
Final check of tech setup (screenshare, audio, etc.)
Go through the livestream mechanics teaching practice exercises.
Do a whole test with your computer + practice the livestream.
You may practice the first 5 minutes of your lesson, going to a break, last 5 minutes, maybe a Q&A. Whatever we have time for.
Answer any final questions and give people confidence to present.
Follow-up:
Improve any problems with your technical setup (screenshare, audio, etc.) that you found.
Final prep with co-instructor.
Teach!
Relax, it’s not so hard. You have a huge support network for anything that may go wrong, and will get continual feedback even during the course. You only need to get as far as the first exercise, then there’s a break and you can breath before the next section.
Instructor checklists
Check with someone before you start teaching
Most importantly, get your setup done well in advance and show your co-teachers for feedback. Feedback and time to improve is very important to make things beautiful.
Lesson revision checklist
If your team also maintains the lesson material, see if there are any updates to be done. You shouldn’t do major revisions every time, but it’s good to see if there is any minor maintenance. See the lesson development section, Lesson review checklist.
Team teaching checklist
See Team teaching
Write down the episodes you will teach
Choose a model (guide/demo-giver, interviewer/expert, teacher/student) for each episode
Choose a primary for each episode
Primary does major lesson review and prepares for teaching
Secondary also reviews material and prepares for teaching
Make a Teaching plan to an appropriate level of detail.
One run-through before the course
Final checklist
Have you moved your configurations away and done the course setup instead (or left it unconfigured)?:
.bashrc(or equivalent),.gitconfig,.ssh,.conda, etc.Are you using a software environment as described in the workshop instructions (conda, virtualenv, etc). Is it clean and without extra stuff installed?
Is your setup as boring-looking as possible, if you are teaching at the beginning of the workshop? The first sessions aren’t the time for distractions. (Instructor computer setup)
Is your terminal (Instructor computer setup)
Dark text on light background? (if not: create a profile so you can switch now or in the future)
Do you know key-bindings to change the font size quickly?
Do you have command history set up? If in doubt, use prompt-log and
tailthe output in a separate smaller window. (Instructor computer setup)Do you have a clean web browser session (different profile for demos)? (Instructor computer setup)
If you use an advanced shell, do you have a simpler shell (bash) set up for the demos? (Instructor computer setup)
(if online) have you practiced Zoom screensharing “Share a portion of the screen” in portrait-mode? See Instructor screenshare.
(if online) have you checked your audio settings (Instructor audio)? Join a test meeting with someone and understand your microphone sound adjustments. Can you control it for the full range from very quiet to very loud, so that you can make whatever adjustments needed? Is your best microphone/headset ready? Audio quality and balance is critical.
Have you shown your setup to someone else for feedback?
Instructor computer setup
Appearance matters. When you look at other professionally made videos online, they look good. As a presenter, you also need to work to make your screen look pleasing to the eye. It also has to be similar to a learner’s screen, so that they are not distracted with your different configuration or appearance.
You don’t want a complex setup to distract from teaching. Boring is better. Set this up before the test session to get feedback.
Simple or fancy screen?
As a teacher of tech, you also need to make sure that your screen supports the learning process: you have conflicting goals of:
Making your screen look simple, to not distract from what you are trying to teach, and
Showing more advanced setups, so that others can learn and improve.
In general, try to use a simpler arrangement at the beginning of workshops. You, or other teachers, can begin showing more advanced screen layouts once learners are able to see what is important and what is extra.
Clean your environment
Do you have fancy .bashrc, .gitconfig, etc files? Move them
away so that you are as plain and normal as possible - beyond
appearances, you don’t want to use any shortcuts that every learner
won’t have access to (telling learners to add some configuration won’t
work - some will miss it and be lost, or worse their system may have a
weird behavior in the future).
Relevant files that are sometimes a problem:
.bashrc.gitconfig.ssh/config,.ssh/authorized_keys.conda/*Any config for any program you will be demonstrating
Arrange your windows well
This is mostly the topic of Instructor screenshare (our recommendations for in-person window arrangements aren’t so up-to-date, but the same principles apply but you have a widescreen view).
For online teaching, you will want to screenshare a portion of your screen: half the screen in “portrait mode” so that the other half is available. See Instructor screenshare.
Desktop environment
Is your overall desktop environment “normal”-looking?
Do your window title bars take up lots of space? Is it possible to reduce their size for the teaching - you want as much space for large fonts as possible.
Since you will only be sharing a portion of the screen, or have a lower-resolution projector, these title bars take up more space relative to the content.
Same for desktop menu bars, etc.
Do you need to go into light-mode theme? Dark text on light background is much better than dark mode, so it is strongly recommended to do this.
Can you easily resize your windows for adjusting during teaching?
Web browser
Are you doing a lot in a web browser? Consider making a separate profile that is just for demos.
Install whatever basic safety extensions / ad blockers are most relevant, but keep it simple otherwise.
Can you turn off unneeded menu- and toolbars?
Does your web browser have a way to reduce its menu bars and other decoration size?
Firefox-based browsers: go to
about:configand setlayout.css.devPixelsPerPxto a value slightly smaller than one, like0.75. Be careful you don’t set it too small or large since it might be hard to recover! When you set it to something smaller than 1, all window decorations become smaller, and you compensate by zooming in on the website more (you can set the default zoom to be greater than 100% to compensate). Overall, you get more information and less distraction.
Terminal
Terminal color schemes
Dark text on light background, not dark theme. Research and our experience says that dark-text-on-light is better in some cases and similar in others.
Make a dedicated “demos” profile in your terminal emulator, if relevant. Or use a different terminal emulator just for demos.
You might want to make the background light grey, to avoid over-saturating people’s eyes and provide some contrast to the pure white web browser. (this was an accessibility recommendation when looking for ideal color schemes)
Do you have any yellows or reds in your prompt or program outputs? Adjust colors if possible.
Eliminate menu bars and any other decoration that uses valuable screen space.
Clearing the terminal
Don’t clear terminal often (or ever - un-learn CTRL-L if possible). Learner’s can follow as fast as you! More people will wonder what just got lost than are helped by seeing a blank screen. Push
ENTERa few times instead to add some white space.
Terminal size
Font should be large (a separate history terminal can have a smaller font).
Be prepared to resize the terminal and font as needed. Know and use keyboard shortcuts for changing the font size when you need to show more columns (it’s also OK if the terminal is wider than your screen if most of the right side is not that important to see). You can have a larger font normally, and make it smaller and the terminal wider when you have long lines that learners need to see.
Prompt
Your prompt should be minimal: few distractions, and not take up many columns of text.
Learners have to read your prompt quickly, understand what you entered, copy it, all the while not being distracted by everything else or your screen. Day 1 git-intro is not the time to have your fancy git-bash prompt, instead show them how to use git to get that information. Set an easily-viewable prompt.
prompt-log(see the next section on command line history) does this for you.The minimum to do is is
export PS1='\$ '.Blank line between entries:
export PS1='\n\$ '.Have a space after the
$or%or whatever prompt character you use.Strongly consider the bash shell. This is what most new people will use, and bash will be less confusing to them. (Later in workshops, using other shells and being more adventurous is OK - learners will know what is essential to the terminal and what is extra for your environment).
Command line history
You need to find a way to show the recent commands you have entered, outside of your main window, so that learners can see the recent commands.
Consider prompt-log by rkdarst (https://github.com/rkdarst/prompt-log/). It adds a interesting idea that the command you enter is also in color and also provides terminal history before the command returns (see below).
Arrange two terminals, so that there is the main work window and the history window with a font smaller size - the history can be off to the side.
See the following screenshot for an ideal arrangement:
S10: HPC Kickstart course. Note the colors contrast of the windows and colors of the prompt and text. The history is smaller and doesn’t take up primary working space. The working directory is in the window titlebar.
Instructor screenshare
You have to assume the smallest screen from learners and plan for that. You should share a portrait screen: either a portion of your screen, or one window in portrait mode. See the examples below.
Learners have a small screen, and need room for their own terminals and web browser open, too. A big screen or multiple monitors is the special case.
Sharing a 1920x1080 screen is not a good idea: you need to make all the text size large so that learners can scale it down to have room to do their work. Pixels are wasted. Instead, force yourself to save space by using a normal font size but sharing less of your screen.
Zoom now has a “share portion of screen” (Screen sharing → Advanced → Share a portion of the screen).
For livestreaming, our aspect ration is 840×1080 (portrait). This is a bit less than half your screen. This is 43% of the width of your screen and the full height, for a standard FullHD screen.
When streaming/recording: Never stop sharing a screen, ask someone else to take it over, or wait for the view to switch to Notes. When you stop screensharing, the window reverts to “gallery” or “active speaker” view which appears directly on stream, which isn’t ideal.

This image can be used as a desktop background to align “share portion of screen”. The lighter grey part is what can be shared at our portrait-mode ratio. Beware and adjust if the title bar covers part of the light grey area.
Screen share examples
These are layouts of the actual screen or portion of screen being shared:
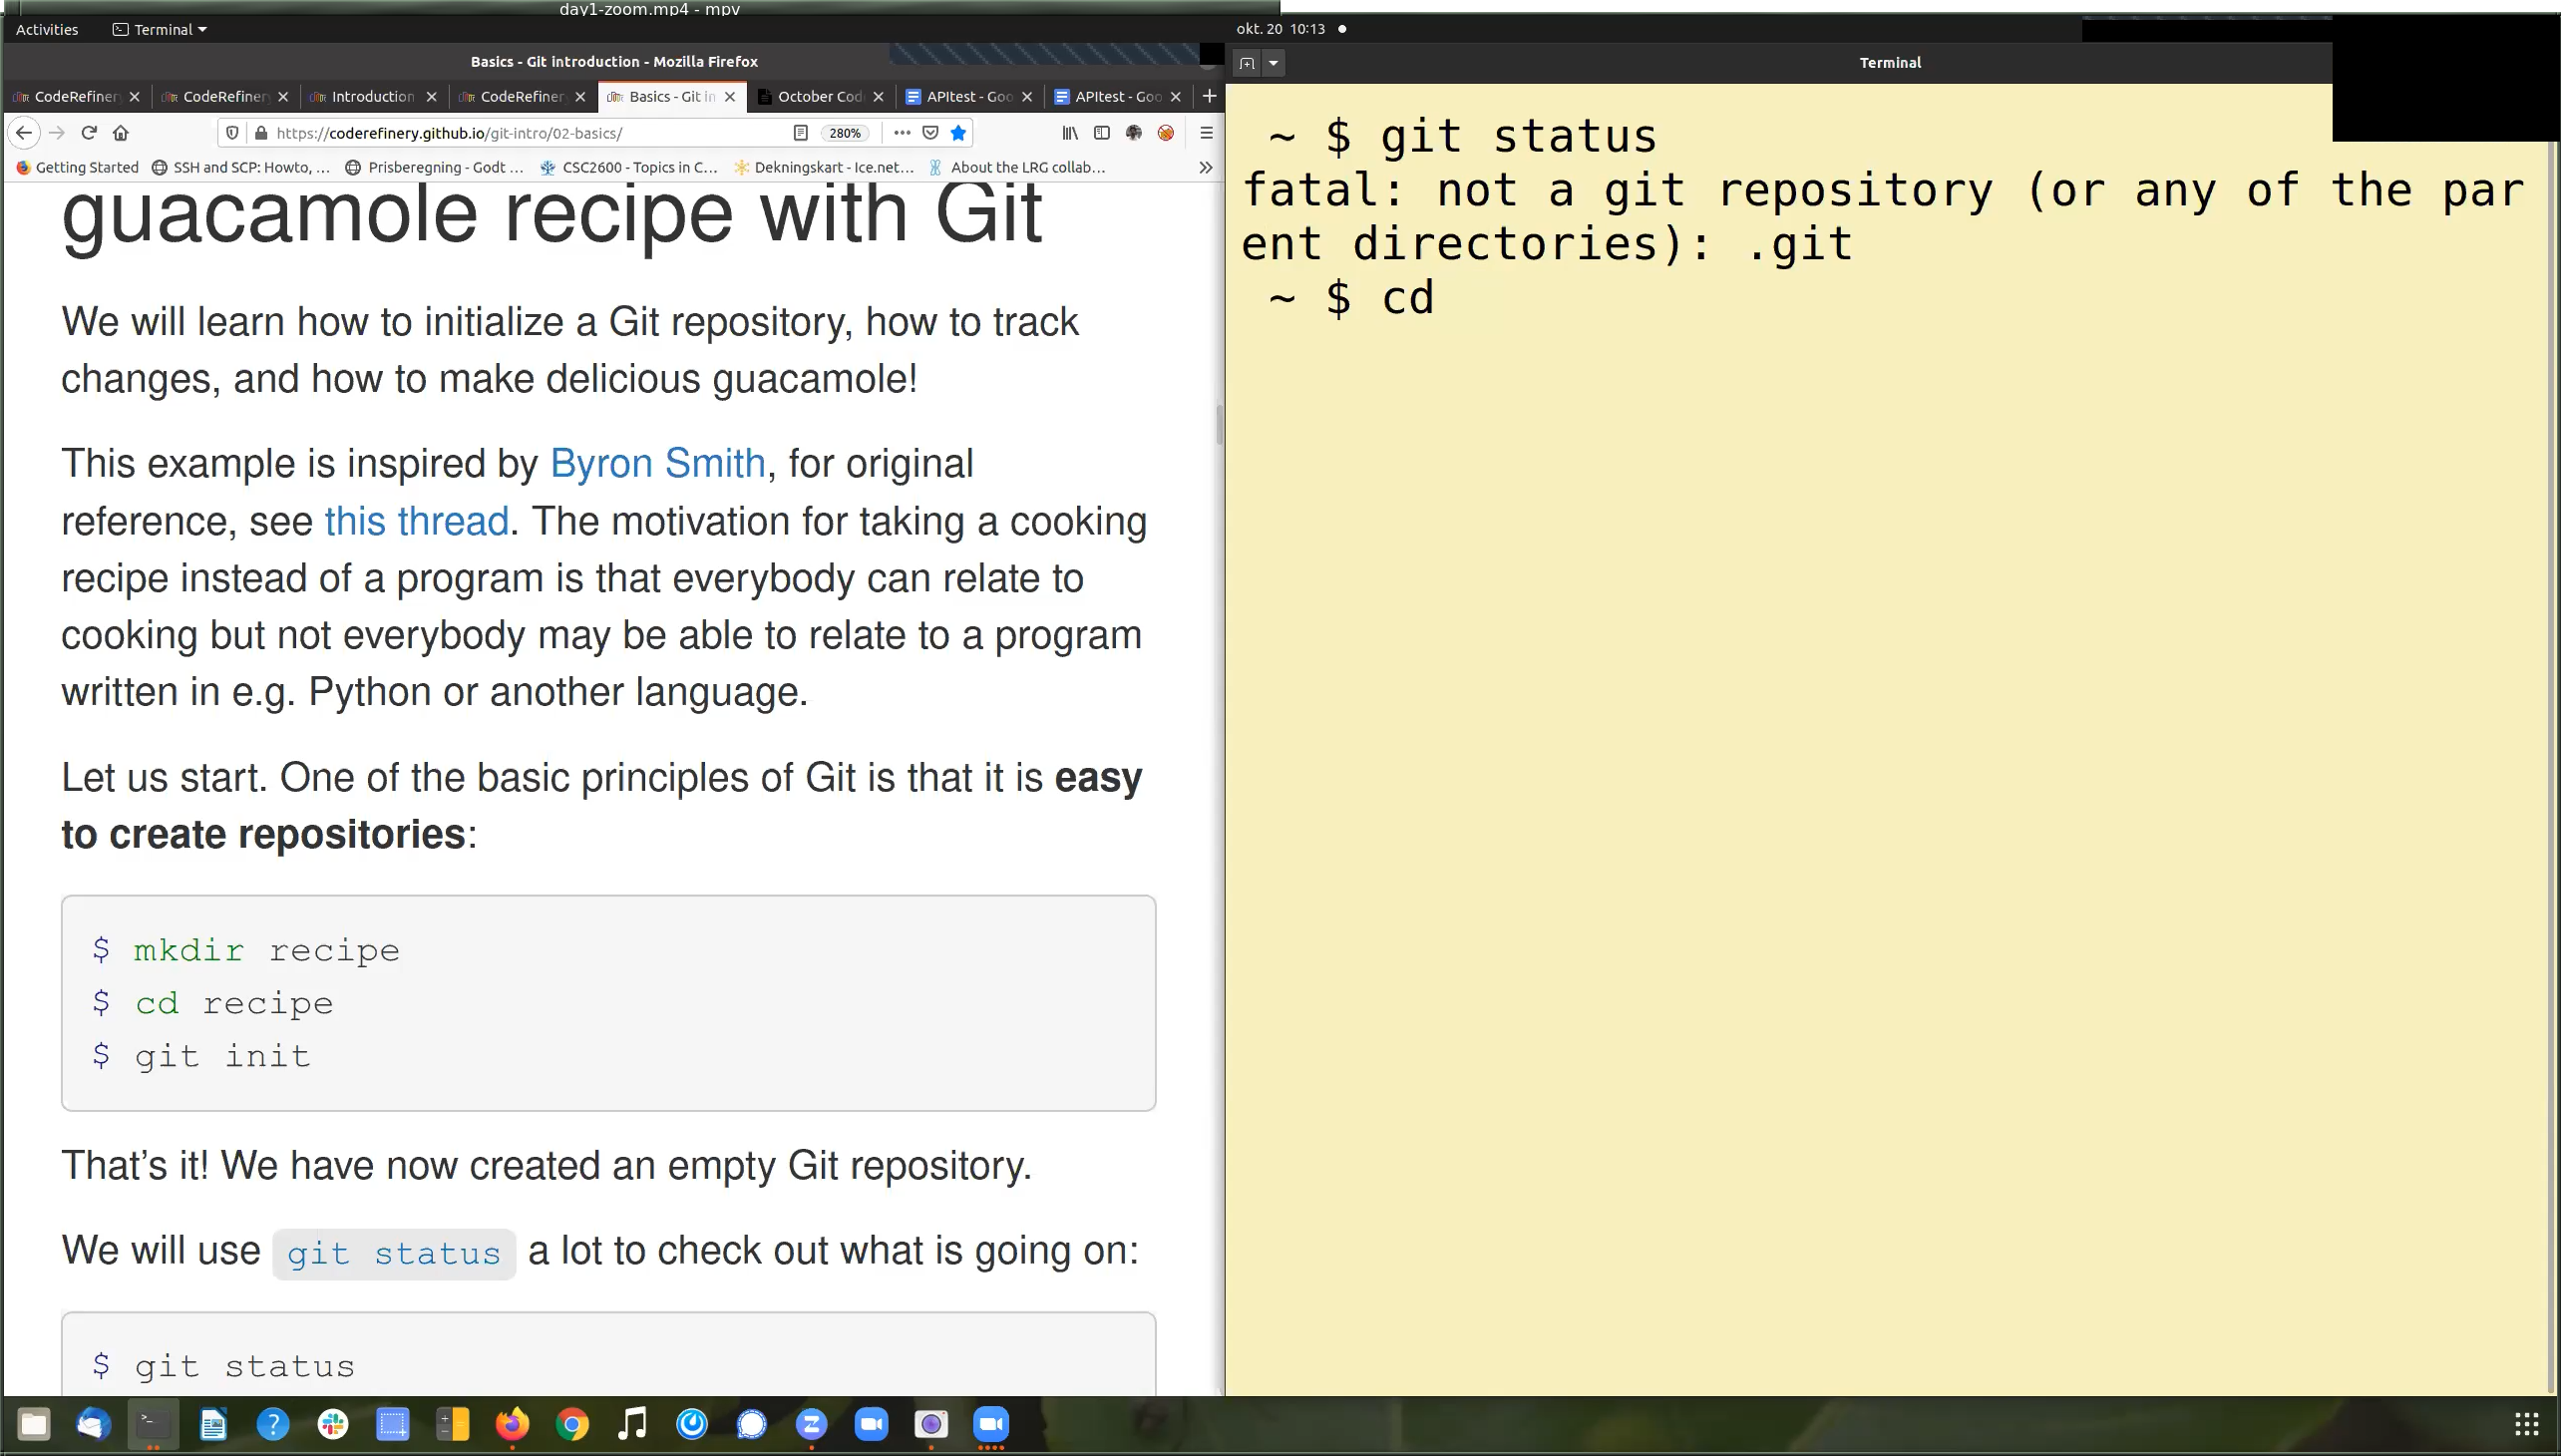
S1: A FullHD 1920x1080 screen shared.
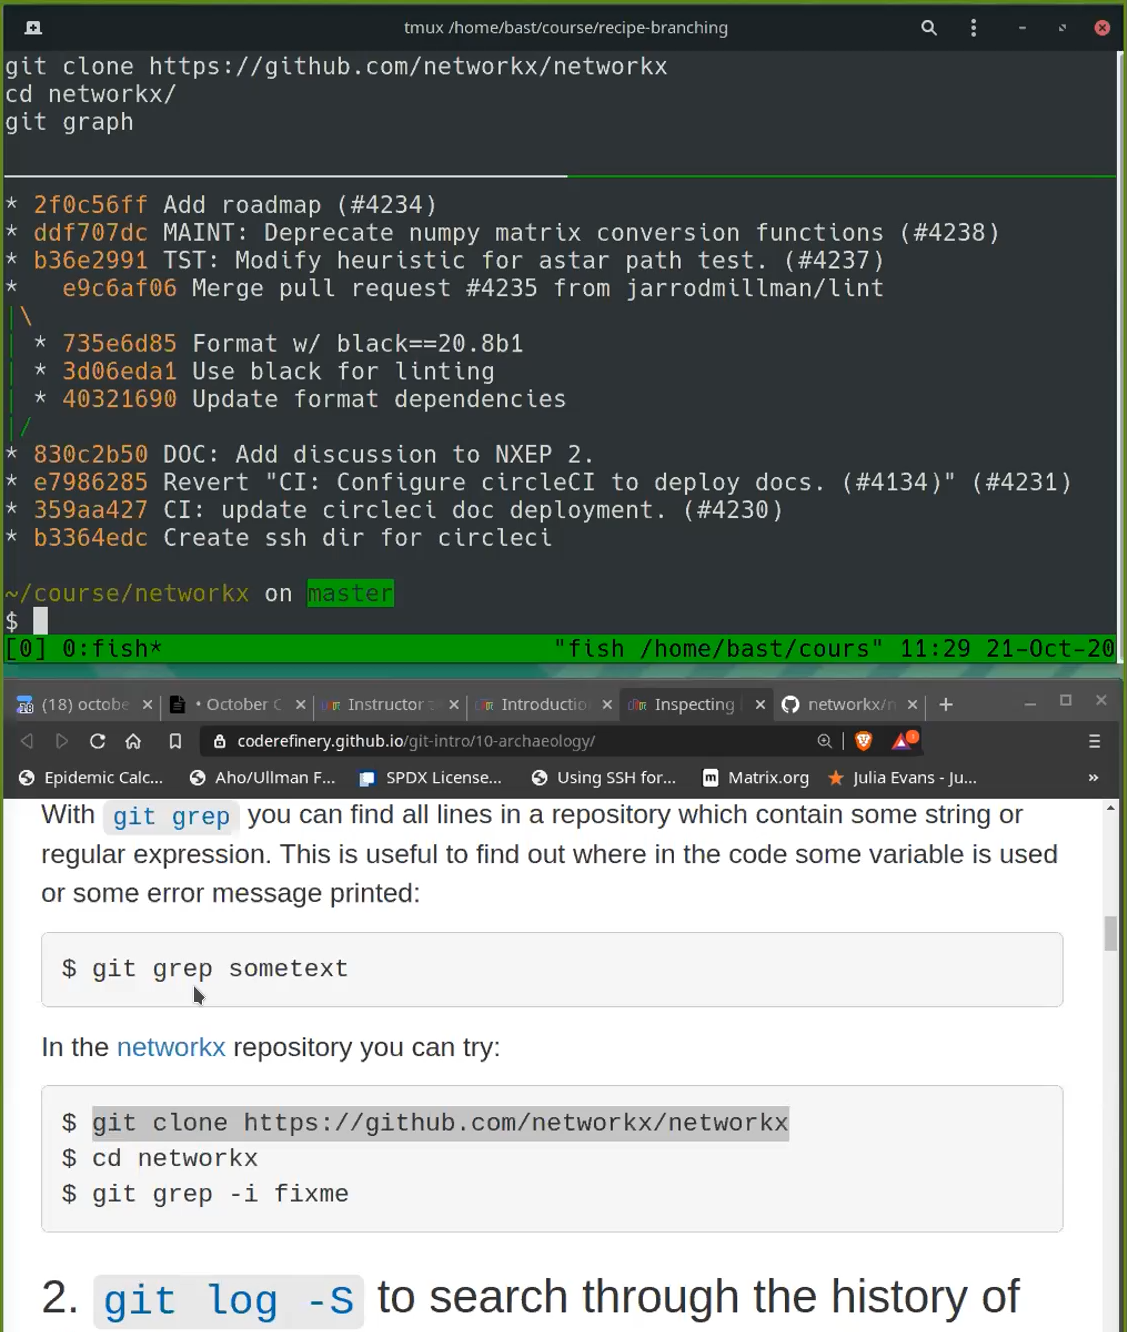
S2: A vertical screen layout shared. Note the extra shell history at the top. The web browser is at the bottom, because the Zoom toolbar can cover the bottom bit.
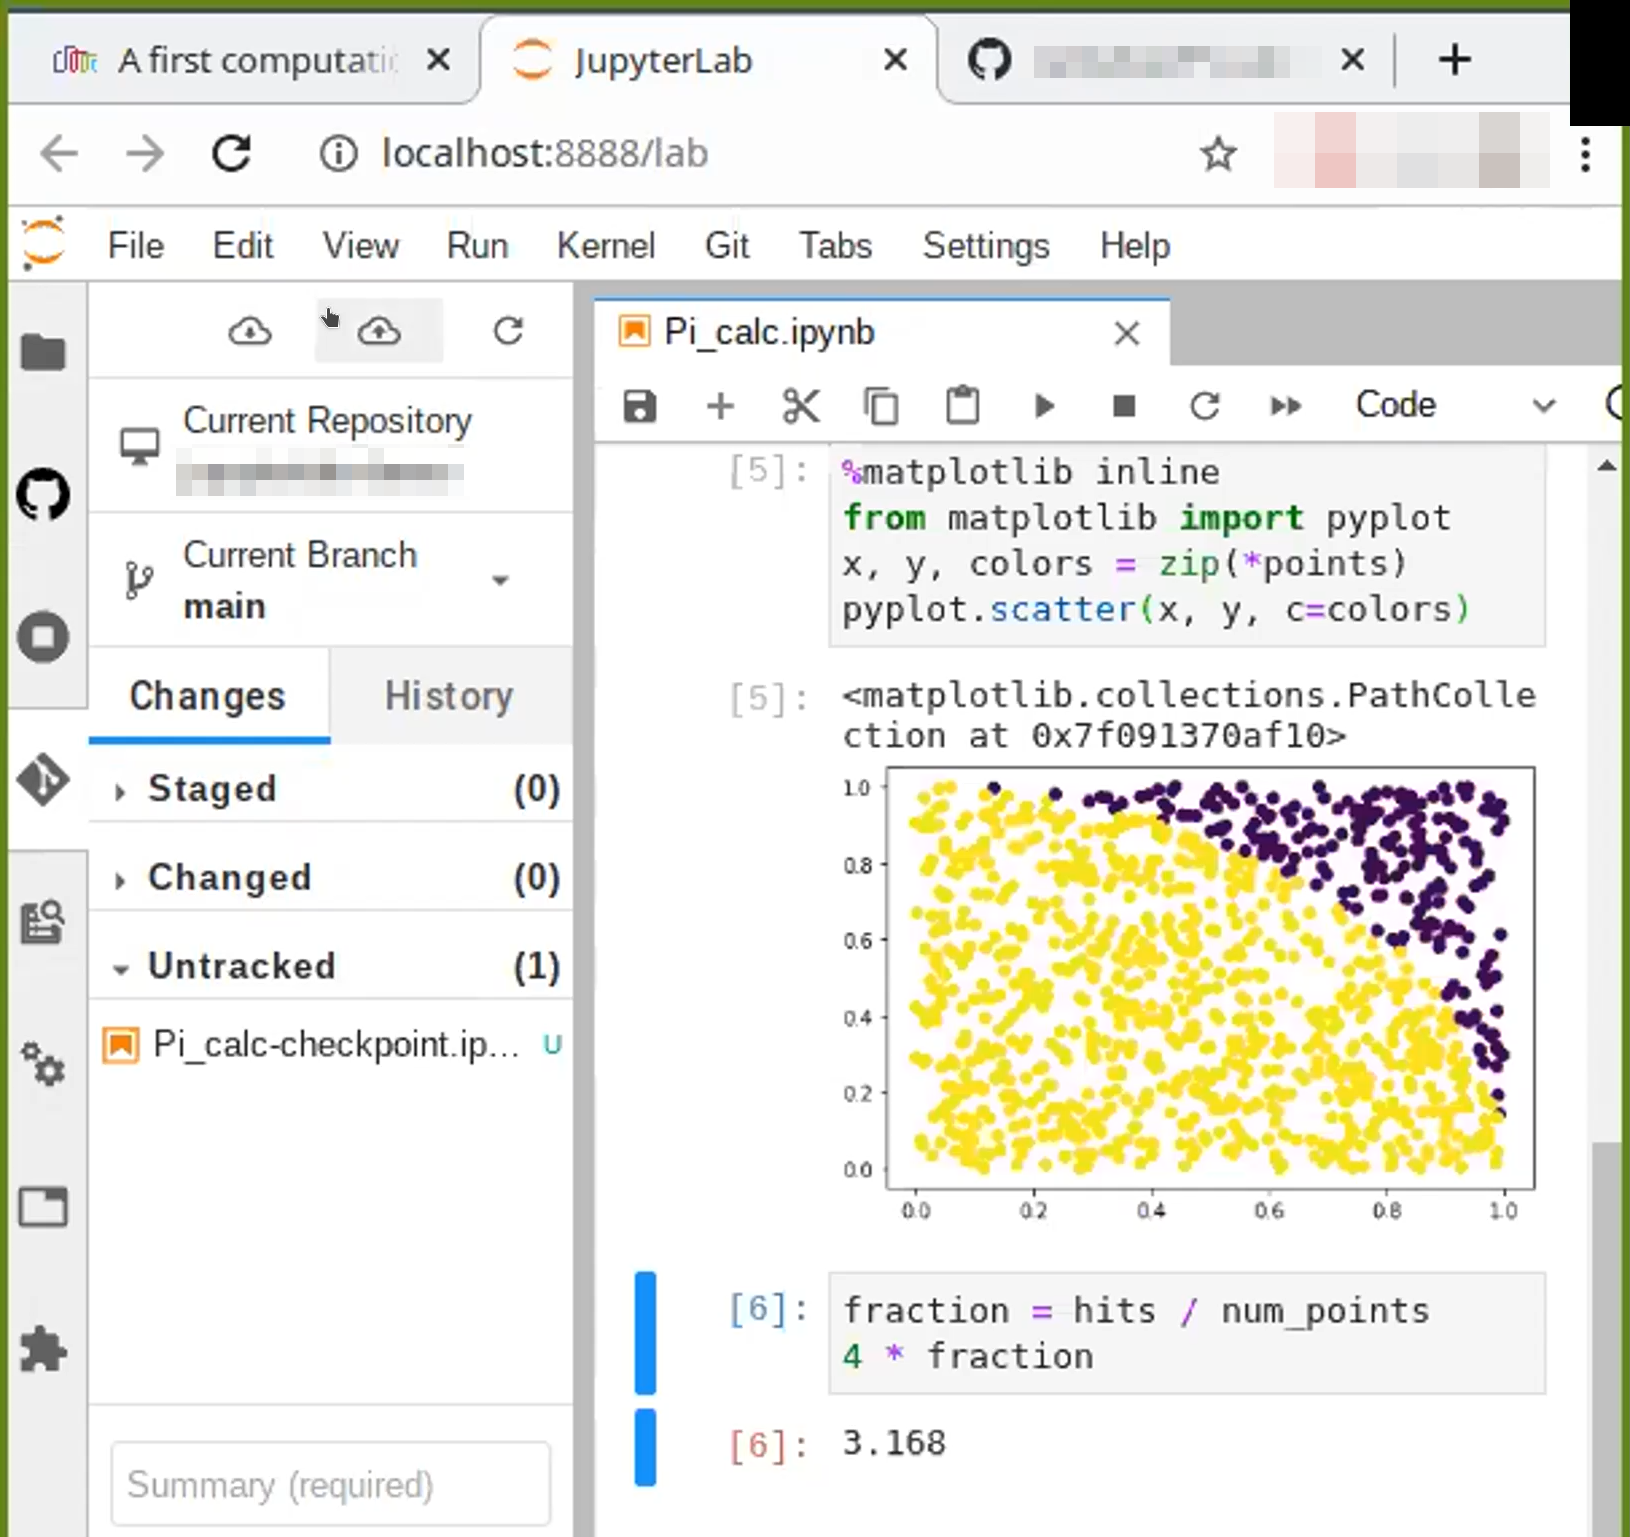
S3: A sort-of GUI (Jupyter) shared vertically.
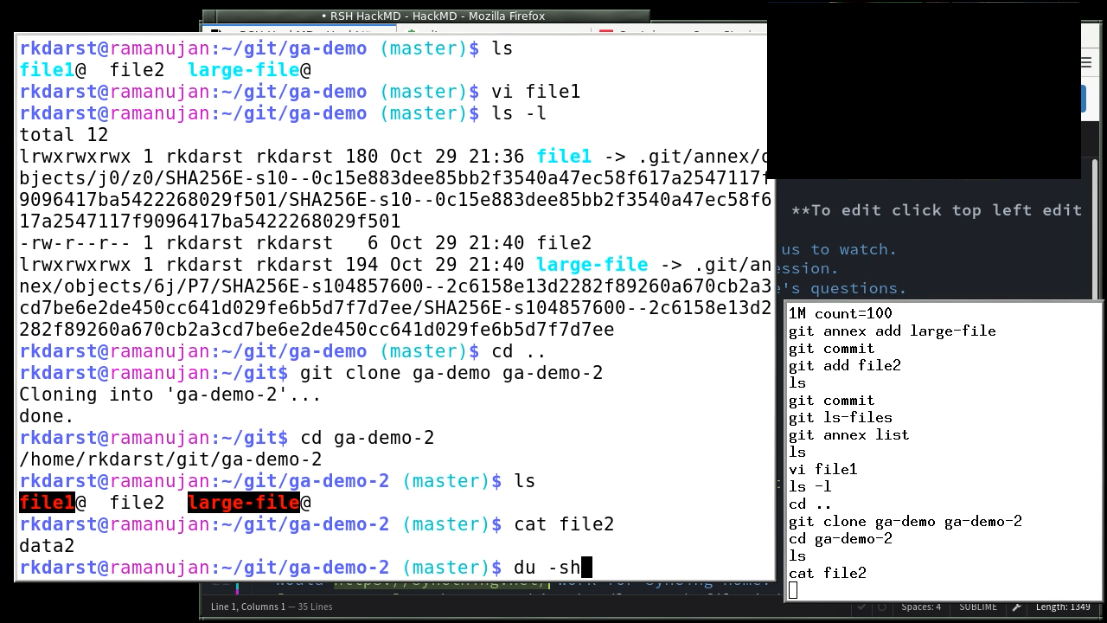
S4: This isn’t a screenshare from CodeRefinery, but may be instructive. Note the horizontal layout and shell history at the bottom right.
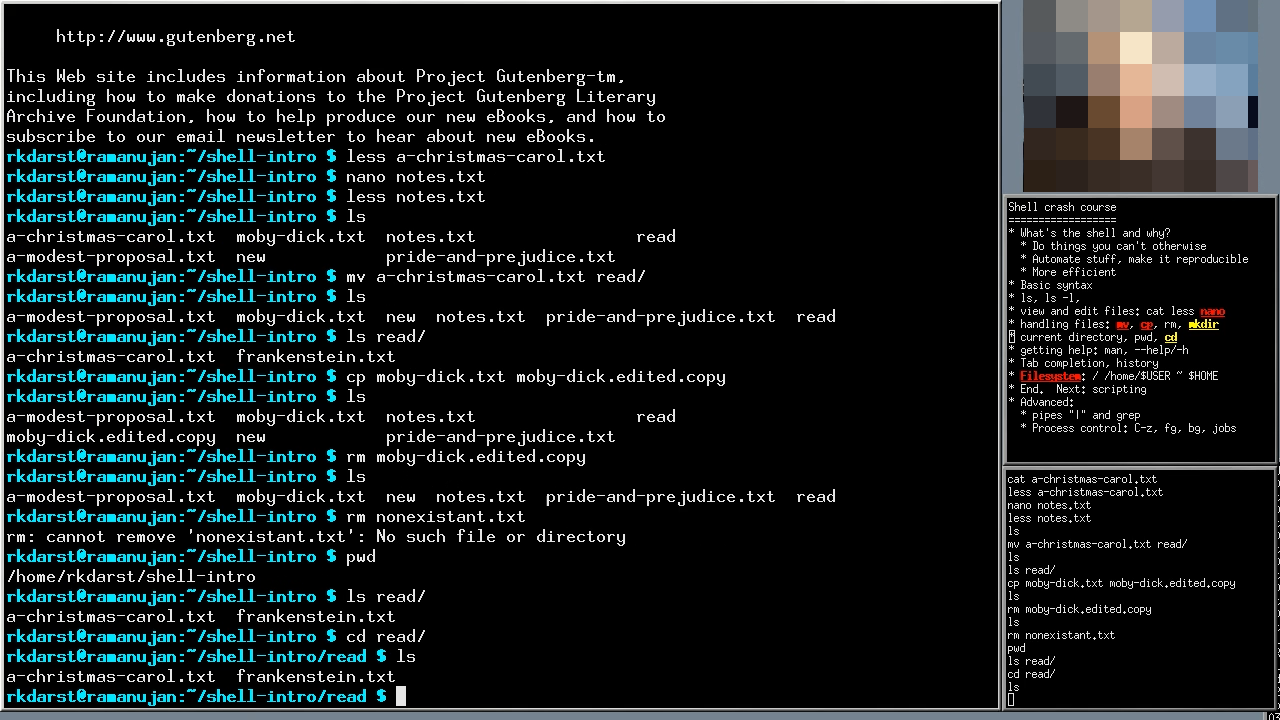
S5: Similar to above, but dark. Includes contents on the right.
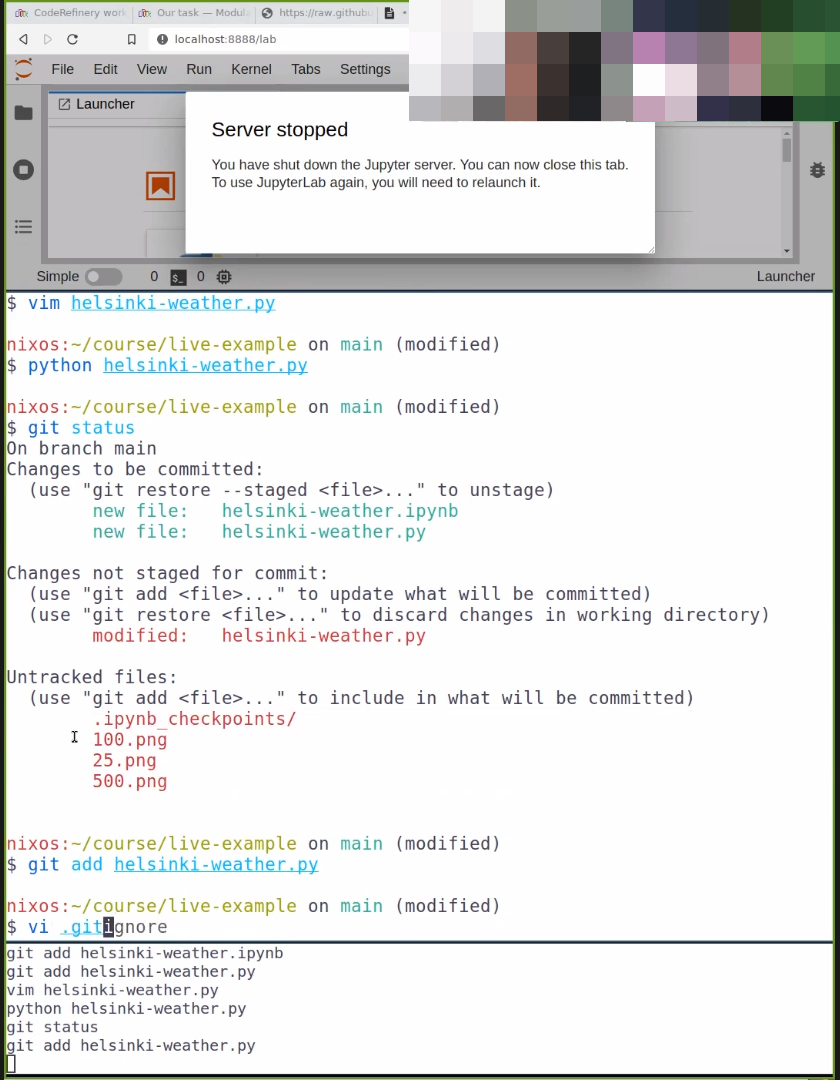
S8: Jupyter + terminal, including the fish shell and the
terminal history.
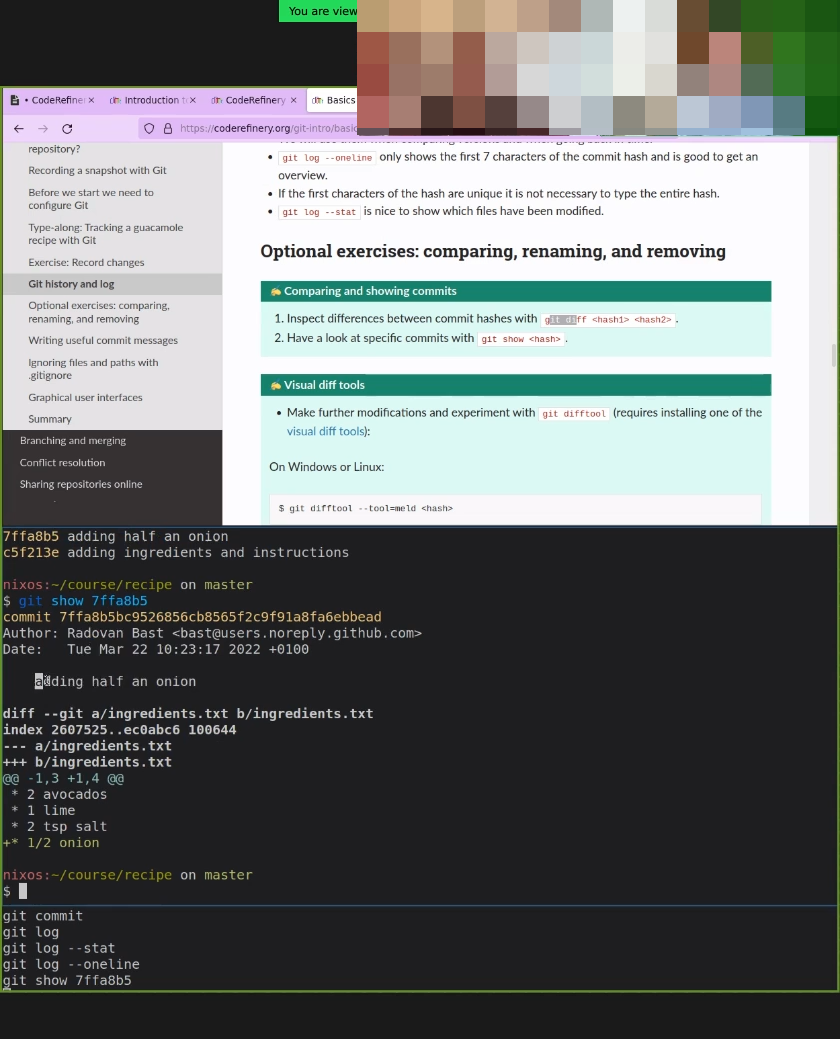
S9: Similar to S8. Lesson + terminal, tmux plus terminal history
and dark background.
S10: HPC Kickstart course. Note the colors contrast of the windows and colors of the prompt and text. The history is smaller and doesn’t take up primary working space. The working directory is in the window titlebar.
Screen layout: learners
This is how learners can arrange their screen:
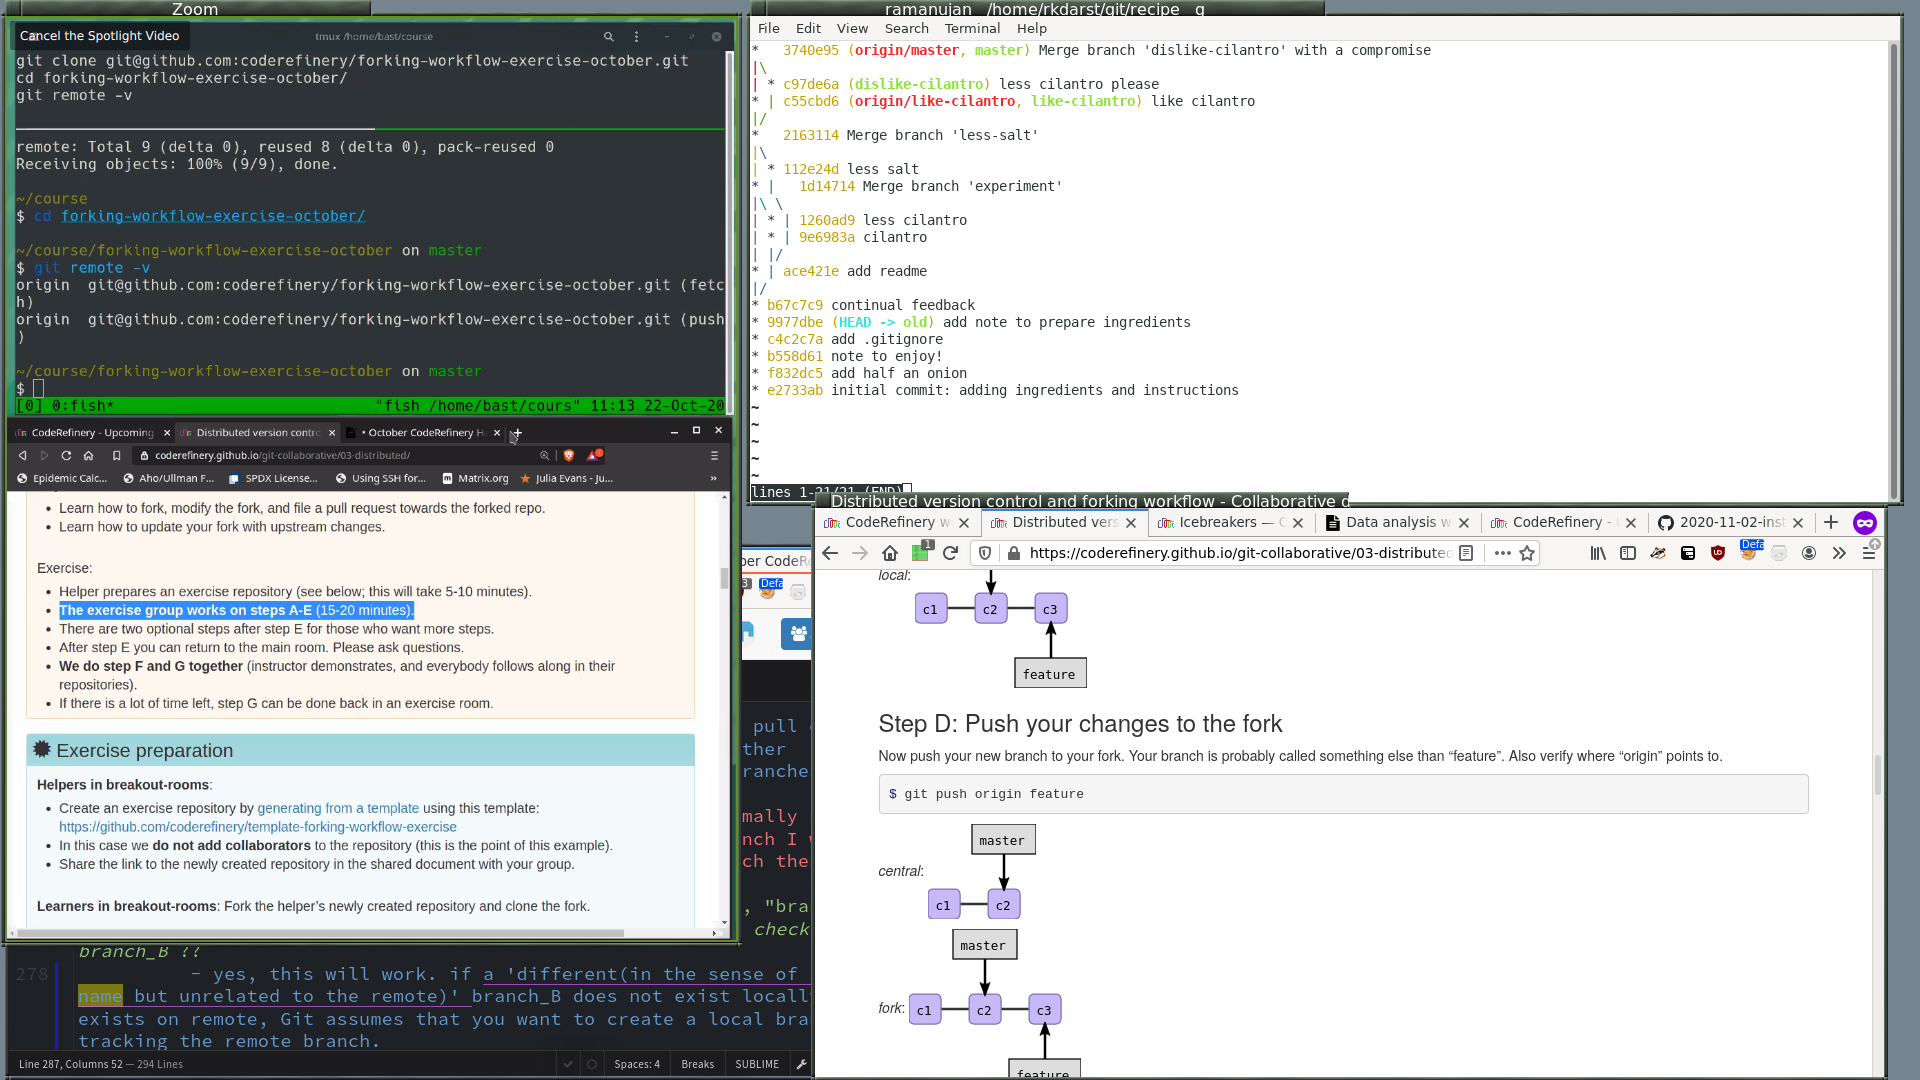
L1: Learner with a large screen, Zoom in dual-monitor mode so that the instructur pictures are not shown. Screenshare is on the left side, HackMD at bottom left, terminal and web browser on the right.

L2: A learner with a single large screen (Zoom in “single monitor mode”). Instructor screen share at right, learner stuff at left.
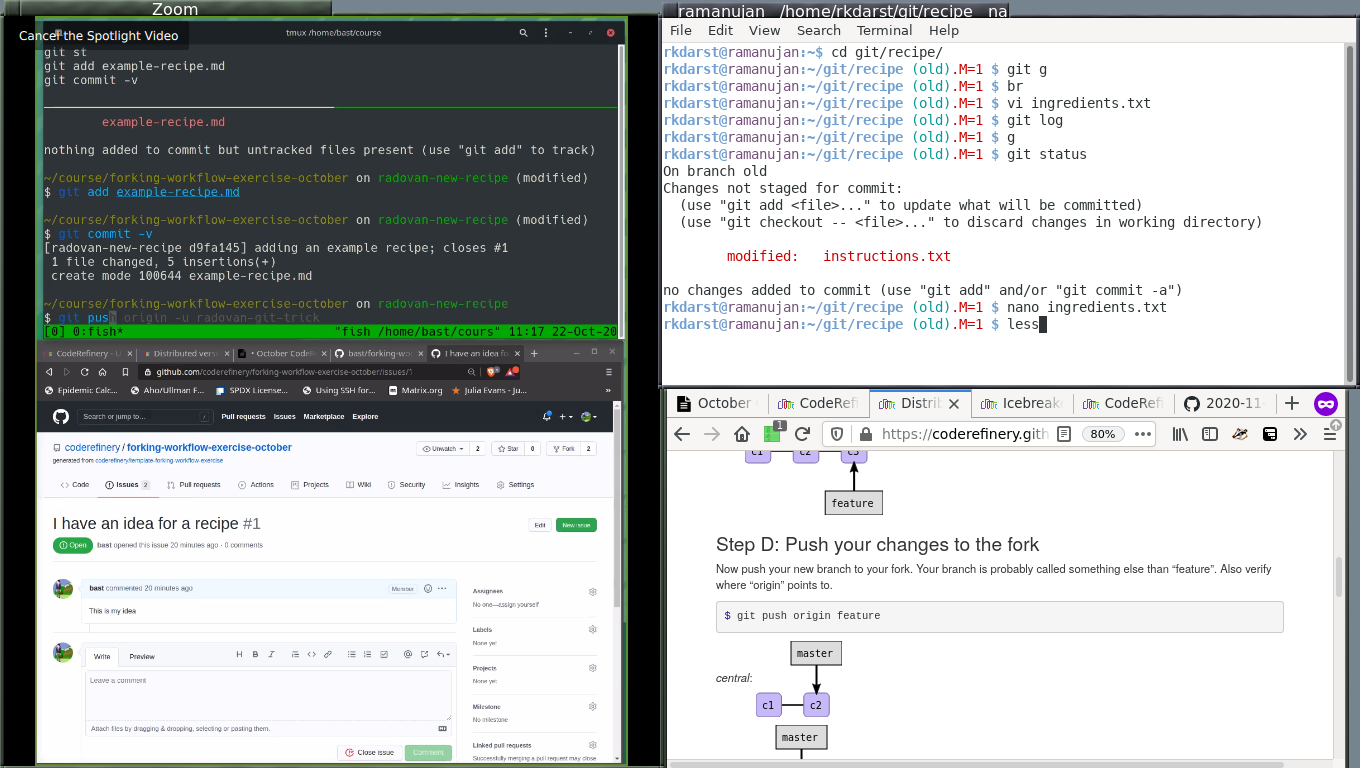
L3: A learner with a particularly small screen. Instructur screenshare at left, your windows at right.
Screen layout: instructors
This is what the instructor sees on their screen:
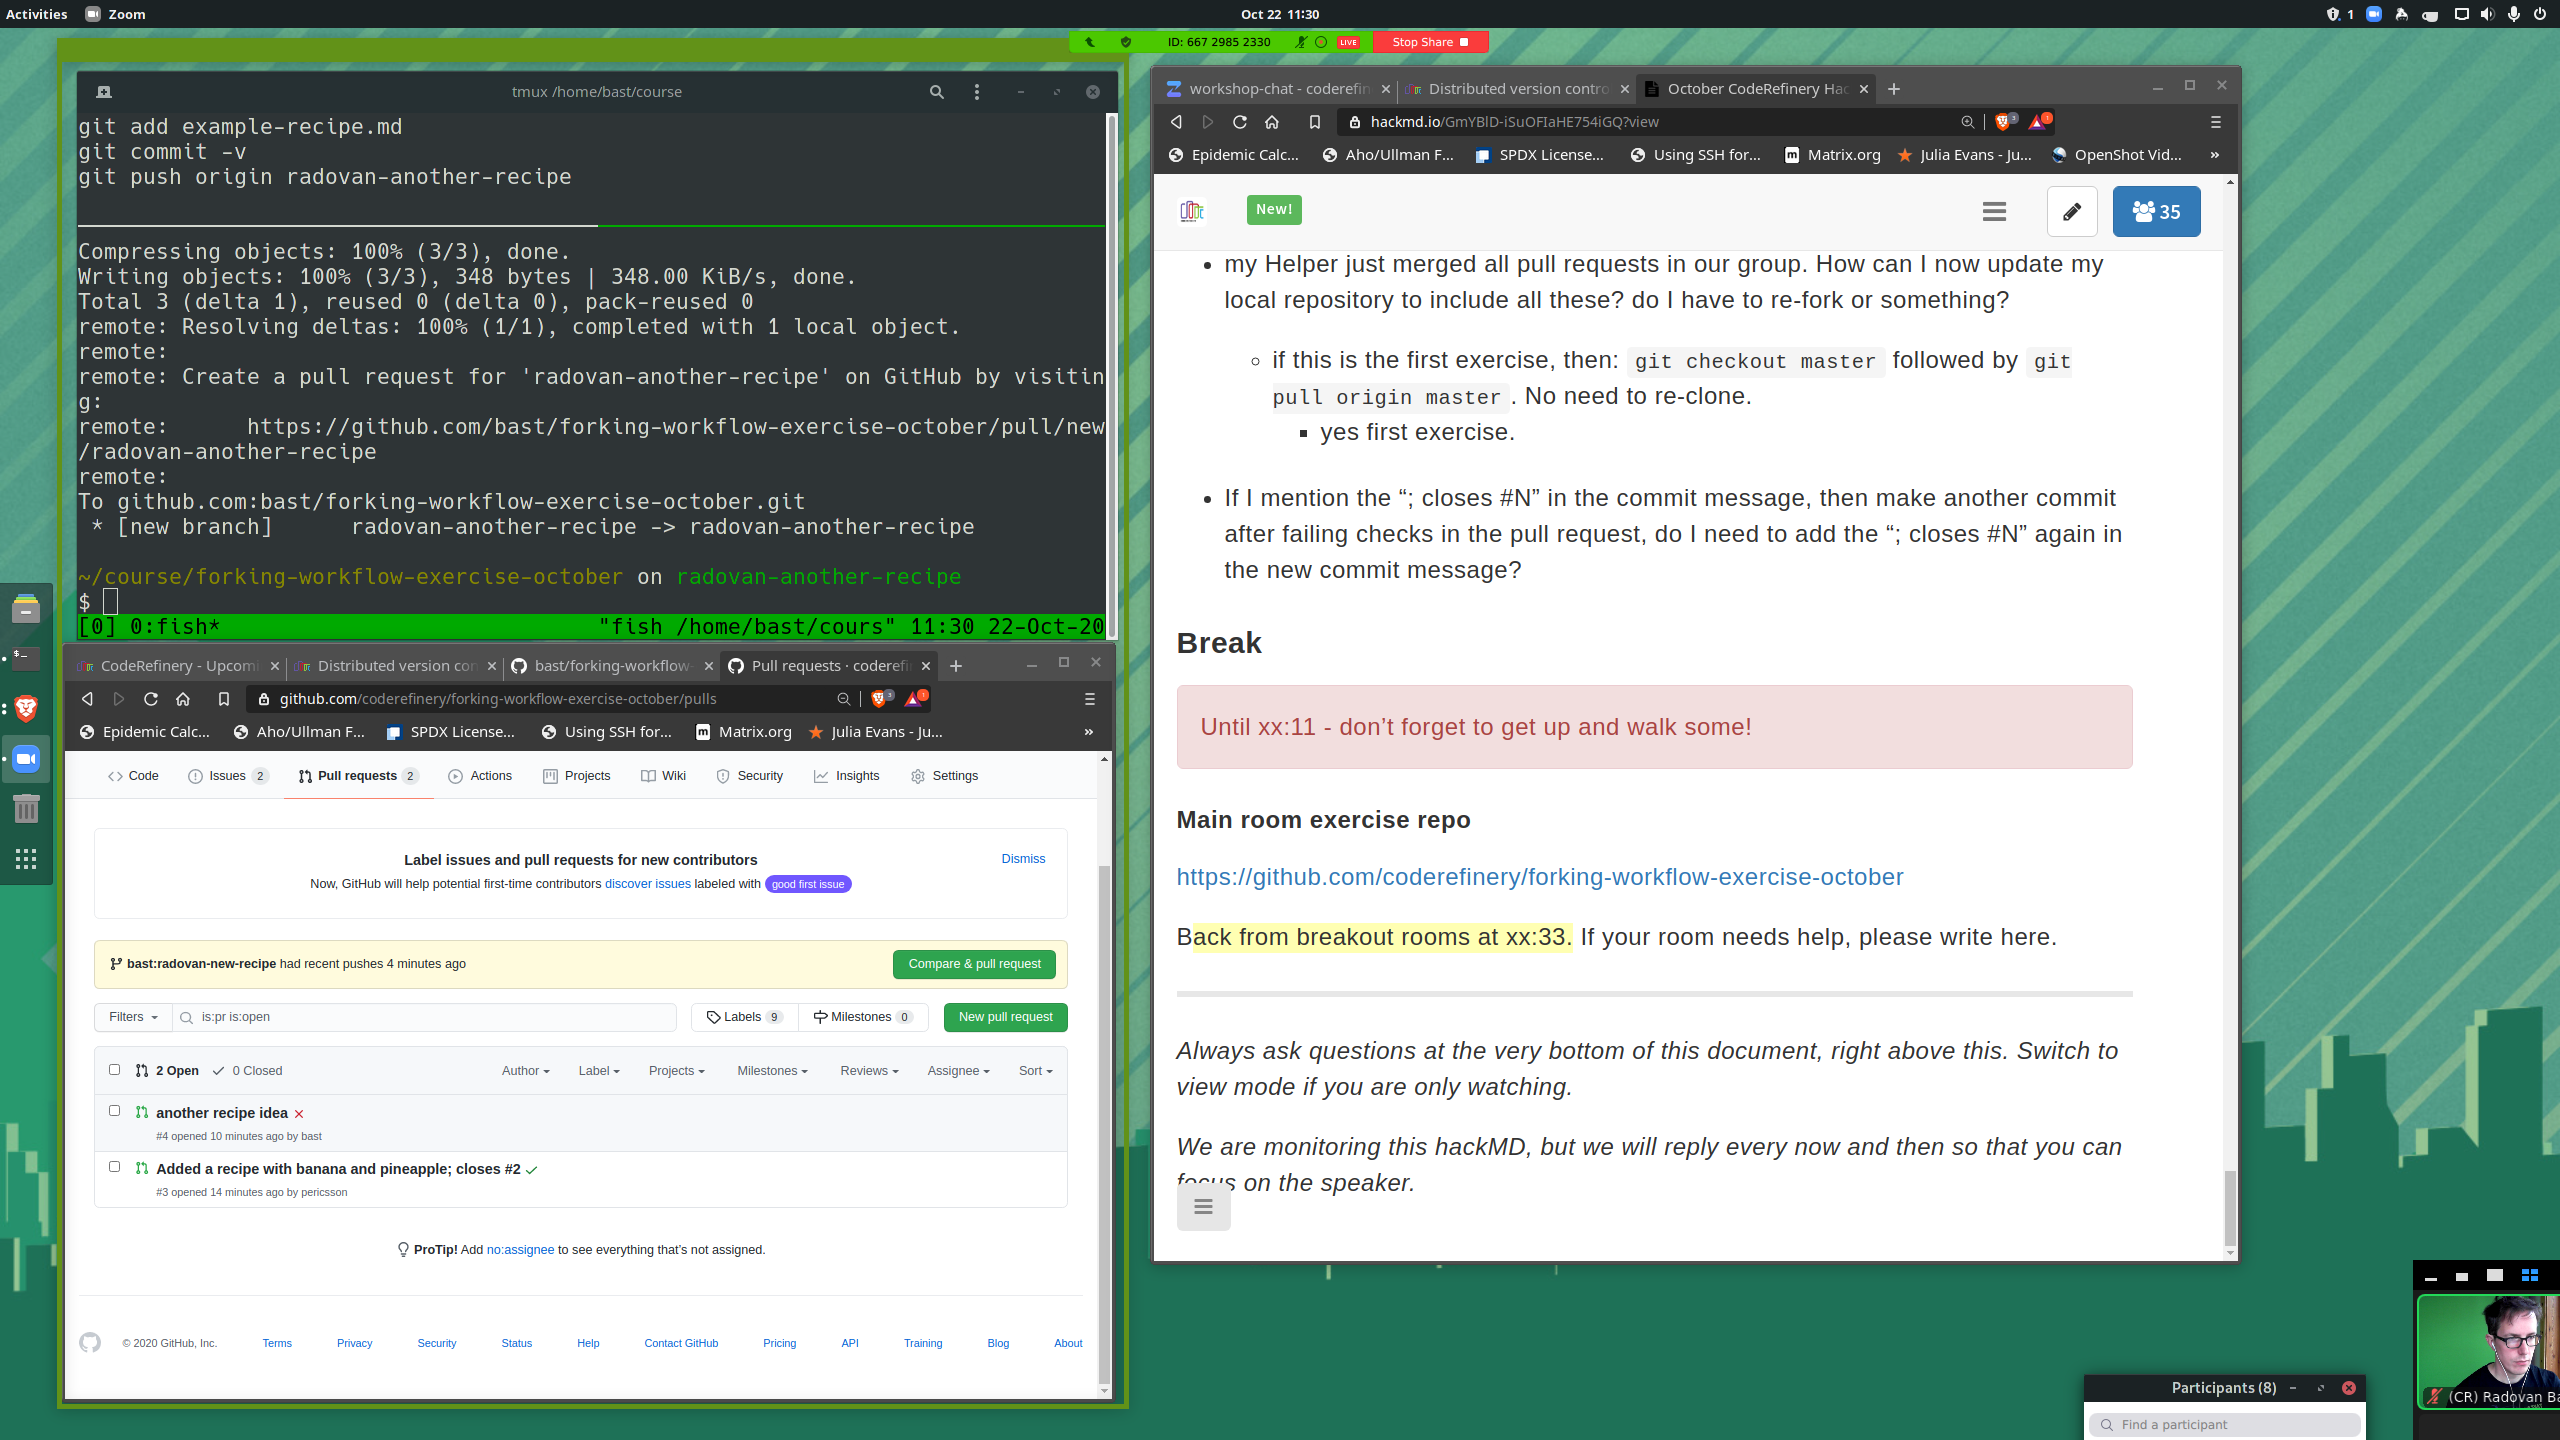
I1: Vertical instructor setup. Zoom is sharing a portion of the left side, the right side is free for following HackMD, chat, etc (but don’t overload yourself).
Instructor audio
Audio quality, and balance between instructors, is absolutely critical to good online work, especially teaching. Consider the following:
Checklist
Can you adjust your microphone volume from very low to higher-than-needed? Make sure your dynamic range is larger than “barely working”, so that you have some room to adjust for later.
Do you have a high-quality headset? A headset with microphone is the most reliable, but if you can get a desktop setup working well, that can be good too. Always have a high-quality headset for backup anyway.
If you don’t, and are employed to do CodeRefinery teaching, ask your employer to provide you a headset meeting these criteria.
If you have a bluetooth headset, consider:
Bluetooth headsets have significant latency compared to wired or purpose-built wireless protocols like gaming headsets have.
The microphone might not have enough bandwidth (if it’s part of the same headset).
Bluetooth 5 is much better in both latency and quality.
Consider investing (or getting your work to invest in) some high-quality headset or desktop audio gear.
Recommendation: Don’t use a bluetooth headset. Tell your employer you need something for meetings.
“Ducking” is when the first words are silenced/quieted by noise cancellation, until it detects speaking. To avoid this, don’t use “high” noise cancellation (as low as possible is better, reduce environmental noise / use headset mic instead). If you need high cancellation because of background noise, switch to your headset.
Set your microphone’s hardware volume to something relatively high - and control via the software.
Latency tester
You can use this web app latency tester https://nullvoxpopuli.github.io/latency-tester/ to check your headset’s latency.
Use the tester. Try to click the button in sync with the beats. You’ll be delayed in the first few beats, but will soon sync up and after 10 beats you’ll get an accurate reading.
Target values
A good value for wired headphones is less than 50ms (it can be within the margin of error of zero!).
A good value for low-latency wireless (dedicated dongle) is 100-200ms
Other example values
1000-1500ms: The 100-200ms headphones also have a high-quality, high-latency mode when the microphone is not being captured. The latency is over one second.
Just consider the difference now, between having a discussion with someone and having 1.5s round-trip latency between compared to 200ms round-trip latency (adding some for Zoom latency - which can be quite small on good connections).
Teaching via livestream
In “traditional” online teaching, there is a “meeting” format: there is a many-to-many conversation possibility. But we all know that in a big enough meeting, most people are silent. Small meetings work fine, big meetings are boring.
But large amounts of people can be talked to with the right means: for example TV and radio reach many people.
We use this idea in livestream courses. We switch our mindset to few-to-many communication for primary teaching, and other bettor tools for many-to-many communication.
Livestream teaching demo video
Watch a demo on YouTube: https://www.youtube.com/watch?v=WjmttAniZX8. (When watching, also carefully read the video description/chapter titles, which provide more the explanation of what is going on).
The concept
Instructors teach in a Zoom meeting, but there are no students. Instead, there is a broadcaster/director which runs software which captures the Zoom windows and livestreams it. Your teaching is generally a lot like normal, but you need to be aware that people are watching you from many different places.
What about interaction? Well, the meeting would be relatively silent anyway, perhaps except for a few loud people. We take the time to go all in on team teaching, where two people teach together as a conversation. Look around, you you see things often happen in groups of two: look at two-person news shows or podcasts.
But how do we communicate with the learners? We use many-to-many tools, mainly the Notes document system, where many people can write and answer questions at the same time. People can get instant answers, asynchronously, and anonymously.
Once there is a stream, there are different ways to watch. We have had all of:
Solo learners watching alone
Groups of people watching in a physical meeting/class room (with local helpers for exercises) (sometimes organized by CodeRefinery partners, sometimes not)
Groups of people watching online, but in a Zoom session for doing exercises together.
We centrally organize a Zoom session for exercises, providing CodeRefinery helpers and organized breakout rooms with teams that CodeRefinery organized.
Basic meeting setup
There is an “instructor Zoom meeting”. There are no students here, and everything can and will be captured, recorded, published, and livestreamed.
In the call are instructors, the Zoom host, and possibly some other helpers who might occasionally comment.
The cameras of instructors are captured via Zoom gallery view. This is show as both a “teacher view” as well as “overlay on screenshare”.
If you have your camera off, you will not appear in the stream. So turn your camera off when you are in the instructor meeting but not presenting. Ask others, but in principle it is fine to join, stay hidden, and interact when relevant.
During the breaks/exercise times, the livestream itself (via OBS) gets muted and switched to another scene. So, you are free to unmute, talk, and chat with other instructors. This is a great way to relax and prepare for the next segments! This actually lowers the pressure to pre-plan every part in advance.
By the same token, you can join the meeting during the previous break to get all set up.
Zulipchat serves as the overall connection between the different parts of the course and instructor backchannel. This is the least important place for the current active instructor to watch (but might be useful for a co-instructor or expert helper to occasionally check).
Why livestream?
A livestream workshop allows us to reach an unlimited number of people, at the cost of not being as interactive as in classroom/zoom room. However, we have had great experiences with the following strategy:
Learners can’t appear on the stream or in any recorded material: this is much better for privacy, which is needed to reach a larger scale. It allows us to relase videos.
There are more diverse ways to attend for different learning styles.
We can have a critical mass of attendees at every workshop, since each workshop is across many institutions. We couldn’t manage many small workshops like we used to do.
Notes as collaborative note-taking tool allows learners to ask questions anonymously and everyone can answer these questions asynchronously.
Learners can register to join Zoom breakout rooms, which are interactive and team leaders can help with any questions during exercise sessions and breaks.
Learners can also form private breakout rooms or meet in person and watch the stream and do exercises together.
While the full livestream setup is a bit complicated, you as an instructor do not have to worry about anything but your teaching. We have setup the whole system in a way that only active instructors are shown in stream, which makes video postproduction faster.
What you need to know
Prepare in advance (all the pages in this section)
Come to the instructor setup session to test and all.
When your teaching time approaches, join the instructors Zoom.
Stay muted and turn your video off until it is your turn to teach
When it is your turn to (co-)teach,
All co-instructors, turn on your video
Unmute yourself only when talking
Share only the important portion of your screen in vertical mode
If you need a reaction from learners, use the Notes
Co-Instructor watches the Notes and relays important information/questions
Exercises: clearly state which exercises should be done and at what time the teaching continues
During exercise sessions and breaks
The director will switch to the notes
You can unmute, turn on video, and discuss with others about what comes next.
Notes and audience feedback
The Notes document is our preferred communication system. The biggest problem is that it is too useful, and too many people ask questions, which will easily overload you. To solve this, we have co-teachers (non-typer can watch the notes), notes helpers (watch and answer basic questions).
There are several general strategies:
Occasionally screenshare the Notes. This emphasizes to the audience that questions there do get noticed.
Rely on other helpers to answer most questions.
During Q&A time, go to (and screenshare) the Notes and comment on the most important questions.
Call on co-teachers, “do we have any good questions from Notes we should look at?”
Co-teachers should be more than willing to interrupt with relevant questions right away.
You can’t use Zoom polls and so on. Instead, use the notes cleverly.
For example, below you see a poll (people add o to make a bar
graph), and a free response:
Have you used HackMD before?
yes: oooooooo
no:  oooo

What do you like about it?
- answer
- answer
- .
- .
- .
Control panel
The control panel allows non-verbal communication between instructors. It has indicator lights which can be pushed and light up for all instructors, and a timer. It is also how the director and broadcaster control the stream, but you don’t need to worry about that.
The broadcaster will send the link to you in advance.
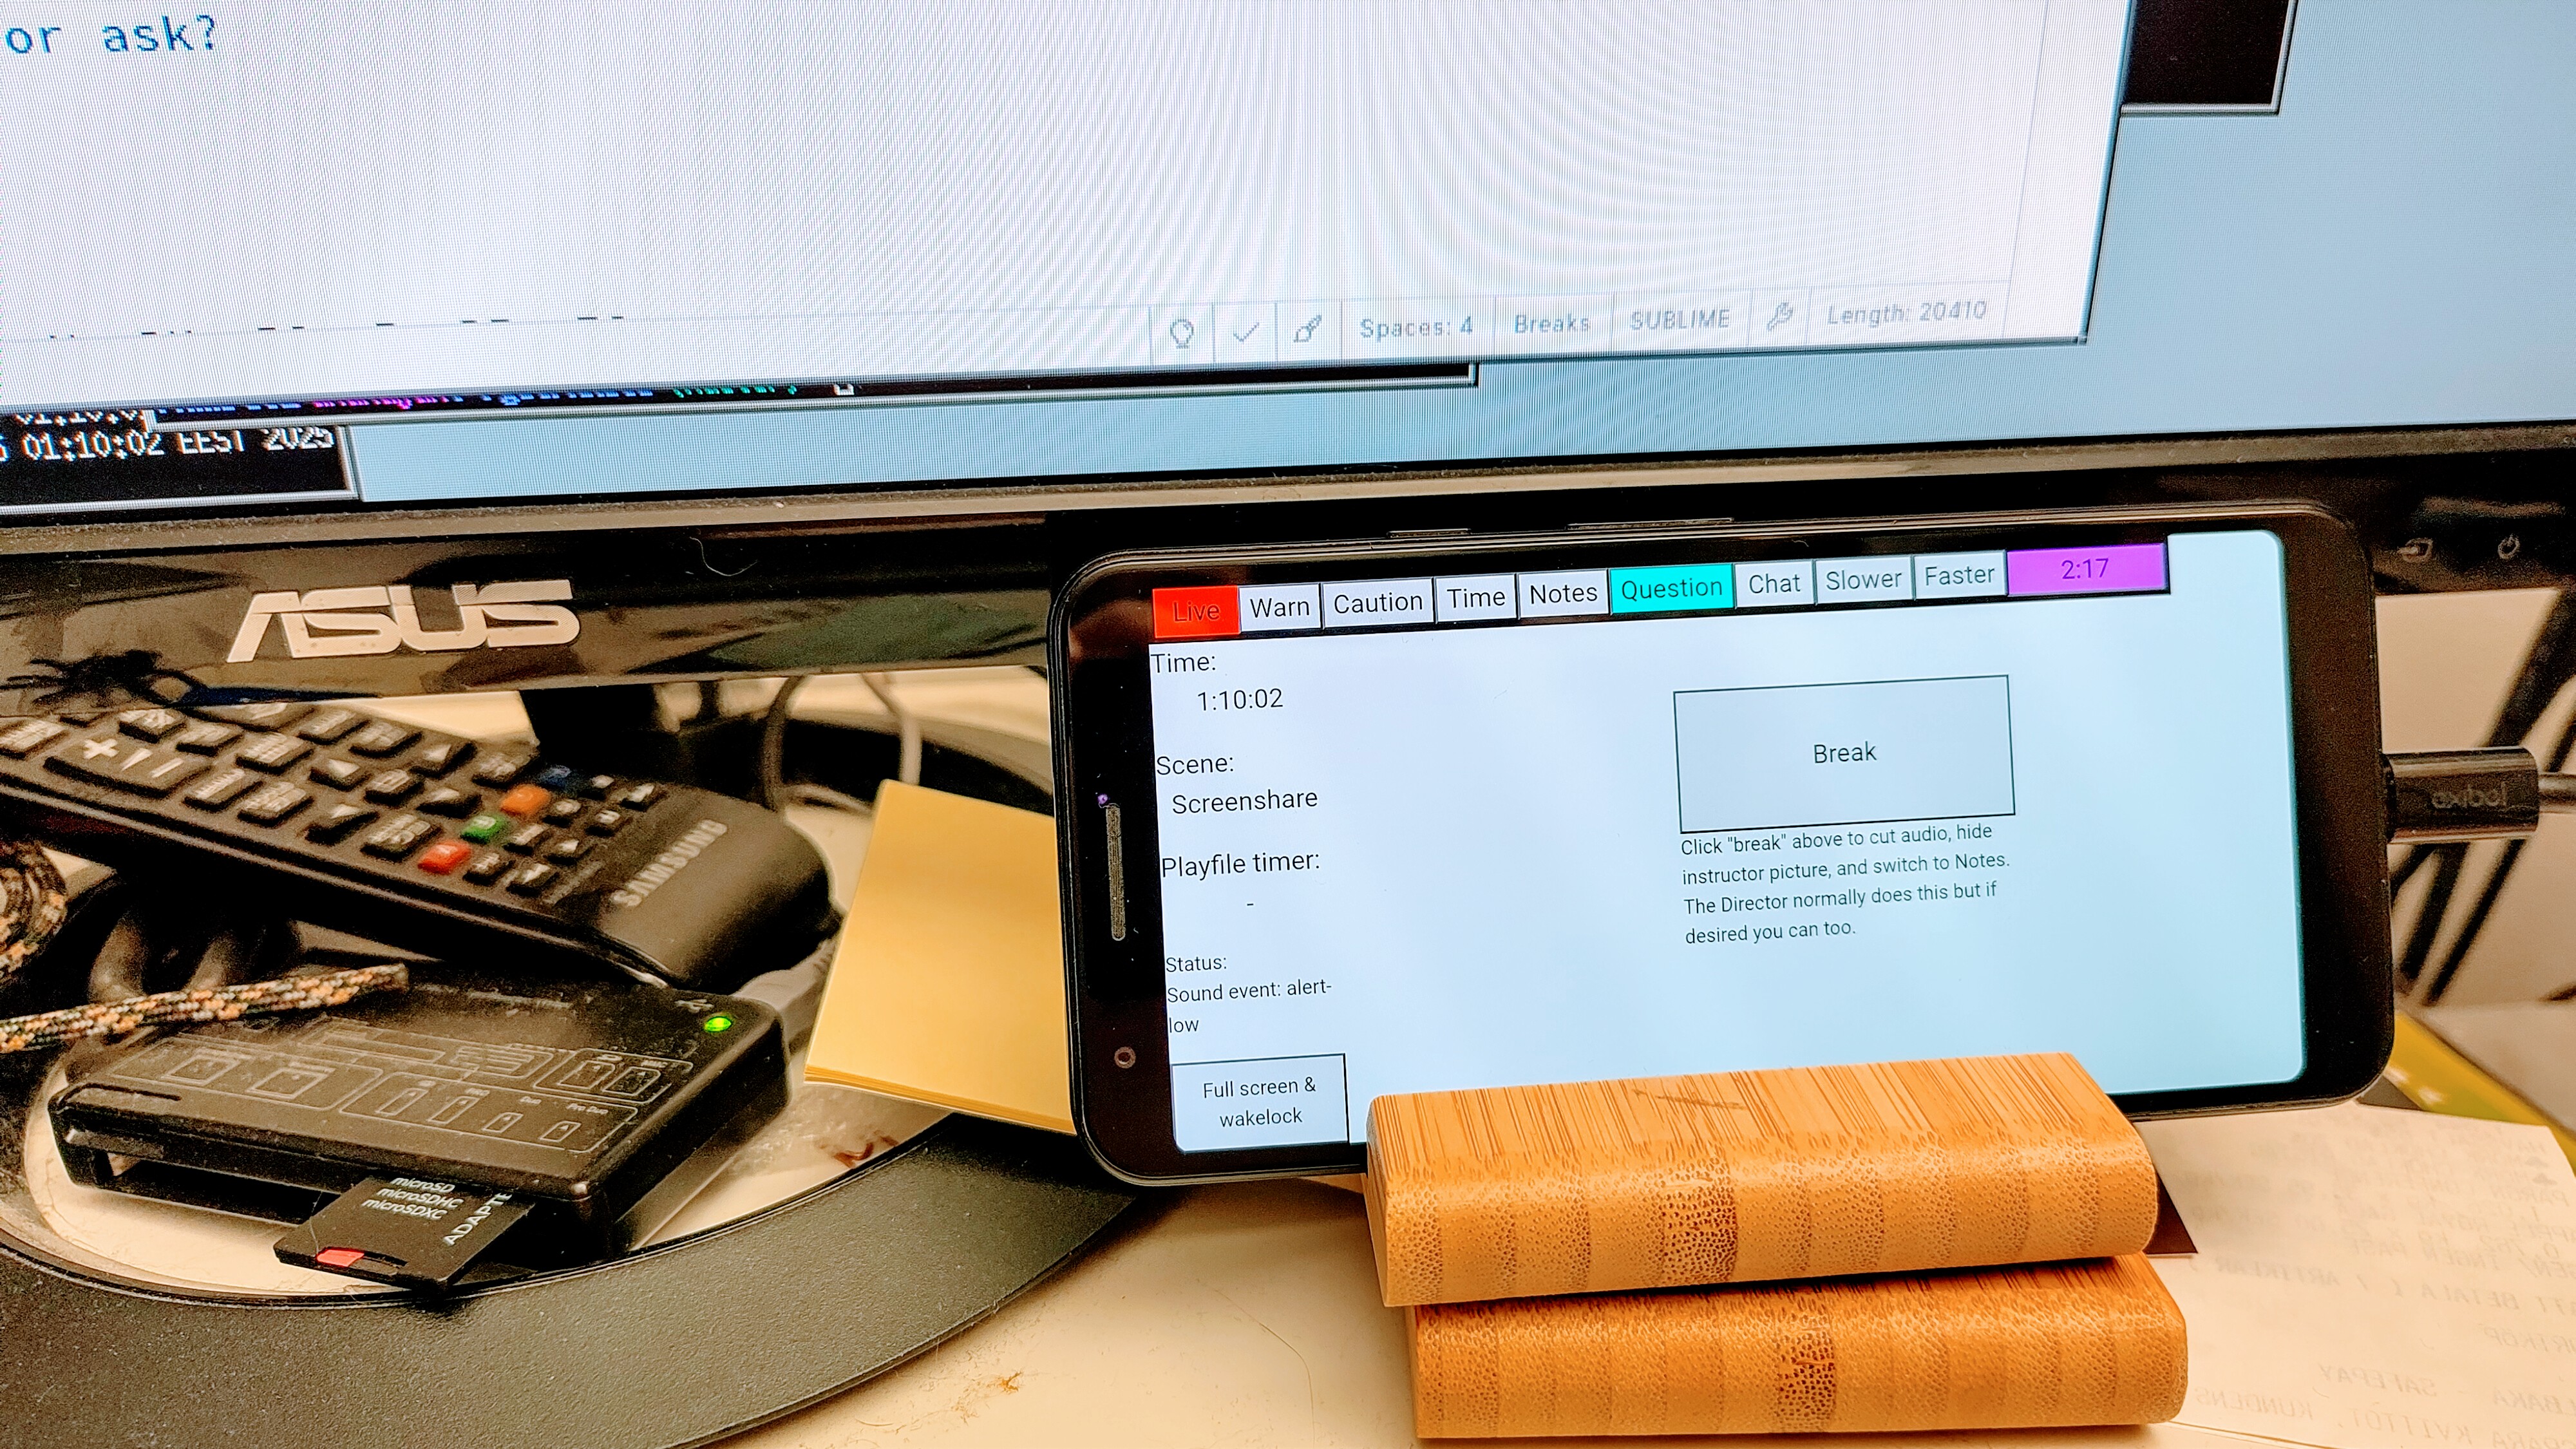
The instructor version of the control panel, running on a phone. Click the “Fullscreen & wakelock” to make it full screen and not powersave.
See also
Every other page in this section of the CodeRefinery manuals
CodeRefinery MOOC strategy - broad strategy
Open Broadcaster Software theory - Open Broadcaster Software theory. Not needed for instructors.
Team teaching
Listening to only one person talk can be boring. Listening to a discussion is much less so. “Team teaching” can mean many things, but in this case we are referring to two instructors are both actively involved in lecturing at the same time, as some sort of conversation between them. It is a form of co-teaching.
When it works well, it makes a lecture much more dynamic and engaging, and reduces the load for each person to plan everything because you can rely on two minds to do it live. The difficulty is that you need to coordinate and it is our nature to fill all silences, instead of yielding to make a conversation.
See also
Demo of CodeRefinery livestream teaching. This shows a demo of many parts of team teaching on a livestream - read the video description for details.
Basics
Demo of team teaching. Two people are speaking, in this case one is typing and giving the small point of view, and one is explaining the big point of view.
The general idea is that you want to make your teaching event a conversation. Pay attention to news broadcasts, game streams, podcasts, etc. to see this in action: it makes things much more interesting to listen to. Usually, they try to do this by having two different roles that complement each other.
The basic idea is that you want to keep a constant conversation going. This can be a mutual discussion, one person explaining big concepts and one the details, one person asking questions and the other answering, or some other combination. This is not simply two people taking turns in different sections.
With team teaching, there is less need for the instructors to prepare every single thing perfectly, since you can rely on two brains to get you through areas you haven’t perfectly prepared. In fact, this is good, because then your learners will see things go slightly wrong and your live debugging (it will look like you wanted something to go wrong to teach it).
Still, you want to agree on a plan in advance, and know what the roles will be.
One of the most important principles of ship handling is that there be no ambiguity as to who is controlling the movements of the ship. One person gives orders to the ship’s engine, rudder, lines, and ground tackle. This person is said to have the “conn.”
— James Alden Barber, 2005, “Introduction”, The Naval Shiphandler’s Guide, p. 8. Mark B. Templeton, via wikipedia
As the quote says, in any large enough operation, multiple people are involved, but responsibilities should be clear. At least, one person should have the responsibility for time-keeping and overall flow. This should be integrated into your co-teaching plan.
We propose some basic models, but of course there is a continuum. And you can (+should) switch up models, or roles within the model, in different sections.
Example of a teaching plan
R and S usually teach a HPC tutorial each year via co-teaching. The general plan is:
Day 1: “talker and typer” format. R is the talker (primary) and S is the typer (secondary). R goes through the main points and tells S what to do in the demos. S pretends to be learning and doesn’t do anything until told.
Day 2: swap roles but otherwise like day 1
Day 1 and 2, sections without exercises (for example, “what is slurm?”): “interviewer and expert” format. Switch primary to “interviewer” and secondary to “expert”, and the primary “interviews” the expert to explain what’s going on.
This is implemented in the following teaching plan (see Teaching plan): https://hackmd.io/@AaltoSciComp/2025kickstart-tritondemos
Model 1: Guide and demo-giver (talker and typer)
One person serves the role of guide (talker), explaining the big picture and possibly even the examples. The demo-giver (typer) shows the typing and does the examples, and could take the role of a learner who is asking about what is going on, the person who actually explains the details, or an occasional commenter. Anyway, the guide is the one navigating through the course and bringing up material in a logical order for the audience and “has the conn”.
Hands-on demos and exercises work especially well like this. Here, the guide would follow the outline and serve as the director (see below).
Example of “guide and demo-giver”
In our HPC course, we use this for the main tutorials. One of us explains the material and says what to type, the other one types the demos. The instructors swap roles depending on interest.
Guide |
Demo-giver |
|---|---|
Introduces most material |
|
Goes through theory |
Asks questions that a learner may ask |
Introduces type-along |
|
Explains steps of type-along |
Types during type-along |
Asks questions to Demo-giver during type-along |
Explains details what they are typing and what happens |
Looks at Notes during type-along |
Looks at Notes during theory |
Discusses during Q&A |
Discusses during Q&A |
Model 2: Interviewer and expert
In this case, there is an interviewer who pretends to be a learner is asking questions to an expert who is mostly explaining. The interviewer serves as a learner or spotter, fills in gaps by asking relevant questions, and tries to keep things on track. The interviewer “has the conn”.
Either person could type and do the demos.
Example of “interviewer and expert”
In our HPC course, we would use this for our intro to Slurm. There are no demos at that point, so one person prompts the other with questions about Slurm.
Interviewer |
Expert |
|---|---|
Asks questions to expert |
|
Follows up with learner questions |
Answers questions using their special knowledge |
Pushes forward though the material |
|
Asks questions that a learner may ask |
|
Introduces type-along |
|
Explains type-along and material |
Explains type-along and material |
Looks at Notes most of the time |
Looks at Notes when possible |
Discusses during Q&A |
Discusses during Q&A |
Model 3: Teacher and student
In this model, someone takes the role of the teacher and gives the lesson. The student pretends to be the student and asks relevant questions.
This is closer to normal teaching, so feels more natural to do. The big disadvantage is that it’s the tendency of the presenter to keep talking, and the tendency of the interviewer to be nice and not interrupt. This negates most of the benefit you would hope to have, but is much better than solo teaching. The “Guide and demo-giver” is usually better when there are demos and “Interviewer and expert” when there aren’t. The teacher “has the conn”.
Example of “teacher and student”
In our HPC course, this isn’t used so much. I might use it if I was co-teaching something like GPUs or MPI, which I don’t know that well. I’m not confident in what to type, so I really am much more like a student than a demo-giver and I don’t expect to contribute much to the content. Of course it’s close to “guide and demo-giver” anyway.
Teacher |
Student |
|---|---|
Guides through the material |
|
Gives demos |
Asks questions a learner may ask |
Watches the Notes closely |
|
Keeps time |
Reminds about time |
Hints
With more than one person, there is a risk of seeming uncoordinated when the team doesn’t know who is supposed to move the lesson forward. It’s not bad to have short discussions to decide what to do next, it makes the show seem interactive and like it is responding to learner needs. But if it happens too much, it becomes noticeable.
As quoted above, you could adopt a principle which exists in many domains: at any time, only one person is in control (we call them the “primary”). This person is responsible for understanding the current situation and checking with other instructors, but in when you just need to something and no one has strong opinions, you don’t debate, the primary decides.
Note there can be “primary” for the whole lesson preparation, that is different than the “primary” for some sections.
We can’t tell you what works best for you. But models 1 and 2 above tend to work very well and give a clear “primary”. The need for someone to “have the conn” is why we don’t recommend fully equal co-teachers. Instead, divide the course into parts and use the two models for each part.
Of course, there are other roles in a workshop.
The Notes manager pays particular attention to the audience questions. They might be a different person from the co-teachers and they can interrupt anytime.
The director manages the flow of the course itself.
The Director could be completely separate from the people on screen, and somehow sending signals to the teachers as needed.
If you ever go off-plan, that’s OK. You can discuss during the lecture so the audience can know what you are doing and why. You want to adjust to the audience more than you would in a solo course. But at the same time, be wary of deviating too much from the material that the watchers have, since it will be disorienting.
Two people works well. With three, it’s hard to allow everyone to speak equally and people tend to jump on top of each other in the gaps - or no one talks, to give others a chance to say something. You could have particular segments where different pairs of people adopt the main roles, and others speak up if they want. Or, at that point, make it a panel discussion format (multiple experts and one interviewer)
Of course, it helps to have a good plan of what you are going to do. But if only one person knows that plan, this strategy can still work, especially if that person is the presenter in model 2.
The less preparation you have, the more useful it is to strictly define the roles of each person (to ensure someone is in charge of moving it forward).
Please send us more suggestions to add to this list.
Preparation
This is one proposed model for preparing for team teaching:
Talk with your co-teacher. These hints assume a two-person team.
Decide what material will be covered, overall timing, strategy, etc. Review the schedule from last time and make a schedule for this time, with timings, breaks, etc. Usually you don’t need to get creative - use what works.
Divide up the material. For each episode, decide the model to use and roles. If in doubt, start with the guide/demo-giver model with the more experienced instructor as the guide.
For each episode, one person prepares the outline (the order of topics to be presented, key questions to ask, etc.) - usually the guide or interviewer.
You don’t need to plan every step in detail but it can be useful to prepare the session together and step through the choreography (e.g. “now I will show this and then give you the screen and then ask you to do this … you will lead this 20 minute block and then I will lead that 20 minute block and please ask me questions while I present X”).
Discuss the plan together and make any revisions as needed.
Do one run-through.
Teach as planned.
Then, just go! Don’t worry if it’s not perfect, if either person wonders what to do next, just pause some or ask the other. This imperfection is what makes it more dynamic and exciting, and in almost all cases the audience has been impressed with the co-teaching strategy, even if it’s not perfect.
Teaching plan
Try to make a written teaching plan that goes over what you’ll cover. This helps to keep on topic (not going off on tangents and running over time) and making sure you cover everything. The plan is very related to Team teaching, since the plan is the written record of how you plan on team-teaching (who does what at each time).
Example plan
See this link, which includes description of how it works: https://hackmd.io/@AaltoSciComp/2025kickstart-tritondemos
This plan format has worked well in the past. It worked very well, because:
It has outline and timing - agreed with instructors.
Has everything that need to be said and typed - no surprises, nothing left out.
Allows us to avoid saying too much - we try very hard not say anything we haven’t prepared (other than audience questions of course).
We don’t read/follow the lesson paragraph-by-paragraph. Learners can do that on their own time if they want (for example during the exercise time or after the course).
It is very closely aligned to the lesson: ideally, each heading/chunk in the plan corresponds to one section. When we get to that section, we scroll to it, and instead of reading from the lesson page, we talk according to the plan.
It isn’t that much work to prepare.
It forces us to test every command in advance.
If a lesson has the exact command you run it it, it’s not necessary to make another copy. Though it may not hurt.
We can still easily adapt the exact words we say to the need.
We don’t have read the lesson word-for-word.
Recommendations
Make a plan suitable for your needs - not too much, not too little.
In particular, it shouldn’t be too much: spontaneous is good.
It doesn’t need to have everything you need to say, just broad bullet points, roles, and timing.
Exact commands may be useful if time is very limited, but if they are in the lesson, you should just follow that.
Presentation hints
This is assorted hints about actually presenting.
Starting off
Don’t start off with tech details, say why this is important. Think of what the emotional (“coolness”) appeal is and start off with that.
Why will this be useful?
During the lessons
Take advantage of the mistakes/typos you make when teaching! When you do a mistake and get an error message and realize what you did wrong, explain what happened since this can offer valuable insights to learners.
Ask “do you do X?” where X is what you are teaching. Instead, ask “how do you do Y?”. The first question implies something you are doing wrong, the second is open-ended.
Exercise sessions
What to do during exercise sessions
Always go over the lesson with someone else the day before.
Try to stick to the material
Don’t try to show everything, show less, but show it clearly.
Try not to completely deviate from the material. Ideally, rather influence the material before you teach. Of course it is good to react to questions and to adapt the material to the audience, so sometimes an excursion can be very useful, but make clear that you then deviate from the script and be explicit about whether participants should follow what you do or only watch.
If you want to show some extra steps in the terminal, show them perhaps at the end of an exercise block to not “mess up” the exercise half-way and change it with respect to the material.
It is good to mention an anecdote or two but be careful about mentioning too much new jargon which only very few participants may relate to.
Wrap up
Say what you taught and why.
Say what comes next. Say where to get that.
Update the instructor’s guide and file issues for any problems you noticed.
Get instant feedback from your co-teachers and helpers (students too, if they offer any).
Consider making notes on a 4-way diagram of (content←→presentation) × (went well←→can be improved).
Presentation hints - in person
This is in-person specifc extras for the Presentation hints page.
Before each lesson
Remember: sticky notes, water, extra whiteboard markers.
Make your text large enough to be seen in the back, then bigger. Make your voice loud enough to be heard in the back, then louder.
As people are coming in, encourage them to sit next to someone with a similar operating system - then, when helping each other, the unimportant differences are minimized.
By the same token, don’t allow people to sit alone: ask everyone to set next to at least one other person. That way, people can help each other.
Have a pen and paper next to you. When you notice problems in the material, write it down right away during breaks in the type-along parts.
Set up feedback system (chat, questions, etc)
Team teaching
Discuss with co-teachers and helpers about what each of you will do.
Hand signals for common situations: too fast/slow in general, louder, time for a break, “good enough, move on”, “explain more here”.
It can be hard for one person to manage everything. How can multiple instructors take part? Probably the most common ones are:
Teach teaching: alternating
Commander and navigator: conceptually divide roles of big picture teaching and doing the details.
If “real” alternating, each section should be 10-15 min at least, otherwise too much context switching is distracting.
Teach and assist (master helper going around)
Teach and observe.
Asking directed questions to fill in gaps.
Tell the students the way the teachers will work together, so that it seems coordinated rather than someone is interrupting.
During the lessons
Helpers can read the team leader guide. Encourage helpers to stand and be constantly walking around, people rarely flag helpers from across the room.
Encourage the use of sticky notes (red=need help, green=I am done with the solution). They can also be used for voting, e.g. red/green for two answers of a multiple choice question.
Don’t touch the learner’s keyboard! This is very hard to do, since it’s only natural to want to get things done quickly. The best idea we have is to have a pen and sticky notes, when it’s hard to spell out a command to type, write it instead.
If appropriate for your topic, create a cumulative cheatsheet/diagram on the board as you are presenting.
Wrap-up
Use the sticky notes to get good/bad feedback: have people write one good and one to be improved thing, and leave the note on the door on the way out.
Lesson philosophy
This page describes the overall spirit of how our lessons are made - basically, what to think about when designing or improving a lesson. Other pages go into details about how this is implemented.
Terminology:
Lesson One repository containing a package of teaching material, for example git-intro. For courses with all material in one repository, “lesson” could also mean one episode there.
Episode One page within a lesson.
Workshop or course One instance of giving one or several lessons.
Summary
CodeRefinery lessons are designed to be widely applicable lessons for the beginner to intermediate level, designed to get people started on a path so that they can continue learning themselves. They are designed to have a few practical things and exercises that can be actually be done, but almost everyone will need to continue their learning after the lesson is done to put things into practice.
Lessons focus on both the overall motivation and “quick wins” at the beginning, and the later parts usually have a demonstration of more advanced follow-up ideas that need self-study.
Lessons are designed to be practical for learners who need to computing, but aren’t “computing people”. This means we make plenty of compromises for simplicity that are not what instructors would do themselves on a daily basis.
The target audience
CodeRefinery is mainly focused on people who are already doing some sort of scientific or research (or other real-world) work, but haven’t been introduced to the best computational practices. Thus, we are in an interesting place:
Our audience isn’t pure beginners, since people are in practice working already. Many may be beginners to the actual topic, but many will have seen bits and pieces through their work.
Our audience probably is not advanced in the topics we teach, since we focus on introducing learners to new topics.
Our audience is also very diverse - not just demographically, but what they study and how they will actually need to use computing in the future. Taken together, this means that lessons and instructors need to do a lot of work explaining what is relevant to which parts of the audience.
Learning pathways
In general, we tend to teach widely applicable basics, with the expectation that our learners are smart and will be able to follow up and continue learning the details they need later on (which will be different for each person).
Modern learning is much different than before. Decades ago, courses and information were harder to find, so people would attend courses for long-term knowledge. These days, information is at our fingertips and we expect to find what we need, just when we need it. And there is so much to possibly know (and it’s hard to know just what is relevant at any time). Thus, long courses are a hard sell.
Self-study materials and AI is able to answer many questions without having done long study - but still, some background is needed to be able to find the right material and ask the right questions, since there are just so many possible ways to do any given task.
This leads to the overall philosophy of: broad introduction to a topic with various follow-ups suggested both within the lesson (advanced material not covered in the main flow) and what to learn next.
Design choices
The above leads to various philosophical design choices:
The main lesson flow is designed around beginners in the topic but people already in “research life”. This means that learners want to get to some point and many won’t want to study the material excessively just for its sake. On the other hand, learners have experience doing new things so if you give them the right foundation, they can figure stuff out.
There is a significant focus on practical exercises, not just theory.
There is often advanced and optional material within lessons which isn’t taught.
There is not one fixed flow. Instructors may teach different episodes in different courses without changing the actual material, though the first few episodes are often fixed. Learners may attend different lessons.
They are designed to balance the needs of in-person teaching, online teaching, and self-study.
They are not pedantic and realize that beginners have different needs than experts than teachers (while trying to give the idea of these better ways of working).
But not just this
CodeRefinery is growing into not just one single workshop program with some lessons, but a network of people teaching different courses. There’s nothing wrong with adapting this philosophy to fit your use case, whether the course is more advanced or for a more focused audience. If you do that, the ideas on this page may help you explain the target audience of your particular lesson and how it compares to others.
Lesson design
This is a checklist and hints when designing and writing a new lesson. It is more actionable than Lesson philosophy. CodeRefinery can’t claim to reproduce all the other good material out there, but this short crash course for what we have seen.
This page doesn’t replace your own knowledge in doing the actual teaching part. Instead, the first half gives pointers on making sure your audience can connect to the material, and the last half gives hints to help you come up with good exercises and examples.
See also
The primary material is in Teaching Tech Together, primarily chapters 6 and 12 for practicalities and 2 and 4 for big picture considerations (note this was back in 2019, it’s changed since then). But really, all the book. See the summary we made or the actual book.
The article Ten quick tips for creating an effective lesson is also a good summary of the main points.
Finally, the Carpentries Curriculum Development Handbook gives practical information on how to design a new lesson and covers the entire lesson life-cycle with a good overview of the lesson release timeline.
Backwards lesson design
Think test-driven development: decide what you want students to be able to do, design exercises to measure it, then fill in the gaps with teaching. You can see their summary. The steps are:
Brainstorm what you want to cover.
Create or reuse learner personas - understand who you want to teach. What do they care about? Perhaps as important is what they don’t care about: make sure that you don’t go too in depth too early and turn people off.
We generally know we teach to early-career researchers, but at what level do they want to interact with the tools? How much time do they have? What do they not need to know?
Create some summative assessments, that show what learners should learn by the end. Try to connect these to the learner personas.
In our case, we don’t give a final test, or even a final exercise to test knowledge.
Instead, this is more like “something that learners can do themselves, in their work, shortly after the course”.
Don’t be over-ambitious! When I (rkdarst) plan a lesson, I try to think of ~three points someone might remember, one or two might be an action and one or two might be knowledge of something they can learn later.
Create formative assessments (exercises) that let the learners practice what you want them to learn. See below for hints on coming up with good exercises. These should also connect to things the learners will actually do, but can also be more of checkpoints.
Basically, interesting exercises at the end of or during each exercise. Think interactive but simple.
I (rkdarst) once heard instructors can do exams ten times faster than students. Think on that level.
Put exercises in a logical order, and fill in any gaps. Ideally there should be a cycle of ~30-50 minutes of teaching+exercise (not including 10 min break every hour). Perhaps most are short (a few longer examples as needed), to identify a certain learning goal and misconception.
I (rkdarst) these days think that it is best to have exercises as long as possible (group many small into one large), since more time than you expect is lost with context switching.
Also, if you can make it work, it’s best to minimze talking to introduction and discussion, if you can make the exercise material self-explanatory. In other words, tell the students what and why, let the exercise text explain “how”.
Write just enough material to get from one exercise to the other.
The most important point here is to start from learner’s needs and how they can feel connected, not from the tech details. It is very easy for us to start with what we would do, and over time every one of these lessons migrates towards a learner-centric design. Make a shortcut and start learner-centric.
When advertising the course, connect it to your learner personas so that you get the right audience and they know why they should come.
Emotional and intrinsic appeal, other basics
You can think of why people should feel emotionally connected to your material - maybe it’s too much to expect people to get emotionally invested, but if you try for that, you’ll end somewhere better. Most people don’t attend our courses to learn a skill. They attend because they think it will help their other work.
Try to design around tasks and exercises which your audience will care about. For example, don’t say “here are some shell commands”, but “aren’t you tired of copying all of these files one by one… check out the shell… once you know it, you will really feel at home. Here are some typical things you might do.”. Intrinsic motivators include sense of agency (being able to do things themselves), competence (usefulness of what they are doing, feeling they know something), and relatedness (doing things that others are doing).
A manual is reference, a tutorial builds a cognitive model. If you can build the cognitive model and tell them the “why”, students may be able to refer to the manuals themselves and become self-sufficient. Thus, our teaching is usually more of a tutorial, with good links to manuals (it can also explicitly teach how to use the manuals).
Perhaps a related point is inclusiveness: make sure there’s not some “in” crowd. Perhaps the best description I have seen: don’t assume that some people are missing something, but that others have had the fortune of learning it earlier. This may not matter in a purely factual lesson design, but if you are trying to make things intrinsically or emotionally appealing, it is essential. (Example: git lessons use to have Star Wars references about “force pushing”. They are mostly gone now, since it’s not clear why force pushing is interesting nor does everyone like Star Wars).
Who is the audience?
Making the learner personas are essential to making a good lesson, even if you think you know who you are teaching to. This is because it grounds you into what your audience already knows (or doesn’t know) and what they are interested in. Think:
Different types of work they do
Different ways they do their work (and thus future needs)
Different levels of background (shell proficiency, etc.)
You also have different ways people can refer to the material:
In a class, with an instructor guiding them
Reading along by themselves
In a class, being much more advanced than others, so that they skip ahead and do advanced material themselves.
In a class and lacking some prerequisites, so may struggle with some parts.
Planning
Do some planning, and document it - the design process helps others to teach and modify. At least put it in the instructor guide (
guide.md). (this is the designer/maintainer’s guide)Put the main points from the “backwards lesson design process” in here, enough that it is easier for someone to improve your lesson than to redo it.
Make learner personas: what is your target audience?
Decide learning objectives based on the personas: high-level end goals. What students get out, not what they do.
Also make a guide for teaching (instructor’s guide), “if you want to present this, do this”.
How much preparation is needed? Is it enough to know the topic and have read the material?
Things to prepare before the presentation. Does anything need to be set up?
Practical notes on presenting.
Are there solutions to exercises somewhere? Are they needed?
Include some pre-assessment questions which can be asked at the beginning.
Perhaps you should do this at the end, but at least starting the instructor’s guide at the beginning will frame your writing.
Writing
There is not much here yet, mostly just follow the “backwards lesson design” above. The hardest part is coming up with good exercises, so our practical advice is to leave plenty of time for this and talk with others. There is inspiration at the bottom of this page. Try to think of diverse types of exercises.
Exercise design is the time it is most useful to be with others to do brainstorming, so we highly recommend discussing with others at this point. Because exercises are used to set the overall outline of the lesson, this also gives people a say in the overall outline - in a very concrete way.
Make sure you include the emotional starting point at the beginning - why should you care and why is this cool?
This should also be at the start and end of each section: not just what or how, but why?
Part of this is also having a student’s guide, so that people independently studying can know how to follow the material.
It’s OK to have more material than can be presented or than people should know, but label things well, including labeling the difficulty.
In the beginning, what sections are expected to be taught in short/long versions? What’s advanced/optional?
Label advanced and optional sections as such. Perhaps also really basic sections that can be skipped for that reason.
Plan for mixed abilities. It’s OK to have optional (basic) and advanced sections, as long as they are clearly labeled. Mainly, don’t have people think that you are uncoordinated because you are skipping advanced sections.
Once you are done, update maintainer’s and instructor’s guides.
Introduction (and conclusion)
The introduction is the first thing people hear, and needs special thought. Don’t start with a cold open, just going straight to the topic (“what” or “how”). Instead, have some careful motivation (“why”). It could be especially good to talk about what is wrong with the current state of affairs (give a good, simple example) and why it should be improved. Then start talking about what the improvements are.
Ideally, the introduction should serve as an self-contained abstract of your material. If you need to teach your lesson in only 10% of the time you have, can you use just the introduction to do it?
Conclusion should remind people about why this is cool and discuss what comes next.
Thinking of exercises
Not every exercise has to be an amazing hand-on example. It’s mixing with smaller, more conceptual things to reduce the cognitive load and be able to have more frequent exercises.
One of your other primary goals should be to make your exercises relevant. Abstract will lead to disconnection. Most lesson designers work at a higher level of abstraction than their students. Connect the exercises to the real world. Also, can you tell a complete story with exercises? (Remember, in backwards lesson design, the exercises form the story of the lesson.)
There are three types of “action”:
Exercise: Learners do these themselves during a quite time. They can focus, read, and figure things out. These are good but make them long. These should be in as long sessions as possible, so learners have time to focus. A five or even ten minute exercise is almost zero time to think.
Subtype: Questions which you ask the learner and they answer via the Notes. These can be short and during your talking.
Demos: The instructor do something and explain it why doing. These can be good, but you need to remember to go slow enough for learners to follow, and they aren’t very interactive.
Type-along is where instructors do something and learners are expected to follow along at the same time. This sounds like a good idea, but there are just so many things that can go wrong, and if someone gets behind, the lose it all. They can work if you give an exercise doing the same things right after, and make it clear “what I am typing is the next exercise, so you don’t need to follow along”.
Good exercises are the most important factor in a good lesson. Even if you are preparing the rest of the lesson mostly alone, consider a good long brainstorming session to go from “list of topics to cover” to “sequence of exercises”.
When you are stuck thinking “how can I make an exercise that covers X”, think of the lists below inspiration. Not every exercise has to be an sophisticated hands-on thing, so don’t be afraid to use different types:
Exercise inspiration
Basic types:
Multiple choice (easy to get feedback via a classroom tool - try to design each wrong answer so that it identifies a specific misconception).
Code yourself (traditional programming)
Code yourself + multiple choice to see what the answer is (allows you to get feedback)
Inverted coding (given code, have to debug)
Parsons problems (working solution but lines in random order, learner must only put in proper order)
Fill in the blank
More advanced:
Tracing execution
Tracing values through code flow (e.g. what is the sequence of values that
xtakes on?)Reverse execution (find input that gives an output)
Minimal fix (given broken code, make it work)
Theme and variations (working code, adapt to other type of situation/problem)
Refactoring
More conceptual:
Draw a diagram
Label diagram
Matching problem: two sets of Q/A, match them.
Thinking through the learning taxonomies also helps to come up with diverse types of exercises:
Bloom’s taxonomy: hierarchical skill levels (can you help students to “grow a level”?):
Remembering
Understanding
Applying
Analyzing
Evaluating
Creating
Fink’s taxonomy: complementary types instead of hierarchical:
Foundational knowledge
Applications
Integration
Human dimension
Caring
Learning how to learn
Lesson review checklist
This presents a checklist for reviewing lessons that already exist. You might want to also read lesson-design.md as well - it shows the picture of big redesigns and making of new lessons.
When reviewing lessons before teaching, the main thing to keep in mind is: you don’t need to change a lot! The lessons mostly work, and need some updating. But, you shouldn’t look at it as too big a job. Try to keep the working things and make the needed changes. Save big changes for less frequent rounds of improvement.
This is roughly sorted from highest priority for short review to lowest priority for big refactorings.
What you should focus on
When reviewing/updating a lesson to teach, focus on:
Do exercises and demos still work?
Any small-scale clarifications to make things flow better?
Does the “big story” need more clarifications?
Using the plan from previous years, with improvements.
Try to avoid:
Changing the whole design of the lesson (unless you are doing a big improvement round - discuss in a meeting to set the plan)
Removing stuff you won’t teach (other people may use that in their flows. It may be taught later)
Changing text too much to optimize for only one path (it should be reasonably modular, so that teachers can pick and choose)
Explicitly changing exercises to demos, or demos to exercises (it can be taught both ways. Try to make it suitable for both.)
Look at reports from previous years
There are reports maybe in the instructor’s guides or an issue.
They should hopefully say timings and what went well or not.
Check the notes archive from previous workshop - the questions that were asked for the session, and the feedback of the day.
Issues
Look through the issue tracker to see what is relevant, remember and follow up when going through the sections below.
Remember to add your own issues about how it went after you teach!
Your teaching plan
This doesn’t actually belong on your page, but somehow this preparation is related to making your own co-teaching plan for this one instance. This is covered in Teaching plan (see the examples).
Lesson guides
Lessons should have some guides for instructors/maintainers. They may be more or less up to date, but it’s the first thing you should read. (Maybe you want to update these after teaching…)
Instructor’s guide:
What sections should be taught for what audiences?
Common pitfalls when teaching
Any required setup in advance?
Any special config files that need to be cleared on instructor’s computer when teaching?
Maintainer’s guide:
Learning objectives (necessary to know its place)
Learner personas (necessary to know its place)
After you’re done analyzing, is there anything in the maintainer’s guide you need to update? (The maintainer’s guide is probably in most cases the same as the instructor’s guide)
Design philosophy, how to modify while preserving the overall character.
Student reference guide:
Anything to fix or already?
Keep this in mind when you get to episode details.
Run through the whole lesson
Run through the parts you will teach. Do all the examples by yourself.
Exercises and demos, episode details
Most of your review time should be focused here.
Read through each exercise (with no other text in between). Does it make a logical progression?
Exercises labeled with difficulty, optional, etc.
Optional advanced exercises or material in places where advanced users may get far ahead.
Each exercise is self-contained as much as possible (not every one can be): a helper can read just the exercise area and get an idea of what is supposed to happen and why.
Update the student’s reference guide as you are going through the details.
Remove duplicate or unnecessary information when possible. Usually, things are added and not removed. This leads to a lot of excess material. Shorter is usually better. If something shouldn’t be removed, perhaps mark it as advanced or optional.
Exercises vs demos
Things should be marked “demo” if it would be hard for a learner to do it themselves, based on what is written.
Things should be marked “exercise” if it should have everything necessary for a learner to do themselves.
Exercises can always be done as demo if the teacher decides (regardless of what the lesson says).
Verify for demos
Clearly labeled as a demo
Explains the purpose clearly (why you would do it)
Explains the outcome clearly
Has enough text/pictures so that a learner can see what you probably typed.
Usually has the “solution” inline with the text of the demo.
Verify for exercises
Clearly labeled as an exercise
Labeled with expected duration
Explains the purpose clearly (why you would do it)
Explains the outcome clearly
Shows every single command and thing that needs typing
Common problems are anticipated and explained
Where appropriate, recovery mechanisms: if someone got lost on the previous exercise, what should they do? Is there any solution?
Has a detailed solution after the exercise steps (enough that it can be followed as a demo if someone wants to)
Episode overview
Verify each individual episode has a overall motivating story (why, what, why, what’s next):
Read the intro and conclusion to every section/episode.
Do they make sense when you read them in order, without reading the text in between?
Do they motivate each section well enough (not just explain what, but why it’s cool?)
Do they have learning objectives at top and food for thought at the bottom?
Does the episode (or lesson overall) say what is next, to keep people interested in growth?
Lesson overview
Verify the lesson overall picture is motivating and forms a complete story (why, what, why, what’s next):
Is the introduction intrinsically motivating enough? Does it promote an emotional connection to existing problems?
Student’s guide and framing: will a student know when this is relevant to them and how it will benefit them?
Doesn’t need to include word-for-word learner personas, but should convey this somehow.
Are the difficulty and prerequisites stated?
Does the wrap-up tell what was learned?
Does it tell why it was learned?
Does it tell what learners should do next?
Installation instructions
Verify everything works with the standard CodeRefinery environment: https://coderefinery.github.io/installation/ (not your own personal environments: learners won’t use that)
Propose updates to the install instructions as needed.
Major Refactorings
Major restructrings should be rare and usually happen as agreed in a group.
Always start with the big picture: does it make sense? When refactoring, always start off with backwards lesson design again (see lesson-design.md) and fully go through that.
After the above, do the details. Remember the guides still.
Before you start major refactoring and rewriting, think if it makes sense. Have you figured out why it’s the way it is based on the instructor’s guide? If you do a big refactoring, make sure you update the maintainer’s guide!
Before you embark on a big refactoring step, please pitch your idea in a GitHub issue and collect feedback from others. Maybe even hold a brainstorming session.
Lesson contribution guide
Thank you for taking the time to contribute to CodeRefinery! All types of contributions are encouraged and valued. We welcome contributions from everyone (technical experts, legal experts, and newcomers alike). In this document we explain how to contribute to CodeRefinery lessons. The most important takeaways are that i) the barrier for contributiong is low and ii) you can always discuss your proposed small (or huge!) changes with the developers of CodeRefinery lessons.
We use GitHub issues to communicate things that need to be updated, collect feedback and improvement suggestions. Latest prior to every workshop we go through the issues and implement and resolve at least the urgent ones.
All our lesson materials are written in Markdown using fairly normal Sphinx, like how we teach, with a few extras from our own Sphinx lesson extension.
The broad development process
Our lessons are continually in use as a reference (and sometimes taught by others), but it’s OK if they continually evolve. A few times a year our self-hosted big courses happen: during these times, there is rapid development. Usually, we try to limit to incremental changes during routine times. Every so often, there is a period of big updates, where we’ll look at all the accumulated bigger suggestions, the current state of the art, and what’s needed, plan out a new lesson, and then implement it in time for the next course. A few lessons each year may get this treatment at most.
How you can contribute
There are three ways to contribute, ordered from the easiest to the most demanding one:
1. Small fixes and suggestions submitted via “Issues”
If you find a typo or have a quick suggestion, but cannot edit it yourself using git, you can open an issue describing the problem or proposal. Maintainers will review your suggestion and address it.
2. Small fixes and suggestions with git
If you are familiar with git version control and you spot a typo, broken link, or error, you can submit a quick fix with git. Even small improvements like clarifying text or adding references are valuable. Usually the process works like this:
If you do not have one, get a GitHub account.
Fork Repository: This creates your own copy where you can freely edit.
Use the GitHub’s web editor or your local favourite editor (after git clone) to work on a new version!
Make your changes: edit or add the content. Please write in Markdown. If adding code or commands, format them properly (use code blocks) and test if applicable.
Submit a Pull Request: Once your changes are ready, open a Pull Request (PR) to the main lesson repository. In the PR description, briefly explain your changes and why they improve the lesson. If your contribution closes an existing issue, mention it. CodeRefinery project members will review your PR, provide feedback if needed, and merge it when it’s ready.
Don’t worry about getting the formatting just right. If you let us know it’s not perfect, we can usually quickly fix the synatx.
Tip: If you’re new to this, check out our lesson on collaborative version control.
3. Large edits
You can also add substantial contribution to the lessons, like a new section, improve an explanation, or include an example related to a specific topic. For major new content creation, please open an issue first to discuss your idea with the community, so we can coordinate and avoid overlaps. We can’t often make big changes, but we accumulate all the ideas and periodically do big updates. Please don’t feel bad if there is a very long period until a reaction. Our own ideas get collected the same way.
Style and content guidelines
To keep the lessons consistent and accessible, please keep these guidelines in mind when writing:
Clarity and Tone: Aim for a clear, concise writing style. Explain acronyms or technical terms in simple language so that readers from various backgrounds can follow. Our tone is professional, but not overly formal or technical: think of explaining concepts to a colleague who is not an expert in the topic of any CodeRefinery lesson.
Formatting: Write content in Markdown. Use headings and bullet points to organize information logically (as seen in our existing chapters). Keep paragraphs short (3-5 sentences) for readability. When adding code snippets, use code blocks and include comments if needed for explanation.
Target teaching style: Try to keep in mind that different courses remix the materials in different ways. Don’t remove or rearrange lots of material to optimize for one path, instead instructors are expected to pick and choose the episodes (pages) they want to teach. These bigger arrangements happen during the major development sessions. (The threshold for adding a new episode isn’t so large, if it’s an optional episode.)
Length: beware of adding too much and increasing the length. There is always more to add, but there is also a strict time limit. Most lessons are designed to give learners a taste of the material and be able to do follow up reading.
Content Accuracy: Ensure any facts or claims are accurate, ideally with a peer reviewed citation.
Originality and Licensing: Contribute only your own work and do not plagiarize from other texts. By submitting a contribution, you agree that you wrote the content (or have rights to it) and that it can be included under the project’s open license.
Privacy Considerations: Your name (or nickname) will be publicly visible and associated to the contribution. Due to the distributed nature of open source projects, you accept that it will be impossible to delete your contribution from the version control history.
Use of generative AI: the undisclosed use of generative AI is accepted only for basic checks of grammar, spelling, and punctuation. If you use generative AI, you must declare it in your contribution and describe how it was used.
Because of the previous point, we reject automated contributions that are clearly coming from AI agents or other automated systems with close to zero human intervention. As a human you can present the work you did with an agent to improve a lesson and we can then discuss on how to integrate it in the existing materials.
Images: only original images can be submitted. Image files for new images should be submitted as editable format using SVG as open standard for vector graphics. Photographs can only be used if released with a compatible creative common license.
For any contribtion larger than fixing a typo: Do not forget to add yourself as a contributor in the lesson repositories citation.cff file.
Lesson preview
Preview lesson page by building it locally using Sphinx, see also Sphinx-lesson build.
Creating a new CodeRefinery lesson
We have a self-explaining Sphinx-lesson.
Code of conduct
Our virtual lesson environment adheres to the CodeRefinery “Code of Conduct” to ensure a welcoming environment for all. By participating, you are expected to uphold this code. In short, please be respectful and constructive in your interactions. For example, we expect everyone to be open to different viewpoints, to give and receive feedback kindly, and to avoid derogatory language – in other words, be empathetic and courteous to others. Admins will take actions in case of violations of the code of conduct.
Additional resources
Also read Lesson design and Lesson review checklist.
Ask for help
If you have questions about the contribution process or run into any problems please contact support@coderefinery.org You can also just open an issue with your question. We are always happy to help!
Thanks for making it to the end of our contribution guidelines; we look forward to your suggestions!
Open Broadcaster Software theory
This page describes the theory around OBS. For practical steps to run a course, see Broadcaster.
Open Broadcaster Software is an amazing open-source audio/video production tool. It’s probably not professional grade, but is used in serious events and will make a non-professional feel professional. The main point is that, instead of being limited to what your meeting software can do, you can:
create more advanced mixes of screens/video/etc, without having to do post-processing.
do more with the (local recording, streaming)
do this all better, for example, exclude the audience speaking from the recording.
It is a GUI application, so is not that hard to figure out, but there are a lot of initial concepts. This page isn’t a comprehensive tutorial, but will introduce the basic concepts and what you can get out of it, and you can either figure out the rest or read other tutorials.
Vision
When teaching online, we are usually limited by our online meeting software. This forces us to make certain trade-offs to fit the limitations of the software, so that we can’t reach our full potential. By using more advanced technology, we can do more: have interactive sessions while also recording and preserving privacy. For more information, see the online teaching guide.
Basics
Basic audio/video glossary
- Open Broadcasting Software (OBS)
OBS, whose current implementation is known OBS Studio. It is a multi-platform audio/video mixer, recorder, and streamer. It doesn’t do any editing, but you can flexibly mix stuff when producing for a one-shot product.
- streaming
Media which is delivered to the user continuously. The term implies over the Internet.
- livestreaming
Streaming of source that is live, delivered in near real-time. Lately, it is popularized by livestreaming games and other activities, which provides us a lot of accessible tools to use.
Livestreaming tools have opened a significant way for anyone to be able to interact in real-time with a large audience online.
- recording
Saving the streaming data locally for later use. And other stuff, you probably know this.
- Twitch
A popular livestreaming site. Popular with gamers, but has all kinds of live-streaming events.
- codec
COding and DECoding. As a noun, the algorithm used to encode and decode sound or video. There are many different codecs, with different properties of compression, CPU usage, etc. The codec is independent of the program actually used to encode/decode, and also (somewhat, not entirely) independent of the container format.
- container format
File format that contains the audio/video data. There are different formats, and the container format is independent of the codec of the material inside (but not all codecs work in all containers). There are containers for both streaming and recorded media.
- encoder
The program that compresses raw video to the codec for distribution. Of course, there are also decoders. You need the right decoder for each codec, but most things you would use these days are widespread.
- bitrate
Amount of data of the media stream over time. Usually measured in Megabits (not bytes, also note the actual unit is Megabit/second). As an example, Netflix on mainstream “high” quality is about 5 Mbit, and Twitch recommends ~6 Mbit at most. Netflix on low quality is about .7 Mbit, but of course all these are for movies, not relatively static screenshares.
The more movement in a scene, the more bitrate required to encode that at a constant quality.
- constant bitrate (CBR)
Encoding method where the bitrate does not vary over time. There is only a small encoding buffer to handle times with a large amount of movement.
Twitch and other live streaming sites recommend CBR because of the way the Internet works. With a live stream, a constant stream of data is needed. Internet congestion control protocols can keep a constant stream going when the stream is constant. If there is a sudden increase in instantaneous bitrate (with VBR and a section with lots of movement), congestion control not be able to keep up and buffers empty, causing lag.
Similar considerations apply to other playback modes, such as embedded devices with limited CPU power, thus the idea of encoding “targets” (profiles optimized for certain classes of devices). Mainstream personal computers tend to have enough power to decode anything, so this isn’t a major consideration.
- variable bitrate (VBR)
Encoding method where instantaneous bitrate varies depending on how much information is needed at each instantaneous point of time, to encode the complexity of the current scene. In x264, this is usually done as “CRF”.
- latency
Time delay between two events. In a livestream, time delay between the performer’s actions and the audience seeing it. This is caused by countless buffers: encoding buffer, network buffers, network transmission time, decoding buffer, etc. Lower latency increases performance demands on the hardware and network, so you need to strike a balance.
On Twitch, “low latency mode” gives you 10-15 seconds of latency.
- x264
A common open-source encoder. Used as an internal encodign backend for many different programs.
- x264 → crf
In x264, a variable bitrate encoding mode (constant rate factor). Values are between 0 and 51, but reasonable values are low 20s. For example, 23 is the default and looks good for all practical purposes.
- Real-time messaging protocol (RTMP)
A common protocol for live streaming. It is proprietary, but was later opened and is now one of the main standards.
- HTTP Live Streaming (HLS)
The other common streaming protocol.
User interface basics
OBS is a graphical program. Once you start it up, you see various user interface features:
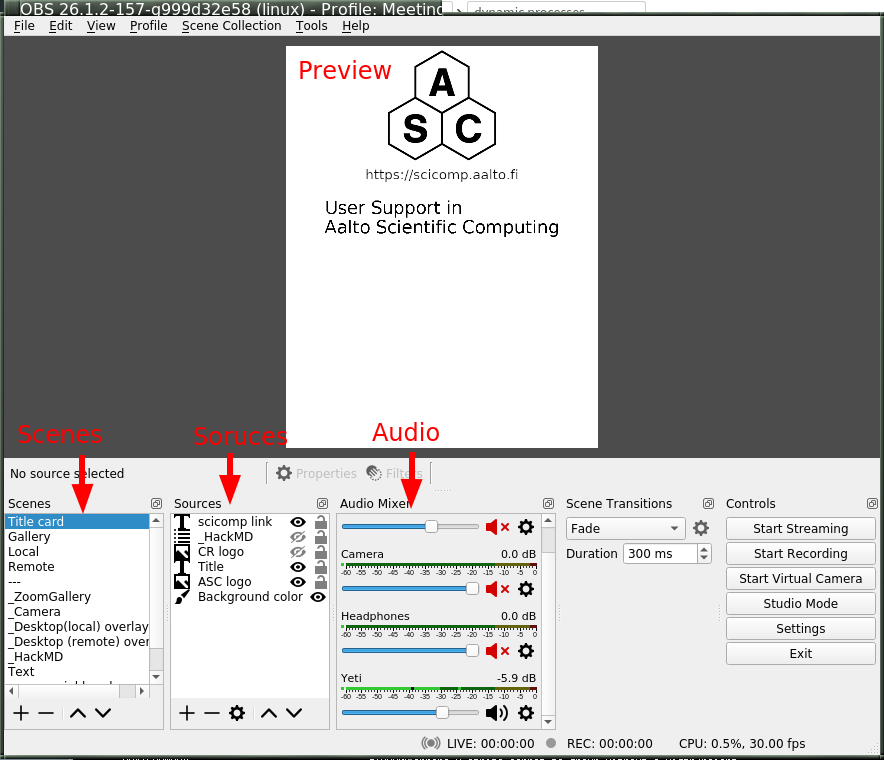
Basic OBS control layout
Of primary note are the following concepts:
- Preview area
Shows what is currently being broadcasted or recorded, or will be if you turn it on. There is also a separate “Studio mode” with a preview area, and live area. The preview area is used to prepare the stream, you can make it live when you want.
- Scenes
A certain layout that can be broadcasted. On the lower left is your scene collection, and you can add, delete, reorder, and rename scenes. By clicking on a scene, you switch to it and it begins broadcasting/recording.
- Sources
An image source which can be composed together in a scene. Scenes can be added, deleted, recorded. Via the preview area, sources can be graphically moved around to your liking. There is a comprehensive set of positional and image effect transforms you can make.
Sources can have filters applied to them, which do some sort of video transformation (for example, background removal). There are also transformations, which affect the position in the scene. Put together, you can do almost anything you would like.
- Audio sources
You can take audio input from various sources: mainly, microphones or as a monitor of a computer audio device (to, for example, play sound). Audio sources are configured in settings, but can be muted/have volume adjusted in the respective area of the screen.
Audio sources also have filters.
- Control buttons
There are buttons to start/stop recording/streaming. The output locations are configured in the settings.
Configuration
Here, we will go over the main parts of configuration. We won’t say everything, since this is graphical program and you can mostly click around and find your own customization you would like.
Because of the popularity of streaming, it is easy to find more tutorials and recommendations for anything here. Add “streaming” or “OBS” to your search.
Basic configuration
These options are found in the “Settings” dialog. These are just generally suggested defaults and when you might want to tone them.
- File → Settings → Stream
Here, you would configure the streaming service, if any.
- File → Settings → Output
Here, you configure streaming/recording output parameters.
If you use Simple, you pretty much can’t go wrong. If you are mainly screensharing and don’t have much action video, you can make the bitrate much lower, for example 1500 Kbps. The slower “encoder preset” is, the more CPU power that will be spent to get that quality, so the less space it will use. The better your CPU is, the slower you can make it; “fast” to “slow” are reasonable.
If you use advanced you have more options:
Streaming: Rate control=CBR, 1500 Kbps, other options don’t matter so much, defaults should be fine. You can search for recommendations online, but realize that most others stream high-action games so their settings are much higher than you need.
Recording: Recording format, mkv (mp4 is completely unusable if the recording dies, mkv can be uploaded to youtube if it has a supported coder inside of it). Encoder=x264, Rate control=CRF, CRF=22, Keyframe interval=auto, CPU preset=medium (or slower, for better CPUs) (slower=use more CPU to do better encoding, either higher quality or lower bitrate. Veryfast–Slow is a good range), Profile=main, Tune=None
If you use the streaming encoder for the recording, then it will only have to encode it once and it will save CPU power.
- File → Settings → Video
Here, you set the base size of the picture you will be using. You could do FullHD at 1920x1080. For vertical recording, we recommend you do 840x1080. Use your chosen value for both Base and Output resolutions. 30 FPS.
When setting your video size, traditionally people tell you to be as large as possible (to attract viewers). However, this guide is focused on teaching and learning, and for that a) we want our content to be as accessible as possible. There is no need for as many pixels as possible, as we often say “present from your smallest screen”, and you can do that by artificially restricting yourself. b) We have found a vertical screen works well: a learner can have the video/stream taking up half of their screen, and the other half available for doing their own work.
Click around through the other menus in settings and see if there is anything to configure to your own needs.
Scene configuration
After the above, you can set up scenes basically however you would like. However, as a starting point I propose these scenes to get you started (and I propose we standardize on these names, so that we can make some uniform scripting tools):
Title, the logos and titles of the event.
Gallery, a gallery of the people presenting (or the one). When presenting from a Zoom meeting, this is a capture of the gallery view in dual-monitor mode.
Screenshare is a screenshare by someone remote. If you are capturing from a Zoom meeting, it is the capture of the second window of the dual-monitor mode.
BroadcasterScreen is a local screenshare, that you get by capturing your own screen.
Notes is some HackMD or other material you might want to show during discussion periods or breaks.
Common types of sources (scene elements) include:
Static image (e.g. logo or background)
Desktop capture, for your local desktop. You can crop it (in the source config) to share only a portion of your desktop.
Single-window capture. Note that this is smarter than Zoom, since it can capture the full window even if is not on top.
Text (which works, but is not very powerful)
Solid colors
Other scenes. You can make one scene, then insert it into other scenes to avoid duplication of scene elements scene elements.
The sources themselves can be moved around graphically, which is good for setting things up. When there are more demanding needs, the source transformation can be edited for more precise control (right click on source in preview → edit transformation). There are source filters, which can do video effects such as removing a color. Some sources can be cropped in the source-specific config as well.
Audio configuration
Audio configuration is simpler than video configuration, since there are fewer different sources. On the other hand, it is harder to see what is going on (no preview) so it is harder to adjust it perfectly, and easier to cause problems like loops.
The main concept is that your computer may have different input and output sound devices (“cards”). For example, I can output sound from some application on my monitor’s speakers, while sound from other applications on the headphones at the same time. Find your computer’s way to see and configure what is going on under the hood.
There are two types of audio inputs:
Microphones, obviously recording from a microphone.
Monitors (as in, monitor a sound card), recording what is currently being played on another sound card. This is what is used to capture audio from a remote meeting, such as Zoom.
You set the active audio input in the application settings. The volumes of these can be independently adjusted - you want typical volume to be in the yellow zone. Advice for various operating systems include:
Linux using PulseAudio:
pavucontrol(GUI) orpulsemixer(terminal)Windows: ???
MacOS: ???
Under “advanced audio properties” (a menu item, also available from the gear icon in the audio area) you have several more options.
You can add various filters, such as noise reduction.
You can group audio sources into various audio tracks, and the stream/recordings can use different tracks. For example, a person may stream with music but leave that out of the recorded video. Or, you might record a video with two different audio tracks, one just the presenter and one with presenter + audience.
You can monitor the audio, which plays what is being recorded back over the headphones and speakers for you to check. Make sure you don’t make any loops!
Audio configuration is a big deal. You can look at these other guides:
???
High-quality audio is quite important. I’ve spent far too long playing with it, and my conclusion is that I don’t know enough to make it better than what I have now. What I know is in the “instructor audio” page linked above. I propose a central recommendation: talk about audio quality. Start meetings early and test it. Communicate about problems early, don’t ignore and think it’s “good enough for now”.
Recording and streaming
Once you have done the above, you can record and stream by clicking the buttons.
One piece of advice: always keep the recording going, and then stop/restart it when you need to cut. It’s easier to delete the unnecessary segments than realize you forgot to push “record”.
Projector and loopback output
Beyond recording and streaming, there are several more ways to use the output that can feed into other applications.
With projectors you can display the scene locally on another monitor or window.
The fullscreen projector displays the scene to a monitor. As the name says, this could be used to send it to an external projector or capture card via HDMI. Or even preview locally, or screenshared in an online meeting.
The windowed projector does similar, but makes a new window that can be moved and resized. This can be captured as a single-window screenshare in an online meeting. Or it can be a smaller preview of the scene if the main OBS window is too large for your space.
The loopback output creates a virtual camera device. This appears to other applications as a camera, just like the camera that captures your video. Other applications can use this as the input just like another webcam. So, you could make a fancy scene that is used instead of your normal camera’s picture. Or, in Zoom you can share screen from “second camera” - which would use this scene. (Note in Zoom it will interpret it as a landscape picture, regardless of what aspect ration you actually use. Thus, this isn’t very suitable for vertical screen sharing.)
Example configurations
Recording your own demo
Scenes: Title, Gallery, BroadcasterScreen. Variable bitrate recording.
Online teaching event
Scenes:
Title
Gallery - contains galleryCapture
BroadcasterScreen - capture of your screen, when you need to teach. Has galleryCapture in top-right corner
Screenshare: capture of Zoom second window (which has been adjusted to be same resolution as your base canvas size). Also has galleryCapture in top-right corner.
Notes: contains HackMD + galleryCapture
galleryCapture - contains the Zoom gallery capture. This gets inserted into the other scenes above.
Audio:
Microphone capture
Monitor of sound card which has the Zoom output
Outputs:
Recorded locally. Start and restart recording after every transition that you would want to publish separately. (Better to cut more than less, to have logically organized shorter segments. Also, always keep it recording, in case you forget to turn it back on!).
Stream to your preferred site.
Use windowed projector or Zoom capture to send the output directly to a Zoom meeting. But, that requires careful audio routing.
Workshop checklist template
This page is a checklist that we use when planning a CodeRefinery workshop with 300 or more participants but may be useful in organizing other workshops as well.
Let’s keep this brief and copy-paste-able to HackMD/HedgeDoc for the actual planning.
.. seealso::
[Workshop organizer plan / cheatsheet (google
sheet)](https://docs.google.com/spreadsheets/d/1gUUaPprOYZ33X2a6b0GnEdkk4YKZrRf47ExzUWKxWSU/edit)
that we have been using lately.
CodeRefinery workshop YYYY-MM-DD
[toc]
Links
- [Workshop page]()
- This document: copy-paste link here from the Share-menu
- [Q&A document]()
- [Archive Q&A document]()
- [Twitch channel](https://www.twitch.tv/coderefinery/about)
- [Emails and communication]()
- [Zoom for onboarding and install help]()
Add missing links! :arrow_up:
Workshop roles
Overview of the roles: https://coderefinery.github.io/manuals/roles-overview/
If you want to take part, add your name here, sign up in Indico and select “I am interest in being a helper, co-instructor, or observer”, and you will be contacted.
Instructors
Two names per lesson, first is primary
[ ] day 1 - git-intro: ???, ???
[ ] day 2 - git-intro: ???, ???
[ ] day 3 - git-collabiorative: ???, ???
[ ] day 4 - reproducible research: ???, ???
[ ] day 4 - social coding: ???, ???
[ ] day 5 - jupyter: ???, ???
[ ] day 5 - documentation: ???, ???
[ ] day 6 - testing: ???, ???
[ ] day 6 - modular code development: ???, ???
Expert helpers
If a central Zoom exercise room is provided: Help in our learner zoom, circle around breakout rooms; there will probably be 2 or 3 rooms where we need to provide the helper. Else: Help answering questions in Collaborative Q&A document.
[ ] day 1 - git-intro: ???, ???, …
[ ] day 2 - git-intro: ???, ???, …
[ ] day 3 - git-collab: ???, ???, …
[ ] day 4 - reproducible research: ???, ???, …
[ ] day 4 - social coding: ???, ???, …
[ ] day 5 - jupyter: ???, ???, …
[ ] day 5 - documentation: ???, ???, …
[ ] day 6 - testing: ???, ???, …
[ ] day 6 - modular code development: ???, ???, …
Managing collaborative document
Keep the document organized, check for unanswered questions, and archive notes each day.
[ ] preparation before workshop:
[ ] day 1 - git-intro: ???, ???, …
[ ] day 2 - git-intro: ???, ???, …
[ ] day 3 - git-collab: ???, ???, …
[ ] day 4 - reproducible research: ???, ???, …
[ ] day 4 - social coding: ???, ???, …
[ ] day 5 - jupyter: ???, ???, …
[ ] day 5 - documentation: ???, ???, …
[ ] day 6 - testing: ???, ???, …
[ ] day 6 - modular code development: ???, ???, …
Workshop organization; roles “behind the scenes”
Organiser roles and their responsibilities. This does not mean that a person will do everything that is part of their responsibility, but they will make sure that their responsibilities are followed-up and not forgotten.
Event director
lead:
backup:
Before workshop
[ ] Create planning document by copying this template
[ ] Distribute roles using this document
[ ] Ask collaborators/stakeholders to pick roles
[ ] Add all sessions to CodeRefinery calendar separately
[ ] Send calendar invite to all organizers, instructors, expert helpers, with all relevant links
[ ] Decide if certificates will be possible and what is needed for getting a certificate/credits (ask from partner universities)
[ ] Remind co-organizers to register
[ ] Send summary email to all co-organizers will all important links in one place
After the workshop:
[ ] Summarize lessons learned and make it a blog post in coderefinery.org repo
[ ] Coordinate post-workshop survey eg. in Indico
[ ] Merge new edits from here (no names ofc) to the Playbook
[ ] Port changes from workshop page to template page
[ ] On CR website move from “upcoming” to “past”
Registration coordinator
lead:
backup:
ca. 2 months before = When workshop details are set:
[ ] Create Indico registration page for the event
[ ] Include event information
[ ] Customise the registration form
[ ] Customise the confirmation email (with outreach and marketing coordinator)
[ ] Add Zoom link if any
[ ] Point to workshop page
[ ] Add collaborative document link if any
[ ] Set up a workshop page from template page
[ ] Add workshop to “upcoming courses”
Remember to add all the emails to workshop page
[ ] Open the registration
Every day:
Check support email (Freshdesk) for requests/questions
Every week:
Check registrations for problems and read notes to organizers
Identify if need to do something – basically, “playing” with the registration data to not forget anybody and not to forget follow-up
Update stats
Update workshop-webpage if new local organisations
ca. 1 month before:
[ ] Reach out to participants (examples from Mar 2023)
Two weeks before
[ ] Send general information to all
Next steps, onboarding, installation
Those who have a team, please organize your own zoom/video
[ ] Try to match up learners and helpers who want to be part of a team
ca. 1 week before
[ ] Update Ondico auto-reply for last minute registrations
[ ] Send email with all links
1 day before!
[ ] Send a reminder with links
During the workshop
[ ] Send daily summaries (with exercise coordinator)
After the workshop:
[ ] Add viewing statistics to CodeRefinery webpage
[ ] Use statistics repo (feel free to edit)
[ ] Close registration
Broadcaster
lead:
backup:
[ ] Prepare ice-breakers for each day
[ ] Create instructor Zoom and communicate it (with exercise coordinator and outreach and marketing coordinator)
[ ] Publish recordings (does not do all the work but coordinates it)
[ ] Prepare for upload (use ffmpeg-editlist and collaborate)
[ ] Upload videos and communicate (with outreach and marketing coordinator)
Instructor coordinator
lead:
backup:
[ ] Confirm that each lesson and session has co-instructors
[ ] Schedule calls with each instructor pair to distill most important questions and tasks to them
[ ] Show where the detailed schedule is and recommend to move it to instructor guide
[ ] Discuss that the detailed schedule can and should be improved
[ ] Show where Q&A and feedback from past workshop can be found
[ ] Discuss plans for exercises: try 3 exercises each half-day, each not shorter than 20 mins
[ ] Ask them to check their lesson’s exercise list
[ ] Ask for any software requirements changes
[ ] Inform about audience (at the time of writing half of registrants prefer to follow on their own) - adapt exercise expectations to audience
[ ] Check/test for high-quality screen share
[ ] Discuss how we can give learners get a good experience
[ ] Test software install instructions
[ ] List instructors on the website (with exercise coordinator)
[ ] Organize team leader on-boarding sessions (with exercise coordinator)
[ ] After the workshop copy detailed schedule to the individual lesson repos as issues
Exercise and team leader coordinator
lead:
backup:
Before the workshop
[ ] Make sure exercise list is communicated (with outreach and marketing coordinator)
[ ] List all team leads (who consent to being listed) on the website (with instructor coordinator)
[ ] List expert helpers on the website (with instructor coordinator)
[ ] Organize staff & helpers on-boarding sessions (with instructor coordinator)
[ ] Send team leader onboarding summary email + save it to the website (with outreach and marketing coordinator)
After the workshop
[ ] Organize a de-briefing call with team leads to learn about their experiences and suggestions
[ ] Help other roles in putting everybody who contributed and consents on the website as credit
[ ] After the workshop remove the exercise repositories
[ ] Help event director with post-workshop survey
Outreach and marketing coordinator
lead:
backup:
[ ] Create/update advertising texts and relevant news on the workshop page
[ ] Newsletter
https://tinyletter.com/coderefinery/archive
draft: https://hackmd.io/@coderefinery/CRnewsletter_1_2023
[ ] Advertising texts on the workshop page
https://coderefinery.github.io/2023-03-21-workshop/communication/
https://github.com/coderefinery/2023-03-21-workshop/tree/main/content/communication
[ ] CodeRefinery Twitter
https://coderefinery.zulipchat.com/#narrow/channel/215460-coderefinery/topic/social.20media.20suggestions
[ ] CodeRefinery Mastodon
https://coderefinery.zulipchat.com/#narrow/channel/215460-coderefinery/topic/social.20media.20suggestions
[ ] CodeRefinery LinkedIn
https://coderefinery.zulipchat.com/#narrow/channel/215460-coderefinery/topic/social.20media.20suggestions
[ ] CHCAA LinkedIn (Aarhus University)
[ ] Partner Twitter, retweet and own tweets
[ ] Aalto Scientific Computing
[ ] Partner newsletters
[ ] Sigma2
[ ] SNIC/NAISS
[ ] ENCCS
[ ] CSC
[ ] Partner websites training calendars
[ ] CSC
[ ] ENCCS
[ ] UiB
[ ] AU (Aarhus University)
[ ] Partner and other email lists
[ ] Aalto STEM students
[ ] Aalto triton users
[ ] Delta doctoral network
[ ] UiB researcher
[ ] UiB HPC
[ ] NERSC Bergen
[ ] Bjerknes Bergen
[ ] University of Oslo computational biology
[ ] University of Oslo Phd and Postdocs
[ ] University of Oslo Dcince contact (?)
[ ] Research institutes in all countries
[ ] Partner posters
[ ] Aalto (CS,U,NBE,PHYS,VAARE)
Certificate coordinator
https://coderefinery.github.io/2023-03-21-workshop/certificates/
lead:
backup: ASC team (the process can be run by anyone and we are now using a ticketing system to track requests)
[ ] Make sure that instructions on certificates are disseminated multiple times
[ ] Workshop page, emails
- Learner sends materials to scip _at_ aalto.fi. This opens a ticket in Aalto "esupport" system
- The person who generates the certificate verifies quickly that the tasks were completed.
- We then work with https://github.com/coderefinery/generate-certificates to generate PDF certificates
- Certificate is sent to the person and ticket is closed
- Aalto specific:
    - The local version of that repository is at /scratch/rse/generate-certificates/. The commands were slightly modified so that the default working directory is not the home folder
    - Aalto students can also obtain directly the 1 ECTS credit. See internal process at ASC pages.
Workshop requirements - in person
This checklist is for the pre-planning phase of in-person CodeRefinery workshops: where you are deciding if you can host one and what room to use. Let us know about the items on this list when you contact us.
Lecture room
The room needs to be sufficiently large (a typical workshop is attended by around 20 learners and 4 instructors).
There needs to be enough space for instructors to walk around and interact with learners individually (a “flat” room is required).
Learners should face the same direction, and learners should be able to sit side-by-side for pairwise work.
The room should preferably have windows, and be ventilated well enough so that 20-30 people (and same amount of laptops) will not make it too warm.
A coffee room (or similar) should be located nearby for the coffee breaks.
Two overhead projectors are desirable, but if only one is available that will work too.
The projector screen needs to be large, and the resolution of the projector needs to be good.
Stable wireless connectivity for 20-30 people.
Sufficiently many electricity outlets so that all participants can charge their laptops.
Standing board for instructor.
Helpers
CodeRefinery workshops are hands-on and interactive, and a lot of time is spent on exercises where participants learn by doing. Participants explore themselves, and that means they need guides to help them if they get stuck.
We recommend that each site takes proactive steps to recruit at least two helpers per workshop. We’ve noticed that helper diversity promotes learning, so we recommend that organizers also make proactive steps to have diverse helpers (male/female, international, etc.). Local organizers should directly contact possible helpers and invite them.
Good candidates are people who have any of:
have attended a previous CodeRefinery workshop
have a passion for teaching, scientific software development, open source, open science, etc.
are research software engineers or hold a similar technical research position
have experience from teaching e.g. Software Carpentry workshops
want to experience CodeRefinery but already have a good idea of most basics
Other requirements
When we organize a workshop or event at a new site, we may need help with some local arrangements, including:
Booking a lecture room.
Ordering coffee and refreshments.
Advertise the workshop through local dissemination channels.
After the workshop
Would you like to become a helper, instructor, or partner and make more workshops possible?
How to plan an “in-person watch the stream together” CodeRefinery event
This is a checklist based on practical experience by Enrico Glerean / Aalto University Otaniemi in person CodeRefinery events. Please let’s improve it with other experiences.
Background:
CodeRefinery usually happens on TwitchTV. Everyone watches the streaming, like watching TV together. Those who register get access to a notes document where they can interact with the instructors and other CodeRefinery helpers behind the scenes. People use their own computers, so some help is given by the CodeRefinery team regarding installations and setup, usually a few days before the workshop starts.
CodeRefinery online workshop is usually divided between “Week 1 (Part 1)” which consists of Git version control and GitHub. Part 2 (it can be on week 2 or over multiple days) covers reproducibility, documentation, jupyter, and other topics. This page describes how to follow Part 1 as a group together in the same room and do the exercises together.
Before the workshop
Book a room with good A/V system.
You will need also a computer to play the live stream
Make sure the room has power outlets since people will have their laptops and most likely they will need power
Snacks+drinks are a motivational factor
By offering snacks+drinks you make people to register to make sure you can have enough snacks (and seats) for everyone. This will give you an idea of how many people will actually come.
DIY catering works better and is cheaper than ordering stuff from official cafeterias. Enrico usually has a kettle + tea + instant coffee + (lactose free/oat)milk + lots of (seasonal) fruits, some cookies and salty crackers.
Local organiser promotes the CR event and specifies there will be an option for doing it together at room xyz
People register to the main CR event
This is important because that is the main source of knowledge about pre-events (installation help) and other updates.
Optional: Local organizer (e.g. Enrico) receives list of registered participants that are affiliated with a certain organisation. Classroom registration may also run in parallel.
Local organiser OR CR team reminds affiliated participants about classrooms and asks to register to the in-person event separately (making sure there are enough seats / snacks available). This may also happen in parallel with the general registration.
Local organiser emails reminder to in-person participants the friday before the coderefinery starts (and details on how to reach the room, accessibility, phone number etc). Local organiser reminds how important it is to pre-install things.
If needed: local organiser can offer “come to the room 1h before the streaming starts if you need help with installations”
During the event
Organiser just shows the streaming on the projector/large screen.
If there are live questions in the room, there is nothing wrong to encourage the participants to use the notes document: “this is an important question that others might also have, can you write it on the notes document?”. In-person discussion often turns into a nice moment of interaction with people in the room. People like to talk with eachother. :)
Some exercises will be done “in the room” rather than on the stream. The most important ones are “git collaborative” on day 3, so that the room host can take the role of “team leader” and create the repository that the learners will fork. Clear instructions are on the exercise pages for day 3.
After the event
Revise the feedback from your participants on what went well, what could be improved, and some other suggestions for the future.
Organizing a CodeRefinery workshop
Anyone can organize a CodeRefinery workshop and teach the CodeRefinery lessons which are licensed under CC-BY. However, making it a successful workshop requires careful planning and preparation. Here we will go through practical aspects of organizing a workshop.
Email templates
A collection of email templates:
Advertising workshop
Dear Professor X,
My name is NAME and I work as a XXX in YYY. I’m contacting you now to spread the word about a workshop which I am co-organizing in LOCATION together with the CodeRefinery project (http://coderefinery.org/) organized under the NeIC organization. I found your contact information via ZZZ…
CodeRefinery (http://coderefinery.org) aims to reach out to diverse academic communities which use and develop software in their research, and advocate more modern and efficient software development methods (such as collaborative distributed version control, automated testing, code documentation, managing code complexity, etc). CodeRefinery is not about efficient code, but rather efficient coding, and experience has shown that researchers have a lot to gain from our course material!
A CodeRefinery workshop is planned for LOCATION in CITY on DATE, see the website here: URL
The most natural audience for our workshops is PhD students and postdocs, but both more junior and senior people may find it valuable to attend.
On behalf of the CodeRefinery team, NAME
Looking for helpers
This was part of a SNIC training newsletter. Saving it so that we can reuse in future:
Engage as a tutor on the CodeRefinery online workshop, Nov 17-19 and 24-26,
9:00-12:00

Engage in the successful CodeRefinery workshop program, by becoming a tutor for
the exercise sessions and discussion groups.  If you have been to a
CodeRefinery workshop, you will have experienced  a very hands-on approach to
training with frequent exercise sessions and group discussions.  In online
workshops these sessions take place in breakout rooms with 5-7 participants and
1-2 workshop tutors.  Tutors answer questions from the learners, guide them
through the exercises and try to keep time.  If needed, tutors can call on
experienced trainers in the background to help answer tricky questions.  The
tutors are an important part of the CodeRefinery teaching concept and all the
workshops to scale to many more people than the instructors could  otherwise
manage!

If you have previously attended a CodeRefinery workshop, and/or use some of the
tools and methods covered in a workshop (Git, software testing, modern
documentation platforms etc.), then please consider joining a CodeRefinery
workshop as a tutor! Being a tutor is fun, it expands your network and develops
your teaching and mentoring skills.  You always learn something new about a
subject by teaching it!

If you would like to help on the upcoming workshop in November, please sign up
as a tutor on https://coderefinery.github.io/2020-11-17-online/.  If you would
like to engage in later workshops, please register as a tutor on the notify-me
form (https://indico.neic.no/event/135/surveys/36).
Notify-me announcement
Dear all,
You are receiving this email because you have previously signed up for the “notify-me” list to get updates on upcoming online or in-person CodeRefinery workshops.
We now have the pleasure to announce that an [in-person/online] 3-day workshop will be held on LOCATION, on DATE. Registration has just been opened, see the workshop webpage: URL
If you want to attend, don’t wait too long to register since the number of seats is limited.
If you wish to unsubscribe from these announcements, please reply to this email.
Hope to see you there!
On behalf of the CodeRefinery team, NAME
Post-workshop survey
First email
Subject:  [CodeRefinery] 5-minute post-workshop survey

Dear CodeRefinery alumnus,

We hope that you enjoyed participating in a CodeRefinery workshop last semester and that it was
beneficial for your work and research! We don’t keep an attendance list, so apologies to those
of you who couldn't make it to the workshop...

Please help us to improve our course material and teaching methods by answering our very brief questionnaire at
https://indico.neic.no/event/109/
about whether and how the CodeRefinery workshop affected how you develop code.
All information you provide will be useful. Your participation is extremely valuable
and will help us to develop the project further. The average time to fill the form is around 5 minutes.

Would you be interested in being a helper or instructor in future workshops? It's a great way to continue
developing your skills and expanding your network! We're always interested in recruiting new helpers
and instructors. If this sounds interesting to you, please get in touch by writing to
support@coderefinery.org or join our chat: https://coderefinery.zulipchat.com

On behalf of the CodeRefinery team,
Thor
Reminder 1 week after first email
Dear all,

It's us, CodeRefinery, again. We just want to send this one reminder to kindly ask you to participate
in our 5-minute workshop-followup survey. To participate, please go to:
https://indico.neic.no/event/109/

Sorry for spamming (particularly to those of you who already participated), this is the last
you'll hear from us regarding the survey!

Cheers,
Thor
Practical info (online)
Dear all,
The online CodeRefinery workshop TITLE is approaching! It will take place on DATE at START - END in Zoom room ZOOMID. On the first day, we also have an optional session starting half an hour before START where you can connect, test your video client and iron out any technical issues (we recommend attending this if you haven’t used Zoom before).
If it turns out that you cannot attend, please let us know as soon as possible so that we can offer your seat to someone on the waiting list.
We will be using a Zoom room with ID ZOOMID. We recommend that you install the Zoom client (https://zoom.us/download). In order to join the room you will need the password ZOOMPASSWORD. You will be encouraged (but not forced) to use a webcam during the workshop. If you don’t want the physical room you’re in to be visible on the webcam, Zoom allows users to set up a virtual background: https://support.zoom.us/hc/en-us/articles/210707503-Virtual-Background You might also be asked to share your screen during group exercises or in interactions with a workshop helper. Remember to keep private information away from the screen you share!
You are expected to install some software on your computers before the workshop starts. Please visit the workshop webpage WORKSHOPURL and go through each tool under “Software requirements”, and install whatever you’re missing before the workshop starts. Note that you also need to create some accounts. Note that each of these tools/accounts can easily be removed/deactivated after the workshop, if you so wish (see https://coderefinery.github.io/installation/accounts/).
Don’t hesitate to get in touch (support@coderefinery.org) if you run into any installation problems or have questions relating to Zoom or other practical details. Note that we maintain a list of common installation issues that can occur at https://coderefinery.github.io/installation/troubleshooting/
If you haven’t already filled the pre-workshop survey, please do that soon since it helps us with workshop preparation. You can find it at: SURVEYURL.
The workshop will be very focused on version control with Git. Some of you are already familiar with Git, but not all. While we will be starting from the basics, we will be progressing quickly so it’s useful if you spend a few minutes to read up on the basic idea of Git. For this purpose, we have prepared this “refresher” material: https://coderefinery.github.io/git-refresher/ Note that this material also contains important Git configuration steps which all of you should go through before the workshop starts, to save valuable time during the workshop.
CodeRefinery strives to follow a Code of Conduct. Please have a look at https://coderefinery.org/about/code-of-conduct/ so that we all are aware of how to treat each other respectfully.
Don’t hesitate to get in touch if you have any questions!
Best, MYNAME
Practical info, in-person
Dear all,
The CodeRefinery CITY workshop on DATE is approaching! The location and schedule is available on the workshop webpage: URL
If it turns out that you cannot attend, please let us know as soon as possible so that we can offer your seat to someone on the waiting list.
You are expected to install some software on your laptops before the workshop starts. Please visit the workshop webpage (URL) and go through each tool under “Software requirements”, and install whatever you’re missing before the workshop starts. Note that you also need a couple of accounts (GitHub and Read the Docs). Note that each of these tools/accounts can easily be removed/deactivated after the workshop, if you so wish (see https://coderefinery.github.io/installation/accounts/).
Don’t hesitate to get in touch (support@coderefinery.org) if you run into any installation problems. We also maintain a list of common installation issues that can occur at https://coderefinery.github.io/installation/troubleshooting/
If you haven’t already filled the pre-workshop survey, please do that soon since it helps us with workshop preparation. You can find it at: URL
The workshop will have a strong focus on version control with Git. Some of you are already somewhat familiar with Git, but not all. While we will be starting from the basics, we will be progressing quickly so it’s useful if you spend 10-20 minutes to read up on the basic idea of Git. For this purpose, we have prepared this “refresher” material: https://coderefinery.github.io/git-refresher/
Please have a look at this material before the workshop starts. Note that it also contains important Git configuration steps which all of you should go through before the workshop starts, to save valuable time during the workshop.
CodeRefinery strives to follow a Code of Conduct. Please have a look at https://coderefinery.org/about/code-of-conduct/ so that we all are aware of how to treat each other respectfully.
Don’t hesitate to get in touch if you have any questions!
Best, Thor
Waiting list
Dear NNN,
thank you for request about the course:
https://coderefinery.org/workshops/COURSE_HERE/ The workshop is currently full but you are placed on the waiting list and I will inform you in case somebody else cancels and a seat frees up.
In case this is too uncertain for you and you make other plans, please let me know.
If you want to make sure to get a seat on the next workshop near you, please register on the “notify-me” list: https://coderefinery.org/workshops/upcoming/
We would love to give more courses and hope it works out for you.
Thank you in advance and best wishes, CCCC
When adding new ones, add to an existing page (make a new section) or. Try to avoid too much markdown formatting, so that a rendered version can be copied to plain text email easily still.
Select a workshop coordinator
One or two persons coordinate the workshop preparation and debrief. This does not mean that they do all the work - they are encouraged to delegate tasks - but they make sure that nothing gets forgotten.
Other documents and references
Workshop organization overview: https://github.com/orgs/coderefinery/projects/4
Instructions on how to set up a registration page in Indico (for NeIC affiliated staff): Indico registration system
Email templates for workshop communication:
Before the workshop
First steps
Recruit instructors - having at least 3 instructors is highly recommended.
Find 1-2 workshop helpers with an appropriate background.
Reserve dates (coordinate this with the instructors)
Reserve room
Select a workshop coordinator
Workshop coordinator creates a ticket with a checklist on https://github.com/orgs/coderefinery/projects/4 and takes it (self-assigns)
Lecture room
Start looking for an appropriate lecture room early.
See this list of requirements for the lecture room.
Set up workshop page
Import the template at https://github.com/coderefinery/template-workshop-webpage to your username or the coderefinery organization, and name it like “2019-10-16-somecity”.
Update the required fields in
index.mdand push the commits. The page should now be served at username.github.io/2019-10-16-somecity/.If the workshop will be customized to the needs of a particular audience, modify the schedule accordingly.
If the workshop should be listed on https://coderefinery.org:
(Fork and) clone https://github.com/coderefinery/coderefinery.org
Under
coderefinery.org/_workshops/, add a file named like2019-10-16-somecity.mdwhich contains the fields permalink, city and dates. For example:--- permalink: https://username.github.io/2019-10-16-city/ city: Somecity dates: October 16-18, 2019 ---
send a pull request with your new file.
Create a registration form following Indico event setup.
Open and test registration
Announcing the workshop
Twitter
Email persons who registered to notify-me form
Use local mailing lists and all channels possible
For self-organized workshops:
Write an email to support@coderefinery.org to get a pre-workshop survey link and registration form on https://indico.neic.no
Distribute the work
Make sure lessons are distributed
Preparing lessons
Go through the lesson material you will be teaching and think about how you intend to teach it, and how much time you will be spending on each episode.
Are there any unsolved issues that you can fix?
Go through the instructor guides of the lessons you will be teaching.
Review the intended learning outcomes, and try to keep these in mind while teaching.
Try to memorize the typical pitfalls and common questions.
Go through the lesson presentation hints.
Go through the helping and teaching guide, and request all helpers to go through it too.
Prepare practicals
Order catering (coffee, tea, water, fruit, something sweet, etc.)
Organize sticky notes
Organize extension cables if needed
Organize alternative wireless for those without Eduroam (if any)
Communication with participants
Send out practical information, including installation instructions, around 2 weeks ahead. Here is a template.
Emphasize that all software should be installed before the workshop starts, and point out the configuration problems and solutions.
Remind registered participants that they are either expected to show up or to cancel participation
Also ask those without Eduroam to speak up.
Maintain waiting list if needed
Make sure we have enough pre-survey answers
Close registration on the workshop page
1-2 weeks before the workshop
Workshop coordinator organizes a call with all instructors and helpers to discuss the schedule to leave no doubts about timing. Also discuss the survey results.
Point helpers (and instructors) to the tips for helpers.
Right before the workshop starts
Prepare a shared Google doc or https://hackmd.io with global write permissions, consider creating a memorable short-link (e.g. bit.ly)
Create exercise repositories
The collaborative Git lesson requires exercise repositories to be set up. For this follow the instructor guide in the lesson material.
Workshop preparation checklist
Workshop organizer plan / cheatsheet (google sheet) (make a copy for each workshop)
This checklist can be set up as an issue under https://github.com/coderefinery/coderefinery.org/ or on another repository to keep track of the progress
- [ ] reserve dates
- [ ] decide workshop organizer
- [ ] (online) prepare Zoom link or (in-person) book lecture room
- [ ] announce (twitter, notify-me, mailing lists)
- [ ] team of instructors complete
- [ ] workshop website up
- [ ] lessons distributed
- [ ] prepare lessons
- [ ] create exercise repositories
- [ ] (in-person) prepare practicals (coffee/tea, sticky notes, extension cacles)
- [ ] (online) Zoom roles distributed
- [ ] registration open
- [ ] team of helpers complete
- [ ] registration closed
- [ ] enough pre-survey answers
- [ ] install instructions sent
- [ ] pre-workshop briefing held, helper training
- [ ] survey results shared with co-instructors/helpers
As participants arrive
Emphasize to participants that you need to sit with someone - don’t work alone.
Try to have participants sit next to someone with a similar operating system if they have no preference, since they will face similar problems.
Introduction talk
Have a 10 minute ice-breaker session where participants and instructors introduce themselves and either describe their research in 2-3 sentences or what they hope to get out of the workshop.
During workshop
While teaching, keep these tips in mind
Don’t start off with tech details, say why this is important.
Try to stick to the material, although some excursions are useful.
Keep up interactive feel by encouraging and asking questions
Keep time
For presentations which have shell commands, create a cheatsheet/reference on the board in real time.
Remind participants about sticky notes.
Make sure we take regular breaks (at least a short break each hour)
Give participants some time to also experiment (do not rush the classroom through exercises)
Encourage optional feedback at the end of each day or end of each lesson on sticky notes. Process the feedback immediately and adjust your teaching (pace etc) accordingly
Create GitHub issues for points which are confusing or problematic
Take active part even in the lessons you’re not teaching, e.g. by asking questions and (politely) interject with clarifications when you think something is confusing to the learners
Wrap up, say what you taught and why, and what comes next.
At the end of workshop
Give credit to those who contributed and helped
Post-workshop
Process and distribute feedback to co-instructors and others (e.g. type up in shared document)
Debrief with instructors
Process certificate requests
Post-workshop survey
To measure the long-term impact of CodeRefinery workshops it’s useful to send out a post-workshop survey. This survey can identify which topics taught in workshops are particularly useful and which have less benefits for the participants.
Indico registration system
This describes the Indico registration system as used by CodeRefinery. Indico is a open-source registration system suitable for large scientific meetings. NeIC runs one at https://indico.neic.no which we routinely use.
Indico event setup
We use the NeIC Indico service, https://indico.neic.no/, so you need to create an account at https://indico.neic.no/login/.
RB is manager of the CodeRefinery category in indico.neic.no and will need to grant you permissions to create event pages.
To create a new workshop page, it is easiest to clone a previous event. This copies the registration form and metadata, but not the pre-workshop survey which needs to be manually imported as a json file.
Step-by-step instructions:
Copy basics from latest event
Visit https://indico.neic.no/, and click CodeRefinery which takes you to https://indico.neic.no/category/5/.
Click the latest workshop event. You might need to show “events in the future” to see the latest event.
Go to admin mode (click the pen symbol on top toolbar, “Switch to the management area of this event”).
Click the “Clone” button, and select “Clone Once”. Click “Next” button.
For “What should be cloned”, select “Registration forms”. Do not clone “ACLs and protection settings”. Uncheck “Refresh user information”. Click “Next”.
Confirm category “CodeRefinery”, and click “Next”.
Select the start date and time of the workshop, click “Clone”.
You are now on the cloned event page (confirm that the event number changed), and you should start updating the information.
Update copied event information
Adjust permissions so that only the workshop organizer(s)/coordinator(s) has/have access to the forms and data. In order to have better control over who has access we do not copy “ACLs and protection settings” from older events.
Update the Title, Description, Date, Time, Room, Venue and Address fields by clicking the pen symbols on the right.
Click “Protection” and remove administrators who were copied from past event but should not have access to this event.
Click “Registration” from the left-hand menu, and confirm that there is one or two registration forms, probably with a wrong title.
Click the “Manage” button on the “List of registration forms”,
Click “Edit” on the “General settings”
Update the registration form name and both the fields “Contact info” and “List of recipients” with your own email address to get notifications on new registrations.
Then go back to “Manage” and verify and configure the “Registration Form”: read all fields and check that nothing outdated has been cloned to this event. Adapt the dates.
Open registration
Go to the Registration page from the left-hand menu, and click “Manage”.
It will say “Registrations are not open yet”. Click “Start now” for both regular and staff registration forms to open for registrations.
Click the blue “Switch to display view” on the top left.
Confirm that both the “Surveys” and “Registration” links can be seen.
Click both links to do a test registration
Once you manage to test-register, update the workshop webpage, and announce via Twitter.
Exporting registrations
Go to the Registration page from the left-hand menu, and click “Registrations” which takes you to the list of registrations..
Click the check-box on the menu just above the list of registrations and select “All”.
Click on “Export” from the top menu, select “CSV” and choose a download directory.
You can use the read_csv.py to parse the CSV file and print selected fields, e.g. email addresses to be used in sending out information to participants.
Indico hints
Emailing people
Warning
Emailing registrants directly out of Indico risks that emails go into spam folders.
Alternative is to export the list of addresses into a CSV file and to import the addresses into your institutional email system as BCC.
Go to registration list
Filter people based on who you need
Select all (this selects only the visible people; you can confirm this by looking at the names in the email box, though you can’t see them all our count them)
Actions → Email
Compose your email (warning: it is easy to lose everything, there is no saving)
Preview email to make sure it works
Ensure that it is sent from support@coderefinery.org
If you want a real test, you could register and send the first draft to yourself (make sure you copy the full text first, otherwise you lose the placeholders)
Copy full text before you send the email, otherwise you lose the form fields.
Click send
Don’t worry
Icebreakers
This is a list of possible icebreaker questions.
You should make it very clear that everyone should answer the question, and thus it should be very broad. The point is to make sure they know how to use the tools. Make sure that the question feels inclusive - not just that people can answer, but that it doesn’t make people feel they are far behind others.
If you ask people to add there name as part of an introduction, the document becomes personal data and must be controlled more, and sets you on a path to extensive editing before it can be released. Think before you do this - maybe you just ask for information about backgrounds without names.
Other references
Relevant to workshop
An icebreaker isn’t supposed to be relevant to the workshop, but it could be useful some days or as a second question.
What from this workshop are you going to use in the near future?
What was the most confusing thing from yesterday?
Have you already used what you have learned in the course during your work? If so, what?
What is the most useful thing you know, that you wish someone had just told you about computing when you first started it?
Adapted from pre-workshop survey
What is the operating system that you will use during the course (on your laptop)?
macOS
Linux
Windows
Other
Have you used version control? If yes, which?
I don’t know what it is
I haven’t used version control but I know what it is
I have used version control, but I don’t know which system
Git
Mercurial
Subversion
CVS
Perforce
Bazaar
Other
Which programming languages are you using or will you use in your projects?
Matlab
R
Python
Perl
C
C++
Fortran 77
Fortran 90+
Julia
Haskell
Go
Rust
Other
Are you using automated testing platforms (e.g. Travis CI, Jenkins or GitLab CI) in your programming project(s)?
No and I don’t know what it is
No but I know what it is
Yes
Are you employing code review in your programming project(s)?
No and I don’t know what it is
No but I know what it is
Yes
Are you using the Jupyter Notebooks in your programming project(s)?
No and I don’t know what it is
No but I know what it is
Yes
Are you using a web-based repository for your code(s)? Which ones?
I’m not using a web-based repository
GitHub
GitLab
Bitbucket
Redmine
source.coderefinery.org
Other
How would you describe your programming experience?
I have no programming experience
Basic understanding and experience, I have looked through code and made minor adjustments
I have written my own simple programs
I have written many small codes and/or contributed to large complex software
I am an expert
How comfortable are you with the Unix/Linux command line working in a terminal window?
I know what most of the following commands do: cd, ls, cat, mv, rm, chmod, man, mkdir, cp, ssh
I do not know what most of these commands do
Please mark the sessions that you are most interested in.
Introduction to version control
Documentation
Jupyter notebooks
Collaborative distributed version control
Managing complexity and modular code development
Automated testing
Git branch design
Software licensing
Reproducible research
General questions
What’s a good icebreaker question?
Let’s select a mascot for this workshop. What should it be?
How is the weather where you live?
How are you doing?
Are you happy to continue this workshop for another week?
Is that an Iphone?
If you could have anything what you want for dinner today, what would it be?
What cool thing/tool have you discovered/learned the past days? (independently of this course)
Is this course part of your work? Or do you spend free time on it?
Do you like olives?
Are you annoyed at the size of anaconda?
What’s your favourite pizza?
Do pineapples :pineaplle: belong on pizza?
What did you have for breakfast?
Do you like Python?
Where’s your favorite place to nap?
Do you use git or identify as one?
When and how did you learn to program?
Credits
Most of these questions came from a “What is an icebreaker” question in the first Mega-CodeRefinery workshop.
Video checking OLD
Note
This is old information, these days we use ffmpeg-editlist and ensure that no learners are in the videos in the first place.
See also
Video editing OLD tells how to edit yourself. This page describes how to check a video for processing.
The purpose of this page is to give video processing volunteers a starting point. CodeRefinery produces a lot of videos, and learner privacy is important: we can’t post videos until they are checked. These videos are mainly useful to the learners of the very workshop, so we need them quickly (and for every workshop).
Overview
Ask for the directory of videos. It is on Google Drive or something similar, but is not public.
Look at the tracking issue. Find a unclaimed section of the course.
Watch the video.
Carefully look for any appearances of learner video within the video.
Copy the template below.
Fill out the template.
Paste the answers into an issue.
Segment report
Template:
* [ ] Title:
* Filename:
* Start:
* End:
* Segments to cut:
* Audience visible:
Other notes for channel description:
Example:
* Title: git-intro basics
* Filename: day1-obs
* Start: 25:13
* End: 45:00
* Segments to cut: 36:12 - 42:10
* Audience visible:  none

Other notes for channel description:

In this first episode, we go over the basics of using git for a single
local directory.
https://coderefinery.github.io/git-intro/02-basics/
Why do we ask all this? It saves time for the person who has to upload it to YouTube.
Title: what would it be called? You don’t need to include the workshop name, someone will add it.
Filename: you don’t need the full filename but indicate what file you were searching (often we have a recording and backup recording for each day)
Start, end: start time of the segment
Segments to cut: Segments which should be cut out. Don’t be strict, it is better to get it out fast than cut out every 3-minute break. But if there is a ~10 minute break or idle time, then we can cut it.
Audience visible: Time periods where any audience (not including staff).
Other notes for channel description: Describe the content of the video, include any links. You can think what is useful for someone to find this (but it doesn’t have to be perfect).
Other comments
How small should segments be? First, it’s better for videos to exist than be perfect, so the 3-hour segment is better than nothing. Short lessons (1.5 hour) are probably fine to be at once, and long ones (git intro/collab) could possibly be each episode separately. Discuss with others to see what you would like.
Ideally, there are two videos from each day: one recorded by Twitch (raw dump of the stream), and one recorded by OBS/Zoom (local recording). The OBS/Zoom recording is preferable. You can tell them apart via the filenames.
Video editing OLD
Note
This is old information, these days we use ffmpeg-editlist and ensure that no learners are in the videos in the first place.
See also
Video checking OLD for how to check a video and give an edit-list to someone else to do the editing.
The purpose of this page is to give video processing volunteers a starting point. (It also has some hints for workshop organizers).
For some of our online lessons, we release videos on YouTube. This is not necessarily for brand new people to watch and learn the material (though they may), but especially for people who attended the workshop to review what they saw. As such, it’s more important to get them published fast, than make them perfect.
What we want
Our workshops consist of lectures, demo, and exercises in breakout rooms. We record the main Zoom room, and also livestream the main room via Twitch. We would like the video of the workshop to be processed so that it can be released on YouTube. This should not be a major production: it is more useful to those who want to review what they saw in person, rather than a new person watching.
We will provide the following:
Raw video files (probably two copies one recorded from Zoom and one from Twitch - so there is a backup.)
List of lessons (= final videos) and which raw files contain them and when.
List of instructors
We want out:
One processed video file per lesson.
With irrelevant breaks removed.
Without any video from learners. We use Zoom so that learners should not appear in the stream, but we can’t be sure it works so this needs to be checked.
The rough process is:
Load up the right video files in the editor.
Find the start of the lesson (hint: look for a change of instructor - ask us if you need help!) and cut off the stuff before.
Watch through the videos. Most of the lecture parts are fairly standard and can be fast-forwarded through (it’s rare for a learner’s picture to appear here).
Cut out the idle time during breaks.
In exercise sessions, learners go to breakout rooms, which are not recorded. This part can be cut out, but sometimes the instructor stays in the main room to do the exercises for the stream.
Don’t be too precise. We aren’t trying to make a masterpiece to end all masterpieces, but a something for those who were at the workshop to refer back to. So:
Imprecise start/stop/break times are fine
Other random off-topic chat is fine
Voices of learners is fine and expected
Video of learners is not ok (really, this is the only thing that needs care).
Before/during/immediately after the workshop
From day 1, advertise that “the workshop may be recorded and put on YouTube. We will prevent any pictures and names from going there, but your voice may be. Please don’t include your name in hackmd unless you accept it may be published. We support your right to be anonymous in this workshop.”
Same announcement at the start of the workshop.
Record in zoom. Note: when you start the recording, make sure that someone is currently sharing the screen, and the screen is a good size (e.g. normal Full HD, as opposed to some vertical shape). The dimensions when the sharing first starts determines the dimensions for the entire course.
Immediately after workshop, go to Twitch and download the raw streamed version. You have to be logged in as the channel, then the option is naturally provided to you.
Choose some standard, shared place and immediately upload videos there. Recommended naming scheme:
day1-topic1-topic2-zoom.mp4
day1-topic1-topic2-twitch.mp4
Processing
Processing principles:
Remove any participant videos, if they accidentally make it into the video file. This is really the only serious rule in the processing, if we didn’t have to check this we could just upload the raw ones and it would be good enough.
Create one final video per lesson in the workshop
Work incrementally, upload processed ones when you can, get quick feedback.
If it’s not clear, the course organizers will provide a list of the lessons (final outputs) and the respective inputs (which source files go into it).
You can generally:
Use some video editor
iMovie on Mac
OpenShot is a simple cross-platform editor (tutorial)
(please give more ideas here)
(so far, this is not a general “how to edit video” guide… you will need to find one for your editing program)
Create a new project for the output (e.g. the Jupyter lesson)
Import the raw video files which contain Jupyter (e.g. day 4). If one lesson is split over multiple files, combine them.
Cut off the part before and after the lesson itself (saving frequently). You’ll have to figure out the start and end times, this may be hard when there are several files.
Begin watching the lesson. Look for the following things:
Break time? Exercise session with irrelevant stuff in the video? Cut the time out.
Any non-instructors pictures in the stream? Cut it out. Sometimes you might need to blank the picture while
Don’t be too perfectionist - the goal is to get something done, not maek the perfect videos.
Export the videos with a high quality, e.g.
jupyter.mp4. It will go to YouTube which will render lower resolutions, so you don’t need to worry about this so much.Upload the videos to the
processedsubdirectory of the google drive. Do this immediately, video by video. It’s better to get continuous feedback on this. You are done!
Publication
We upload them to YouTube (not that we agree with all the ethics of YouTube, but it seems like the least bad and most useful of the options).
Preview the processed videos, do a quick check for any issues.
Upload to the channel. For one workshop, put all related videos into a playlist. CC-BY license.
This is a prototype channel description you can copy:
git-intro 1/2, CodeRefinery 25.may-4.jun 2020 day 1

Day 1: git-intro: LINK-TO-LESSON

Part of a series of video recordings of the CodeRefinery workshop,
25.may-4.june.  CodeRefinery teaches intermediate software
development skills to researchers in the Nordics.

Workshop page: LINK-TO-WORKSHOP
Q&A for day 1: LINK-TO-HACKMD

(table of contents below)
Create a table of contents (can be done later, after uploading). This divides the videos into chapters, with clickable links in the description and labels in the video’s time slider. In the bottom of the description, put this text and it is automatically parsed:
00:15 Introduction
02:30 Motivation - https://coderefinery.github.io/git-intro/01-motivation/
17:17 Basics - https://coderefinery.github.io/git-intro/02-basics/
38:29 Staging - https://coderefinery.github.io/git-intro/04-staging-area/
...
You may want to ask someone for help with this, since it can take some time to go through the videos.
Example with table of contents: https://youtu.be/r1tF2x5OLNA
Online training manual OLD
Note
This hasn’t been updated since we developed our MOOC strategy.
Also please read our lessons learned.
This manual covers general guidelines for conducting online training as well as specific tips on using Zoom.
For the instructors
If you have an old spare laptop, connect to the call as a second “you” and you can watch and verify your screensharing and fontsize to avoid “Am I sharing the screen? Hopefully you see what I see.”
How to avoid “Zoom bombing”
Either set a password or use waiting rooms
Share connection details only with participants and helpers, not on the web
Disable file transfer
Disable “Allow removed participants to rejoin”
Preparation
Schedule the meeting/webinar in the online Zoom system
do not auto-mute participants’ microphones, as this also happens when you enter breakout rooms.
Decide roles:
Decide the Zoom host and co-hosts
Use panelists? (Zoom webinar feature)
Decide instructor and backup-instructor in case of network issues
Decide helpers. One helper should be responsible for monitoring Zoom, i.e. the chat window, hand-raising and other feedback
Co-hosts, breakout rooms and feedback controls need to be enabled (on website) before the meeting starts. If options are reconfigured, the meeting may need to be ended and restarted for them to take effect.
Create enough breakout rooms at the beginning since this cannot be easily changed during the meeting.
TODO: set up pre-lesson polling? (zoom feature) Maybe unnecessary in view of pre-workshop survey
Instructors and helpers should use a reliable camera and microphone. Computer microphone might not be enough since audio quality will depend on instructor’s head angle and proximity to screen.
Workshop owner creates a HackMD which will be used for collaborative note taking.
At the beginning of the session
Allow time at the beginning of the session to debug video/audio and to arrange windows. This takes few minutes so better do not start with teaching from minute 1. Plan for an early 5-minute break to debug this.
We cannot assume that all Zoom participants have the same and up to date client and some clients do not contain “sticky notes” feedback or a button to raise hands so agree with participants on signals (e.g. typing
\handin the chat window seems to be standard).-We demonstrate how HackMD works and use it in an ice-breaker (roll call or asking a questions).
Recording of sessions
If you plan on recording and publishing the session, prepare in advance so that you don’t have a difficult editing job later. Make sure that you (or users) don’t show any personal or confidential information. Think about what happens if users speak: do you ask for permission to publish in advance (maybe encouraging people not to), or edit it out later (taking your time later).
If you plan to record the session, make sure that everybody is aware that the sessions is recorded, informed about how the recording will be used, and gives consent to be recorded: https://support.zoom.us/hc/en-us/articles/360026909191-Consent-to-be-Recorded
In Zoom it’s important to start recording in the form you want the video to be in (e.g. start recording when screen is shared so that it stays there): https://support.zoom.us/hc/en-us/articles/360025561091-Recording-layouts
Set screen background to black. We saw a glitch in Zoom which caused the background image to flash above the screen, if it was pure black it would be less distracting.
Zoom-specific installations instructions sent out before workshop/lesson
Recommend to install Zoom app. Browser is possible but more limited
Test-launch zoom and test microphone, speaker and camera (lower left corner buttons)
Instruct participants to watch a zoom introduction (TODO: insert link), and play around with zoom.us/test to get acquainted with interface.
Optional: set up virtual background
“During the workshop, you might be asked by a helper to share your screen. Make sure to keep private information away from the screen you share.”
Contingency plans
Be prepared for intermittent network problems.
There should be a backup instructor in case the main instructors disconnects
Learners might occasionally experience lag and temporary network hickups. This makes it particularly important to speak slowly and repeat important topics.
Breakout rooms
Breakout rooms can be used both by helpers to assist individual learners during an exercise, or for multiple learners working on a group exercise.
When creating groups, the host or co-hosts can choose automatic setup, where only the number of groups is selected and the distribution into groups is automatic, or manual setup where the host/co-hosts distribute learners into groups.
Host needs to move helpers, co-hosts cannot enter rooms on their own.
Somebody asking for help gets assigned to a room together with a helper.
TODO: is it possible to create breakout room for only some participants, leaving other learners unaffected? This is crucial for helping participants during exercises who have raised their hand. Need to test this
Host and co-hosts can join any room and jump between rooms. This should be used during collaborative exercises to see how the exercise is progressing or participate in the group work.
When a collaborative exercise is about to end, the host/co-hosts can broadcast a message into all groups.
When the host/co-hosts end a breakout room session, participants in groups have 60 seconds to finish before the session terminates.
Exercises
Just like in a regular workshop, demonstrations and type-along sessions should be interspersed with frequent exercises
For pairwise or group work exercises, the instructor (or Zoom assistant) should create breakout rooms with chosen number of participants in each
For single-person exercises, no breakout rooms are needed
Learners should be instructed to raise their hand when they need help. This corresponds to putting up a red sticky note in in-person workshops.
TODO: what signal should be used for green sticky notes?
Polling can be used as formative assessment questions. The host creates a poll based on a lesson template and requests learners to answer. (TODO: polling seems not available in kth-se zoom subscription)
Breaks
Following an online event can be even more tiring than a physical event and therefore also during online sessions we need to plan for breaks as we would for an in-person event.
More resources
Online teaching
In 2020, we were forced to start teaching online. Is this good or bad?
The promise of the Internet was that we could reach everyone in the world. Instead, we immediately learned to hide or Zoom links from anyone except the people who register in advance to hide from trolls. We directly translate in-person to online, and wonder why we don’t have as much engagement. It doesn’t have to be this way. CodeRefinery has developed a vision of this teaching that can take the best of both worlds.
Video: The future of teaching
“The future of teaching”, https://www.youtube.com/watch?v=S9Jor12Cxdc (45:31) is a talk describing many aspects of this strategy in a concise form.
What is different about online?
Online teaching requires a certain mindset.
First off, it is different, and different is not better or worse. You must rethink your existing assumptions and design for the current world.
Some differences in mindset include:
If the material is online, why pay attention now. Why not find the same or similar material when you need it? If the course isn’t online, still you realize you can do a web search and find something equivalent later.
Why dedicate myself to this now? Why night attend a course passively now, get the basics, and come back later when I need to really understand something?
How to best use the tools? I might have only one screen to take the course (and no projector to watch), but the instructor material is also closer. Why type things myself, if my normal work is copying from StackOverflow anyway?
Related to the above, you can’t use attendance as a proxy for engagement. You have to actually engage people, or accept that passive attendees are OK. Do you measure the benefit of people watching the course later?
Everyone knows how to way of attending in-person courses. But there are different ways to attend online courses, and you don’t get as much feedback from others. You need to be explicit.
Once you learn to take advantage of online formats, you might never go back!
Taxonomy of online teaching
This isn’t a strict division, but here is a rough vision of steps to take, from simplest to more advanced.
(1) By yourself, in a meeting
It’s you and a group of students in a meeting (e.g. Zoom). This can reach people, but it’s easy to lose the attention of attendees. Because you need to avoid trolls and protect privacy, you may have a private registration and you may not publish recordings. This gives limited usefulness in the future.
Key aspects:
Set up a good screen share (Instructor screenshare)
Be explicit on how to attend. Plan for not only attention during the course but something that has a lasting usefulness.
Possibly use HackMD for discussions/questions (Collaborative document mechanics and controls, Notes manager, need new info)
(2a) Group teaching, in a meeting
One of the advantages of online teaching is it doesn’t require full-time physical attendance, so you can more easily bring in a diverse set of helpers, which greatly reduces your load.
Definitely use HackMD instead of chat (Collaborative document mechanics and controls)
Separate roles more, so that the instructor only needs to focus on teaching. Other helpers can come and go or attend part-time. (Instructor introduction, general info: Roles overview)
Exercise/breakout room leaders
Expert helpers, helping students
Zoom host
HackMD watcher
At the same time, you can start grouping learners together into small groups. This is the equivalent of different tables in a physical workshop.
Zoom breakout rooms can group people together
You need to be explicit about how the groups work. Even in person, many learners work independently even when forced into a group.
Add “team leaders” (helpers, former students) to guide each group.
(2b) Higher production values
Now we reach the real promise of online teaching: by using streaming platforms, you can reach everyone in the world. No registration is needed and anyone can take part. The disadvantage is that you don’t have close interaction with the learners (by design: removing these close interactions how you can accept everyone).
This focuses on technical setup
OBS Studio for producing good recordings/stream (Open Broadcaster Software theory)
HackMD for questions from the audience (Collaborative document mechanics and controls)
(2c) Multiple ways of attending
One no longer has to limit yourself to interactive watching
Streaming
Encourage in-person “watching parties”
Make videos available (Video editor)
Make videos available immediately, for catch-up purposes
(3) High-accessibly zen-level courses
Finally, we get to our final state: You can combine the contradictory options: privacy for learners, but anyone can attend. Interactive course, but people can refer to it later.
This is more a mindset thing, and combines everything from above.
CodeRefinery MOOC strategy
This page documents the CodeRefinery MOOC (massive open online course) strategy. It is not a real MOOC (it’s not massive enough yet), but it does reach out from one to many, and can scale to basically all the world.
Video: The future of teaching
“The future of teaching”, https://www.youtube.com/watch?v=S9Jor12Cxdc (45:31) is a talk describing many aspects of this strategy in a concise form.
Technical setup summary
We have a public broadcast, with goes out via a livestream. Disconnected from this, people are watching the broadcast in a separate Zoom meeting and doing exercises/breakouts there. Or, people can watch via the livestream alone. Or there can be different meetings. Or people could watch recorded videos later.
The mental model here is “Watching TV together”. We collectively watch a show together. There are periodic intermissions where each watching community discusses among themselves and works on the exercises. Everyone feels they are a part of something big and that keeps people interested.
We have clear communication channels from learner→instructor (HackMD), helpers→instructors (chat), instructors→learners (livestream). Of course instructors can directly communicate with the audience during their breaks.
The Director controls the stream and is responsible for keeping things running smoothly.
Summary diagram
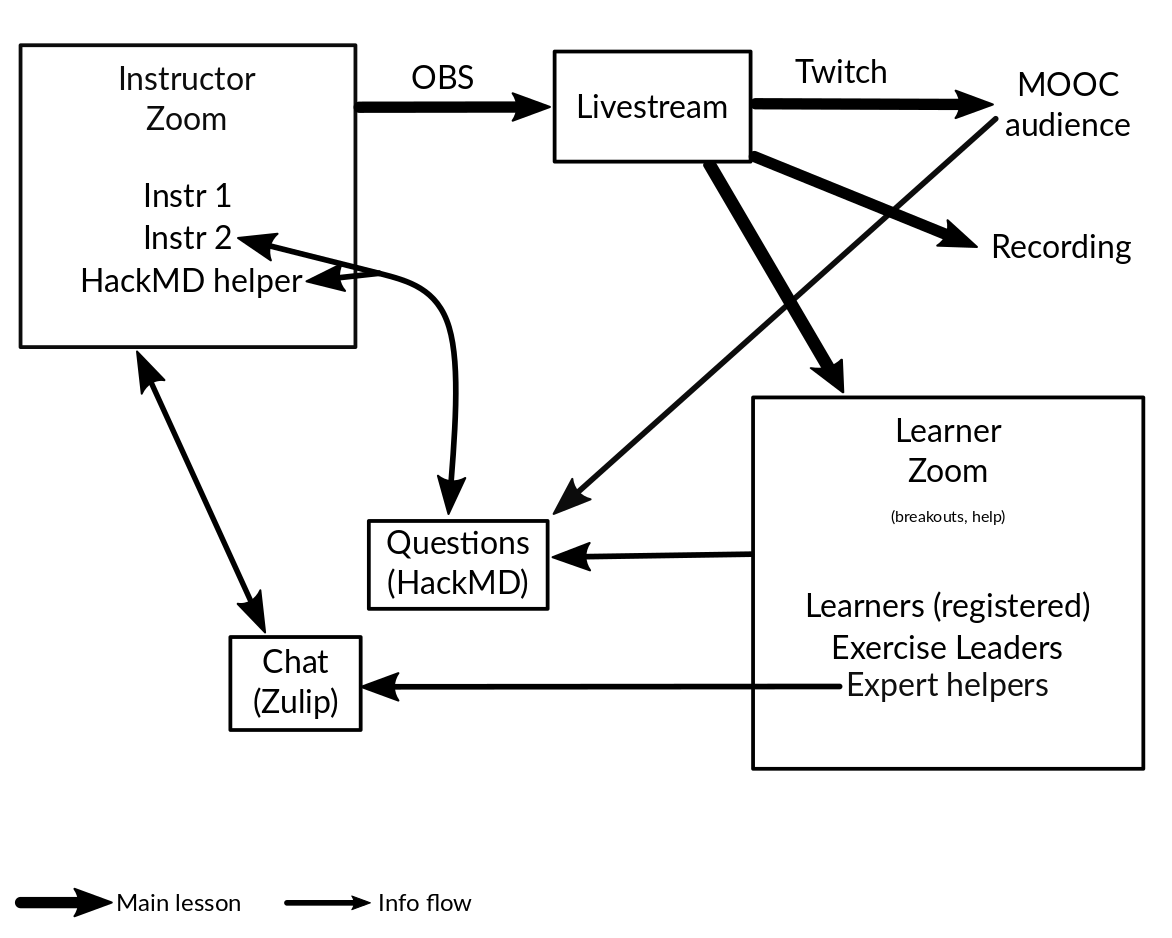
The general presence and information flow within the MOOC strategy.
Instructors
There is an instructor Zoom meeting. This is broadcasted via Twitch, using OBS (there is usually a separate director or production manager for this, instructors don’t need to worry themselves with this).
Compared to the classic style, advantages include:
You are freed from student management, others help manage the audience and convey these important parts to you.
Audio/video is muted during breaks, there is more opportunity to discuss and plan what comes next with the instructors.
Disadvantages:
You lose the direct access to all students (but how often would someone speak up anyway?).
Instructors should keep in mind (many of these are not special to the MOOC format, but are even more important):
At all times you will have a director to help keep you on track: just teach and watch chat (and HackMD when you have time, but others do this and let you know).
You will have a private Zoom meeting with only instructors (and any other key helpers who want to be there).
Share a vertical screen (840 × 1080 is our standard and your maximum). This allows students to keep half of their screen open for their own work.
HackMD is the main way of receiving questions from students (just like in our current courses). The HackMD helper can be in the main stream to immediately ask questions from the audience, or your co-instructors could do this. Really, perhaps both.
During breaks and pauses, the livestream will be muted, so that instructors (and helpers there) can talk without the audience hearing. This greatly increases professionalism and makes it easier to coordinate.
There is the standard text chat (Zulip) to use to communicate with other helpers.
Of course, you can go join the student room during breaks, other sessions, and so on.
Zoom polls won’t work, since the instructors and audience aren’t in the same Zoom meeting. This is one reason we already use HackMD for polls (though there are other options, such as presemo.aalto.fi, which could work in even larger courses).
You will have more than just the registered students in another room as an audience. Your audience includes students in the breakout room meeting, livestream watchers, people in their own meetings with a private team we don’t know about, people broadcasting it to physical rooms, people watching recordings later, and who knows who else.
Try to speak with awareness of this diverse audience. You don’t need to change much, but go slowly and give plenty of time, and you can say things like “If you are registered, … . If you are on your own, … .”
Repeat back questions before answering them, so that people across channels can follow. This is a usually good idea anyway, and also it is natural when questions are coming through chat or notes.
Speak in terms of breaks and exercises sessions.
Speak in terms of relative times, since people will be in different timezones. For example, say “We resume at 50 minutes past the hour” and write “xx:50”.
Realize there are different learning styles. Some people will attempt all exercises. Some will passive watch and want demos.
We propose this general model for each lecture-exercise cycle:
Give the lecture part
Introduce the exercises
Short break (~5 minutes). People attempting exercises themselves go into their other meetings and work on it. The learners attempting it themselves will mute the stream.
On-stream, do the exercise as a type-along or demo. This is useful for some audience, and also is very useful in recordings.
At the designated time, the learners come back to the livestream. Depending on what you want, you could use the outcome of the demo to discuss what we learned, do a whole new demo (perhaps faster this time), or you go on.
You should also make it clear to the audience (mainly helpers/team leaders) what the expectation for each exercise session is. This should be written in the HackMD!
It is OK to decide you can’t make things perfect for every audience. The rest will understand this if you make this explicit.
Director
You job is to be aware of everything going on, and when there is a question like “Do we need more time?” or “what should we do now?”, you can answer it. You can give people the pushes when they get slightly off track (though others should always be willing to speak up when this is needed, too). You maintain this awareness by watching as many of the communication channels as you can.
Hint: find your computer’s detailed audio controls, so that you can adjust volumes of multiple sources independently. This helps you be in multiple meetings at once. (This may be useful for others that want to attend multiple meetings.)
Expert helpers and other staff
As a helper, your job stays pretty much the same. There is more emphasis on making sure that all questions and comments are in the HackMD.
Some helpers can join the instructor meeting and directly relay questions and thoughts, and in general provide the “voice of the audience”. This is a logical role for the HackMD helper.
Audience and team leaders
The learners and team leaders focus on watching the material and asking questions in HackMD, much as in a regular course.
In the main meeting with breakouts
Here, there is a meeting (e.g. Zoom) which has a lot of learners in it. There are two options for lectures:
Meeting host shares the livestream (video + audio)
Participants individually open the livestream and watch, and go back to the meeting when it is time to do exercises.
All audience members ask questions and discuss in HackMD (just like in regular workshops). The meeting chat is mainly used for practicalities, and is not designed to be monitored by the audience.
The most significant risk here is that learners have to mute the livestream (or turn it off) during the exercise sessions if there are demos going on while they are doing exercises. This means we may have trouble getting their attention.
Via livestream
Here, each audience member watches Twitch independently. During the exercise sessions, they can work alone, watch the demos, or work with their own self-organized teams.
Live
The stream is broadcast in the physical classroom or meeting room where a class or team is located.
Recording
You can watch the recording, refer to the lesson page, and refer to the archived HackMD notes afterwards.
Open issues
It can require some cognitive effort to understand and keep track of all of these different channels. But when we did it in January/February, learners picked up quickly and there were few complaints in the end.
HackMD spam: Lately, we have had one HackMD for all students (registered or watching via the stream). There has yet to be any spam or trolling problems, but it will happen if we get big enough. We need a transition plan to private HackMD if needed. (Proposal: have a backup HackMD. If spam starts, we email the new one and go from there.
Chat/Q&A scaling: Will HackMD actually scale enough for us? What alternatives do we have?
See also
Livestream teaching demo video: https://www.youtube.com/watch?v=WjmttAniZX8 (carefully read the video description to understand what is going on)
Writing technical docs
This is a guideline for non-teaching technical documentation, for example HPC infra usage. Since many of us overlap with HPC or other support roles and our CodeRefinery mindset partially overlaps, we have some brief guidelines here.
There is far too much professional information for us to reproduce here, but hopefully this is useful quick reference for a typical person to get started. Check the links at the bottom for more.
What kind of doc?
Tutorial - emphasis on concepts and mental model, after reading you can do limited things.
Reference - more likely to read if you know the concepts and want to know more advanced stuff.
Example - example of one specific thing. Good for copying and pasting if you know enough to understand it.
“A good tutorial is different from a good reference. Very few things are good at both at the same time.” - (I don’t remember who, seen in Teaching Tech Together). Thus, both tutorials and reference are useful. Sometimes, we need a tutorial for our stuff and can point to outside material as a reference. People also really want examples they can copy - is your infra similar enough that outside examples can be copied?
Recommended sections/things to include
(Of course, depending on what type of doc it is)
Introduction that says when this material is relevant and why you might want to use it. (who it is written for, when it was updated). Prerequisites.
If relevant, there is a concepts section at the beginning. Perhaps define a few key terms. Possible prerequisites (required or possibly useful).
Is the actual content good and understandable? Are any conceptual or technical prerequisites mentioned in the introduction (or when they are needed, if minor)?
Examples spread throughout.
A conclusion that wraps up and what happened, why, and what comes next.
“See also” section at the end if relevant.
If relevant, exercises at the end or spread throughout. Even if this isn’t the point, it makes people think and makes it minimally useful for informal teaching.
Style suggestions
(not standards, since of course people do what they want anyway. Not all things apply in all cases)
Bold for definitions or the first time a concept is introduced. Basically, a time where someone is likely to scan up the document to remember what a certain concept is, such as “what’s a git stash?”
Italics for local emphasis.
Never feel bad to use simpler text, in the best case someone can now understand, in the worst case there’s less mental effort.
Use an active/imperative voice (Y does X, do X to get Y), not passive (X can be done by Y). Try to use present tense.
Make the docs skimmable - by looking at headings and first words in each section, can you figure out what you need to focus on?
Use gender neutral text, of course.
Style guide
(Is it worth making a minimal academic HPC/tech doc style guide? The benefit would be that we can share stuff better. There’s no need to emulate or reproduce actual professional ones, since we probably aren’t that formal.)
Other ideas
Consider documentation-driven development. Write basic docs, review, then implement it.
See also
Of course, there is far more professional information than you can find above.
The Write the Docs guide seems useful - especially about organizational aspects.
Styles and list of style guides, though most are probably too long for hobbyist reference.
lesson-design.md might be useful to understand. The “backwards lesson design process” is especially important to think about: while you don’t have exercises, you do have goals to accomplish you can design to.
Code Refinery lesson on Sphinx and Markdown
Meeting checklist
This checklist was made because we had a major issue with not announcing good events to our community because we weren’t sure what to do, thus a community doesn’t form. These steps should be taken to announce any event unless there is a specific reason not to (for example, a workshop is well underway and organizers known). You don’t have to follow what you see here, but the point is to make announcements as boring as possible, so that it gets done quickly and well-enough.
As soon as meeting topic/time is decided
Decide central HackMD/join link. (Join link can be decide later by putting it in the hackmd).
Create a calendar event for yourself, and send it to related people. You should be ready to forward this to people who request. It’s OK if the event only includes HackMD link (+ join link, if known).
[Mailing list: not yet present, we are relying on the other options here.]
Make a post in #events channel. Don’t be shy, just do it.
<time:TAB will produce a time picker that adjusts for everyone’s timezones.At <time:...>, there will be a [meeting on topic]. Topics will include [a few highlights to let people know who should attend]. HackMD (including connection details): <link> More info: #[channel-name] If you want a calendar invite, send [me] a private message (or react with :email: quickly if I know your email already).
Make a Twitter post for most meetings, if you want a broader community to attend.
You can do this yourself via the “tweet-together” Github Action:
CodeRefinery: https://github.com/coderefinery/coderefinery-twitter/
Nordic-RSE: https://github.com/nordic-rse/
Research Software Hour: CR + AaltoSciComp
You can do it from the web interface, find the “Create new tweet” button from the readme.
Edit the file path. It pre-fills
YYYY/MMoutside of the text box, but you can backspace and change that to current year/month.Suggested template:
[title] will be held at [time CEST]. [optional: why should
someone attend?  Attend if...]

More info via our chat https://coderefinery.github.io/manuals
[tags]
Suggested tags
CodeRefinery:
#coderefineryNordic-RSE:
#RSEngResearch software hour:
#RSEng
Ideally, someone else should merge quickly after checking facts Don’t wait for “permission” or something like that which may never come, we agree that more tweeting is a good thing.
Days before the meeting
Send reminders to the #events channel. You can find the old topic and reply to it, quoting the whole text.
Archive meeting agenda
Archive the agenda, if needed.
Workshop preparation meeting
Each workshop should have a preparation call among instructors, experts, hosts, etc. This is separate from the helper training call.
Topics of workshop instructor meeting
Introduction round
Go over Instructor introduction and other pages in this section
New staff: go over in more details.
The role of expert helpers.
Everyone: discuss the roles in the workshop
For each lesson, a meeting between a former instructor and the current one (even if current one is experienced teaching it).
Set up any possible co-teaching arrangements.
Discuss hand-over times each day
Breaks should be descussed among instructors for each day, but default is 10 minutes between xx:50 and xx:10 each hour.
Practice instructor tech setup (screenshare, etc): can also be done in the one-on-one meeting.
Joining CodeRefinery: what comes next?
Don’t forget
Update Zoom client (later than mid-October 2020) for breakout room features. Zoom alone isn’t enough.
Common CodeRefinery conventions to remember
Breaks are not negotiable, minimum 10 minutes
Sessions can’t be extended indefinitely, it’s OK to run out of time and skip things (in fact, we expect this: all lessons have op. All lessons have optional episodes. Not finishing is normal, in fact.
Emphasize to learners that we can’t cover everything and don’t expect to.
During workshop, we communicate via:
HackMD
Zulipchat
Zoom chat is minor and most people don’t need to watch.
Summary of Teaching Tech Together
Teaching Tech Together is a book compiled by Greg Wilson which is about the pedagogy and practical hints of teaching technology in informal environments. It is a very good resource, and the main point is that research does back up teaching, it’s not all intuition. Many citations are included.
This page contains a summary of the most important points. The point is that one can quickly refer to this before writing a new lesson or teaching a course. The article Ten quick tips for creating an effective lesson is also a good summary of the main lesson design points of this book.
Useful appendices:
Ch1: Introduction
Novice = no good mental model of what they are learning, “not even wrong”
A manual is not equal to a tutorial - a tutorial needs to build a mental model from scratch.
Formative assessment = determine what the misconceptions are.
Ch2: Building mental models
“Expert blind spot” = experts have more links, so don’t see what links are missing.
Concept maps as a metaphor for connections
7+/-2 concepts can fit in short term memory at once
Get feedback from others, then give feedback to others, then self-feedback (last one is “deliberate practice”)
Ch3: Expertise and memory
Cognitive load: too much is bad and makes learning slow
Faded example: blank out certain things in an example which are added as an exercise/example (what you want to progressively teach). Seeing examples is good, debugging as an example.
“I want to do something, not learn how to do everything”
Parsons problems - give working code but in random order, students must put it into the right order.
Minimal manual: one page micromanuals on specific tasks. Helps training but loses content.
The last exercise of this chapter has some good hints for making useful graphics.
Ch4: Cognitive load
Cognitive load is divided into intrinsic load (background required learn), germane load (mental effort to link new to old), and extraneous load (everything else that distracts from learning). (this is “cognitive load theory”)
A paper claimed that self-guided learning is less effective, because people are overloaded: you have to both learn new facts and learn how to use them at the same time.
Strategies: use exercises well that minimize tho load. a) parsons problems, b) labeled subgoals, c) split attention (separate channels, but complimentary rather than redundant), d) minimal manuals
Ch5: Individual learning
(chapter about how people can help themselves)
Six strategies: a) spaced practice, b) retrieval practice, c) interleaving (abcbac better than aabbcc), d) elaboration (explain to self), e) concrete examples, f) dual coding (e.g. words and pictures, or different forms of same material).
Manage time well
Peer assessment
Ch6: A lesson design process
Backwards lesson design, similar to test-driven development: 1) brainstorm ideas for what to cover, 2) create learner personas to figure out who you want to teach, 3) create formative assessments to give learners a chance to exercise what they are trying to learn (3-4 per hour), 4) put formative exercises in order, 5) write the teaching material around this.
Learner persons, to guide your design process: a) general background, b) what they already know, c) what they think they want to know, d) how course will help, e) special needs.
Learning objectives: write objectives and think of what depth of understanding you are getting too. Consider Bloom’s taxonomy: a) remember, b) understand, c) apply, d) analyze, e) evaluate, f) create.
Fink’s taxonomy (unlike Bloom’s, complimentary not hierarchical): a) foundational knowledge, b) application, c) integration, d) human dimension, e) caring, f) learning how to learn.
Maintainability: is it easier to update than replace? a) You have to document the lesson design process, b) technical collaboration, c) are people willing to collaborate? Or do teachers resample rather than update?
Ch7: Actionable approximations of the truth
(chapter about learning programming specifically… title comes from not necessarily having clear research that says what you should do, but you have to do something anyway)
Experts know what and how, novices lack both but most teachers focus on what only.
Think about teaching debugging and using it as examples - the how.
If you are teaching programming specifically, just read the chapter.
Ch8: Teaching as performance art
Get feedback on your teaching. People aren’t born teachers, and feedback isn’t in the western teaching culture enough.
Use live coding. It’s much more effective, especially because it’s two way and you can demonstrate making mistakes. a) embrace your mistakes, b) ask for predictions, c) take it slow, d) be seen and heard (stand + microphone), e) mirror your learner’s environment, f) use the screen wisely (make it big enough), g) double devices (one to present, one for notes), h) use diagrams, i) avoid distractions, j) improvise after you know the material, k) face the screen only occasionally
Drawbacks of live coding, which you can minimize over time: a) going too slow, b) exercises can be too deep and have too much cognitive load (give skeleton code).
Ch9: In the classroom
Code of conduct: teaching isn’t for those that are already “in”, it’s for those that aren’t. If you don’t notice problems and enforce it transparently, it means nothing though.
Peer instruction. Discuss in groups. e.g. multiple choice question, if there is a wide variety of wrong answers, have them discuss in groups.
Teach teaching: different strategies, consider what you want to do: a) teach teaching (taking turns) b) teach and assist (going around helping) c) alternative teaching (group with more specialized instruction), d) teacher and observer, e) parallel teaching (two groups, same material), f) station teaching (rotate through stations).
If co-teaching, plan ahead: a) confirm roles at start, b) work out some hand signals for common conditions, c) each person should talk at least 10-15 min at a time, d) person who isn’t teaching shouldn’t distract, though leading questions OK, e) check what your partner will teach after you are done, f) inactive teacher stays engaged, not doing own stuff.
Plan for mixed abilities, especially false beginners who have studied the material before.
Can you make a collaborative not online document?
Sticky notes
Don’t start from blank pages, give some starting point. Many other good points in the chapter itself.
Ch10: Motivation and demotivation
Extrinsic vs intrinsic motivation. Extrinsic: have to do it for job or something. Intrinsic: do it for self, you want to encourage intrinsic motivation. Drivers of intrinsic motivation: a) competence, b) autonomy, c) relatedness (connection to others).
Consider usefulness and time to master. Focus on useful and fast. Useful = authentic tasks, things people will actually use.
Avoid demotivation: for adults, a) unpredictability, b) indifference, c) unfairness. Specific examples: a) contemptuous attitude, b) saying existing skills are worthless, c) complex or detailed technical discussion, d) pretending you know more than they do, e) the word “just” as in, it’s “just easy”, f) software installation problems, g) giving impossible challenges to fail at to try to learn something, if not understanding.
Consider accessibility and inclusivity - consider things are harder for others, try to understand diversity of backgrounds.
Ch11: Teaching online
Disadvantage of MOOCs: can’t clear up individual misconceptions
The chapter has various good ideas, including how to make sure everyone is heard (certain group doesn’t dominate online discussions), short cycles and short exercises, require some small group work, use videos to engage rather than instruct (people can read faster), identify and clear up misconceptions early.
Flipped classroom: watch lectures on own time, do exercises and discuss in class time.
Ch12: Exercise types
Multiple choice, code yourself, code+multiple choice, inverted coding (given code, test and debug), fill in the blanks, Parsons problems (given questions but in wrong order).
Tracing execution, tracing values, reverse execution (find input for output), minimal fix, theme and variations, refactoring exercise. Pen and paper exercises.
Diagrams and connection: draw diagram, label diagram, matching problems.
Autograding is hard, in particular most automatic grading tools don’t provide useful feedback messages. Also, automatic grading can only test low-level skills, not higher abstractions like code review.
Ch13: Building community
(Chapter about forming a community of teachers and learners working together)
Ch14: Marketing
Think about what you are offering to who. Who are the target audiences and why should they be care and become invested?
Ch15: Partnerships
Main two points are work within schools or outside of schools. If inside, part of academic programs? Academic programs and especially teachers change very slowly.
Ch16: Why I teach
New team member onboarding
Good to know
CodeRefinery is a training network around FAIR research software development. We usually offer two massive streamed interactive online workshops per year with instructors from within the team but also try to onboard new instructors from anywhere. You can find all information about how we do workshops in our manuals. Many partners are also collaborate on additional workshops or hackathons. But CodeRefinery is not only workshops: It also is a community of people who enjoy helping others. We also want to do more outreach, so if you are a social media guru or enjoy giving presentations in different forums, we would be delighted if you could help with that. Below you can find all links that are useful for anyone joining the CodeRefinery team.
Anyone can be part of the team! If your organization officially wants to join:
If your organization is in the Nordics, it can become a partner in the project.
If your organization is outside the Nordics, it can become an observer in the project.
Read about the benefits for partner organizations
Links
Connect
Community chat - Zulip: https://coderefinery.zulipchat.com
in addition to default channels, join at least: #coderefinery and #tools-workshop
introduce yourself in #greetings>introductions
lots of optional channels, check them out!
CodeRefinery team meeting notes, agenda and connection details: https://hackmd.io/@coderefinery/team-meeting
Every Monday 14 CET in Zoom
Everybody welcome
CodeRefinery Ambassadors
Network of people that like what we do and want to help spread the word and give us feedback
Meets roughly every two months
Events
Events calendar: https://coderefinery.org/calendars/
Workshops: https://coderefinery.org/workshops/
Events + workshop specific channels on Zulip chat
News
Collections
Lesson materials:
Learning: https://coderefinery.org/lessons/
Development: https://github.com/coderefinery/ + lesson title (NOT lessons!)
Presentations:
Public with DOI: https://zenodo.org/communities/coderefinery
Source and abstracts: https://github.com/coderefinery/presentations
Project reports and proposals https://github.com/coderefinery/reports-and-proposals
Other links
Our website is on GitHub too, built with Zola -> Website repository
Registration management is done via NeIC Indico, only workshop organizers have admin access.
Accounts
Please get yourself an account on the following platforms to use for CodeRefinery work:
Zulip
GitHub
HackMD
On GitHub we have an organization that you will be added to to have access to few private repositories and be able to merge pull requests etc. On HackMD we have a team that you will be added to to have write access to some team notes.
Team responsibilities
According to project plan: Engagement in project activities. It is up to you, which activities you would like to join. Please let the project manager know if you are unavailable for multiple weeks/months.
CodeRefinery activities you may want to join
Instructor
Our main tools workshop is happening twice a year in spring/autumn. For these workshops, we always have two instructors per topic and provide an instructor onboarding before the workshop when needed. We have gathered a lot of information and guides about “how to instructor at a CodeRefinery workshop”, but the main aspects are summarized in our Instructor introduction.
As an instructor you should bring or be willing to acquire the following tools and skills:
Competence in FAIR software practises
Interest in online streamed teaching to large audience
Pedagogical skills
Patience with supporting students and researchers without technical background about software tools and techniques
Persons who like working with others since the teaching always happens in collaboration with others
A decent camera and microphone for clear audio and video
We generally recommend CodeRefinery instructors to also visit the Carpentries instructor training or similar to prepare for teaching tech with live coding etc. Contact project manager about possibilities.
Apart from instructors, our workshops also have a lot of other roles to fill: Roles overview.
Material contributor
Apart from lesson materials feedback and improvements, we also welcome any feedback and improvement suggestions on our manuals (these files here), installation instructions, webpage etc. Open tasks are summarized on the CodeRefinery webpage.
More info at Lesson contribution guide.
Help us make the lesson and other materials more clear, expand on examples, add exercises or new sections!
To help with material development, you will need or be ready to acquire the following tools and skills:
GitHub account
Skills in open source collaborative lesson development; fits well as learning by doing!
Apart from contributing new materials, contributions by others also need to be reviewed. In order not to put pressure on the individuals we try to use the coderefinery-team as reviewers. If you notice a pending review, please at least read and comment, even if you do not feel confident in merging.
Organize other collaborative workshops
As mentioned above, CodeRefinery is a training collective. Apart from the main CodeRefinery workshop, partners may also choose to collaborate on other related training topics. The best way to get in touch is via Zulip chat.
Support with outreach
It is incredibly hard to reach our target audience at the right time in their career. Please help! We have social media channels that could always use some entertaining posts, a blog to share experiences, submit a talk or poster for a domain specific conference, or other places where our target audience may already be.
Thank you!
No matter what you choose to do, we are happy to have you! CodeRefinery lives through its people and community!
CodeRefinery Zulipchat
The CodeRefinery zulipchat is where our primary discussion, planning, and action takes place. Many things are announced only via Zulipchat. This is a public chat and everybody is welcome to join, no invitation needed, and we explicitly invite anyone to give ideas in any channel or topic.
The chat is a joint community of CodeRefinery (teaching), scientific computing teams (infrastructure and support), and Nordic-RSE (usage and software), which are other Nordic projects about scientific computing which share some of the same people. Together, we have a network of all aspects of modern scientific computing.
Unlike Slack, Zulipchat is very heavily threaded, and one can follow along without being active all the time. Respond within the topic (=thread) that is relevant, or make a new topic. Sometimes you can find old topics to revive.
Channels
Once you join the chat, you will be subscribed to some default channels. The first thing you should do is join some more channels, depending on your interest. Join more channels by clicking gear icon by the steams list on the left side on that chat, then selecting what you are interested in.
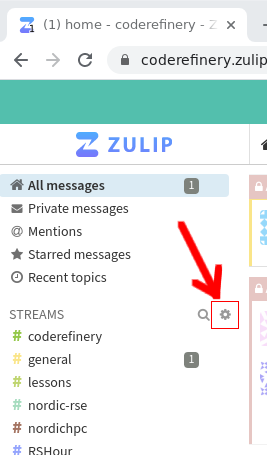
The easiest way to find channels of interest is to go through the list and join whichever sounds interesting. You can always leave a channel again too.
If you mute a channel, you can see the contents if you click on it, but you won’t get notifications. If you mute a topic, it will be hidden from view but you can later unmute it in your personal settings. Under channel settings, you can request email notifications for all messages in a certain channel (possibly useful for the announce channels).
Default channels (everyone joining is automatically subscribed):
#events : Share information about courses, workshops, seminars or other events; can also be used to look for collaborators
#jobs : Share open job positions that others here might find interesting too
#greetings : New joiners are recommended to introduce themselves here, so we can welcome you. Other greetings/thanks also welcome!
#coderefinery : CodeRefinery organization: about the team, project, strategy, CodeRefinery Gitlab
#nordic-rse : Nordic Research Software Engineers: General discussion about research software and related topics.
#random : Memes, jokes, animal pictures, whatever makes you smile or does not fit any other channel :)
#general : Ideas, TIL/W (today I learned/watched), general discussions, tech stuff, …
#help : Community support. Ask questions related to anything about the topics on this chat (CodeRefinery, RSE, scientific software and data, HPC,…)
#lessons : Discussions about CodeRefinery (and other) lessons. There’s usually one topic per lesson and other related things.
There are also multiple sub-communities related to a specific event, group, region:
#aalto : Aalto University scientific computing community (+friends)
#aaltoscicomp : Aalto scientific computing support personnel
#advent-of-code : For chatting about the advent of code challenges
#cr-retreat : Temporary private channel for CodeRefinery writing retreat related discussions
#finland : Discussion related to activities in Finland (CodeRefinery, RSE, HPC, SciComp, anything else)
#hands-on-scicomp : Work on the https://handsonscicomp.readthedocs.io/ training map
#hpc-kickstart : Aalto’s twice-a-year kickstart courses (scicomp and HPC). Channel exists because the course is open to anyone and this is the coordination channel.
#nordic-rse-2025 : Nordic RSE conference 2025 organization
#python-for-scicomp : Python for SciComp coordination: A big course each autumn, public to the world. We are happy for any help here.
#rshour : Research Software Hour community and coordination. It is a weekly livestream about research software.
#scicomp-teams: Teams related to scientific computing, especially about running of the teams themselves. For example, HPC teams, RSE teams, data manager teams, etc.
#SWC DLN/ELIXIR/UiB Dlab : a sub-community
#coderefinery-tools-workshop : Where we organize the “standard” CodeRefinery workshop each spring and autumn.
#workflows-course : Real-life cluster computing workflows course, “Tuesday tools and techniques for HPC”. A new course started in 2024
#hpc : Discussions around HPC in Nordics and beyond
#zulip: Zulip notifications and discussions around the chat platform
New channel announcements will be visible in #general, Zulip updates can be followed in #zulip channel.
You are very welcome to create new channels, e.g. for regional subgroups, such as #finland. You can also create topical private channels for groups that significantly overlap with our community. Currently, Zulip admins can’t add themselves or others to private channels.
Good practices and tips
Views
Recent conversations
To follow up on most recent conversations in chat, use recent conversations, which shows you all your channels, the number of unread messages per channel, starting with the most recent one.
Combined feed
To see all the latest messages in all your channels/topics, use Combined feed view.
Or read by channel or topic
Sometimes I see that I have many unread messages when I have been away for a while. Then I like to “zoom into” channels and read them by channel and topic. For this I start with the channel that I am most interested in. And I can return to the other channels later.
Notifications
You can set separate notifications settings for the full chat, channels, and topics.
Topic vs private message
Just want to share something with a small group of people -> Send a private message to multiple people instead of starting a new topic.
Search before creating a new X
Use the search function to search for some relevant keywords before creating a new topic. But also don’t be afraid to create a new topic. We recommend the search first because it can nicely connect to a previous discussion and those who participated previously can be notified about the new question or comment.
Mark as resolved
To indicate that a topic is resolved, for example because an event happened or a help request got resolved. This does not make the topic vanish but a small checkmark is added to the topic.
Too many unread messages?
Don’t be afraid to mark all messages in a channel or topic as read if you have been away for few days or weeks. Sometimes it can be more useful to join the current conversation rather than feeling “guilty” about not having read everything that happened in the last weeks or days.
Chat digest
If this chat is not your main “hang-out spot”, but you would still like to stay up to date, you can sign up for the CodeRefinery chat digest, providing one e-mail per week with the latest updates from the chat.
Clients
Zulipchat can be used in a web browser, there’s a desktop app, mobile
apps, and even a terminal client installable using pip.
Reacting and voting
We want everyone to take part in chat and express their thoughts, but
of course people don’t want to give pointless agreeing replies (but
you can always welcome to do that, too). So, we encourage everyone to use reactions in cases they want to express agreement/disagreement but not so much they want to send a message. Common reactions you might see are 👍, 👎 (thumbs up/down, agree with general sentiment), 🐙 (:octopus:, awesome/amazing/ace), and well, plenty more that are more obvious.
We also use reactions to express some idea of a more concrete vote, to empower people to take an action (otherwise, it is difficult to get a decision on anything). This is not formal or necessarily binding (so it’s not really a vote), but a useful intermediate system for a young project. If you see a message proposing something and you want to say, in no uncertain terms, “I think you should do that” or not, let us know by the following:
↔️ (+0,
:left_right:: I see this and am neutral.🔼, 🔽 (+1, -1,
:upvote:,:downvote:) or similar: I agree/disagree with this.⏬, ⏫ (+2, -2,
:double_up:,:double_down:): I agree/disagree with this and am willing to work on making it happen/finding an alternative.
If you want to do something, ask for opinions, and a reasonable time later it seems the sentiment is positive, consider yourself empowered to do it. If you are voting, feel free to be creative with emojis or numbers, but realize that other reactions may not be so explicit. Note that if you are negative, you should explain why or alternatives, otherwise your opinion may not be weighted so much. The person doing the thing decides what to do (and this is open source: we find a way for everyone to do what they need to do).
Do you think you aren’t important enough to vote? That’s wrong, because we are usually interested in the thoughts of everyone. We can see who voted and use that to weight our decision if needed.
Privacy
All activity (except private steams) should be considered public, and the data controller is zulipchat.com. Zulip admins can’t add themselves or others to private channels, but still: there is no contract guaranteeing confidentiality.
Ambassadors
Do you like what we do and would like to help spread the word to your community?
Become an ambassador!
Anyone interested in the project can become an ambassador.
Materials to include in your talks, posters and trainings at events (you may anyway be attending):
Ask us for stickers (we have some in stashed in many countries ;) )
We can also support you to start your own local community of CodeRefinery enthusiasts or other activities. Let us know what you need.
What we can offer:
A chance to influence the future of the project
Visibility in social media and on our webpage
Weekly community news
Support for organizing local events or other activities
Join the ambassador chat stream in our Zulip chat (#coderefinery > CodeRefinery ambassador program).
Contributing to CodeRefinery
CodeRefinery is an open-source project. All our work is open, and we accept any type of contributions: there is a lot more than instructing to run a successful workshop. Also, CodeRefinery is really more of a group of like-minded people than one particular plan, so you are welcome to join just to hang out and share ideas.
If you aren’t sure you are ready for more, you can always lurk in the chat (passively watch our community) and become more active when you feel the time is right.
These manuals (and in general, other guides we have) describe the past, not (only) the future. They are made so that new people can know what we typically have done, so they can work on the future (even if it’s different).
A good way to get started is to take the lead of some workshop (doing it like it was before), then do it again with your own improvements.
How to take part
Join the CodeRefinery chat, give comments or submit emoji reactions to show how you feel about things. Many things are announced only through the chat.
Come to our meetings- the monthly community calls are for a broad audience, but anyone is welcome come to the weekly meetings.
Attend a CodeRefinery workshop - they teach the very tools we use to collaborate!
Action: Join our “community teaching training”
CodeRefinery isn’t just about doing teaching ourselves, but improving your teaching. Whether you focus on teaching, or it’s a side-activity to your other tasks, the CodeRefinery (online) teaching can help you avoid re-inventing good practices and prepare you for teaching together.
Read more: https://coderefinery.github.io/train-the-trainer/
Action: Advertise and/or help out in our online courses
CodeRefinery runs many open, online courses, which anyone can attend. Some of them can be attended by anyone via livestream, even without registering (yes, this really works - we get high ratings for this). You could simply advertise our courses, or go even further and run local breakout rooms.
Take it a step further and help out with the course, whether it’s as an instructor, helper, or some other role. Of course, anyone is welcome to help, even without advertising the courses!
Read more: Local breakout rooms and Roles overview.
Action: Teach openly and allow others to join
Go to the next level and adopt CodeRefinery strategies for your own courses, so that others can join at little cost to yourself. By opening, you start to find more lesson developers and instructors, so that your courses can reach the next level of quality and impact. Soon, you will wonder why you ever bothered teaching alone.
Read more: Open your courses to others
Lesson contribution
All our lessons are hosted on GitHub. You can find the link to the GitHub repositories from the respective lesson page (lesson links on our webpage) on the top right corner -> “Edit on GitHub”.
Please refer to our lesson contribution page for guides and support: Lesson contribution guide .
Other types of contributions
As an open project, there are any number of ways you can contribute:
Take on any of the roles in a workshop - with co-teaching, it is surprisingly easy to go straight to instructor, but there are also many other roles.
Help with lesson maintenance (read and make suggestions) or become a maintainer of a lesson. Watch GitHub repositories to get notified of issues and pull requests, and help review. Anyone can watch any repository, and comments from outsiders do help us review things faster.
Lesson credits
Page status
This is a draft/proposal as of 2024.
We hope to acknowledge all contributors to our material, but there are many different sizes of contributions to something as wide-ranging as CodeRefinery. We have these levels of credit:
Editors take an overall, long-term view, set the overall strategy, and manage the fit of the various sections. They merge pull requests (but so can others).
Contributors/Authors have made contributions which are locally significant to one part of the lesson, and take responsibility for what they have added (along with the team).
Acknowledgees have made other contributions.
Editors and contributors are listed in the CITATION.cff file within
each repository and are includes as authors in the archived DOI in
Zenodo. Editors are usually mentioned in the README file itself.
Acknowledgees are listed on the Github contributors pages (or
READMEs if it’s not via Github).
Adding an acknowldegee
There are very many, so we try to leave the Github contributions page as the main source of them. They can also be added to the lesson README page if it’s not a Github interaction (or if it’s desired for some other reason).
Adding an editor
Anyone is welcome to take a long-term view of the lesson to become a future editor. Be active in Github/chat/our meetings/etc. and we will be happy to distribute the work and credit more.
Local breakout rooms
Some CodeRefinery courses are designed to be large scale, with distributed registration. In short, this means there is a livestream that anyone in the world can watch. Since we can’t handle a personal support for everyone in the world, you can open registration to attend the course and provide support.
Principles
We have a livestream, open to everyone in the world. The CodeRefinery MOOC strategy strategy allows us to reach a huge audience in a decentralized manner.
Decentralized teaching allows us to reach many more people than we could otherwise.
Most attendees can ask from help through the Notes doc (Collaborative document mechanics and controls), which works very well
There are periodic exercise sessions, where learners and teams can work together.
Step 1: Local breakout room
Create your own breakout room - whether online or a physical space. That means for example ask some friends to join you to watch the stream and collaborate with the exercises.
Our exercise sessions are very clearly announced and communicated. During these times, the livestream goes silent, and you can work within your breakout rooms. The end of the exercise sessions and breaks are clearly communicated as well - we support your breakout room scheduling as much as possible.
Attendees can ask general questions via the Notes
You can continue your local support even after the course.
You may want to run local “installation help” sessions.
Step 2: Registration
If you have a broad audience, you may want to make your own registration form, completely separated from ours. That may help with reservations and catering if any.
Please let us know the total registrations and attendance, or have everyone to register in our form in addition to yours. This help us in reporting our impact and secure support.
You may (but don’t have to) create teams, where you have one team leader for 5-6 learners. The team leader guides the team and supports collaboration and community - and lets us scale much better than we could otherwise. Teams also support retention after the course, especially if they knew each other before registering. (See Team leaders (Helpers, Exercise leaders))
We would like to know statistics from how many people attended from your location for our impact reports. (still, the top priority is reaching as many people as possible, we’ll adjust reporting to what works)
Step 3: Teaching
You support learners during the course
If you don’t know everything, that is OK! You can also relay questions to our Notes doc where experts can answer
Step 4: Follow-up
A course is good, but learning doesn’t stop then. Our materials remain available indefinitely.
Since you know your local audience, you can continue to support them for long-term impact (if you want). This is probably why you value the teaching anyway, right?
Summary
As you can see, there are many models, from distributed and simple to centralized. It’s best to talk in chat and see what will work best for each workshop, but we are generally biased towards more decentralized approaches for large courses.
Open your courses to others
CodeRefinery strategies allow you to reach a larger audience without much extra work from you. Once you open to other attendees, you also naturally get co-instructors who want to help improve your material. This allows you to reach the next level of quality and impact, even for your own local audience.
Principles
Thanks to the CodeRefinery MOOC strategy, you can easily reach more people than you could otherwise.
It may seem hard, but there are many small steps to take and you can gradually scale up.
How-to
Learn by example: attend our courses, advertise our courses, and volunteer, too.
Read all of the manuals here - we try to document everything we can, but they are always going to be a work in progress.
Attend our train-the-trainer course to network with others and learn from the experts.
About CodeRefinery
History
CodeRefinery began as a Nordic e-Infrastructure Collaboration (NeIC) based off of some previous workshops at the KTH, Stockholm. The first round of funding was from 2016 - 2018, and a second round is going from 2018-2021. Thus, so far, it has always had some paid staff (each up to 0.5 full-time equivalent of their primary jobs). Most of these staff are from some sort of computing center.
Over time, it has evolved into a more open project direction.
Governance
There is a steering group within NeIC which governs the CodeRefinery project. However, strictly speaking that mainly covers activities done via NeIC funding. The materials and open-source project is open to all.
There are currently no formal decision making processes. Typically, decisions related to some repository go through the process of…
Submit an issue or pull request
Discuss in the issue and/or
Discuss in a CodeRefinery team meeting
If there is rough consensus, then commit it.
In general, most decisions (of the open project) result in some sort of commit in git. If the reaction is positive in a CodeRefinery meeting, then it’s accepted. (Most day-to-day things aren’t discussed in the meetings, only major things affecting the whole project.) In general, if you are open and discuss, then do what will improve the project for you.
Communication methods
This is an exhaustive list of our communication methods
CodeRefinery team meetings (announced in zulipchat)
Team email list (in practice, only used for calendar invites)
Github repositories issues and pull requests
Chat
Zulipchat is our primary means of communication. Subscribe to at least the #coderefinery, #lessons, and #workshops, #general, #announce, and #help channels to fully integrate to the CodeRefinery side of things.
Team meetings
These tend to happen every ~2 weeks. Mainly, we discuss NeIC project, workshop organization matters, and how to organize ourselves. Most work on actual lessons happens in Github issues.
You can find upcoming meetings by TODO.
Github
We are focused around the material we make, and for that, most discussion happens in Github issues. For more abstract discussion on lessons, there is a topic in the #lessons chat corresponding to each lesson.
Decisions
There is no formal process of decisions. It should be brought up in chat, then brought up in a meeting. In the meeting, be very clear about what you need a decision or advice on.
Core team
There is currently no formal “core team” - only those who are most active. If you hang around, contribute a lot, you will end up being seen as “core”.
Joining
There is currently no formal joining process. Take part, and contribute as you would like.
The usual way of joining would be to decide how CodeRefinery has to adapt to serve your needs, and start proposing ways to do that. Reading existing pull requests and giving a comment of “approve” is a great way to get noticed.
CodeRefinery governance
CodeRefinery Community
Right now, the CodeRefinery community is small, so we do not want to make things very formal. However, we expect things to formalize in proportion to its need.
In short:
Team meetings are approximately once a week. Rough consensus is used to make decisions. Read more: https://coderefinery.org/organization/meetings/
Important decisions should also be announced and discussed via chat in advance, and ideally at several meetings.
Because this is a small project, the deciding factor is “what does someone want to do?”. Meetings provide a way to empower people to take action which may otherwise be hard to find in asynchronous chat, despite the voting.
The monthly “Community calls” allow us to get a perspective of a broader audience and bring in new members.
This document will be updated (by pull request+discussion) as we improve our governance in the future.
In the future:
An advisory role could to taken on by some sort of community council or board made up of partner representatives and community representatives.
NeIC project
The Nordic e-Infrastructure collaboration funds a part of CodeRefinery, and with that comes a certain standard of governance and reporting (see also the collaboration agreement). However, we consider this to be in parallel to the community project (with the community project being more important).
There is a lot of overlap between the NeIC-sponsored staff and the community, but the community will increase in proportion over time.
Outreach plan
This is a prototype the CodeRefinery outreach and marketing plan.
Since most of us are not very good at marketing, this is actually a summary of the book The new rules of marketing and PR : how to use content marketing, podcasting, social media, AI, live video, and newsjacking to reach buyers directly (David Meerman Scott, 8th ed.) with descriptions of how it can apply to CodeRefinery. The book is available at my university’s O’Reilly Online Learning platform through our library for free. If you like what you read here, consider checking it out - the book was a very good inspiration for someone that needs to outreach better, but is not at all that kind of person and needs some inspiration for how to even think about it.
Perhaps this summary is useful to others outside of CodeRefinery as well.
Currently, this page is one person’s description and their own interpretation9 as it applies to CodeRefinery. Over time, it should be adapted to represent a broader view, this paragraph updated, possibly the current content archived, and the new plan made into a new page.
Introduction
Many people need marketing and outreach: CodeRefinery isn’t trying to sell things, but we are trying to encourage people to make a choice to gain skills. It’s free, but it does have a cost: time. We think that it does save more time in the long run, but then again, how many businesses sell things that will save money in the long run?
We need to encourage people to make a specific choice, and we need to tell them why we think that is the best choice for them.
1 The Old Rules of Marketing and PR Are Ineffective in an Online World
“Interruption advertising” doesn’t work (anymore?). Few people want to have their life interrupted with a TV commercial, banner ad, or email from university administrators telling them to make some choice. People think of different things now.
For CodeRefinery, you could argue that flyers, emails from university staff, etc. are all some form of interruption advertising.
There’s all kind of anecdotes about how advertisement, mentions in the press, and so on aren’t useful, but we wouldn’t do those anyway. Although, we do want press, that’s not the main way we get people to take our courses. (maybe it helps our funding, though)
2 The New Rules of Marketing and PR
People do, however, take recommendations from people they know. Social media lets people communicate. The match is clear. By making good use of social media, we can reach people directly.
(this chapter starts off with an example of social media inspiring the author to visit Saariselkä in Finnish Lapland, which was interesting to see.)
3 Reaching Your Buyers Directly
Social media lets people reach buyers directly. This is obvious.
But, how to use social media. You don’t want to go doing interruption advertising, trying to use it to directly sell your stuff. Instead, produce good, free content which people will want to consume. Most of your activity should be about this, which gets people interested, and makes them want more. Then, when they want to go deeper or are ready to make a purchase, they come to you.
CodeRefinery does nothing but make free content, so how does this apply to us? Well, we have to think more. Our main content costs a lot of time, so we need to think of content that is shorter and easier to consume. For example:
Short videos or pictures explaining things.
Short blog posts about tips or tricks, which have a clear, catchy, immediately useful title.
Tweeting links to specific pages we have just made, which are especially useful standalone.
Short “git hacks” or clever things, which people like and share, and makes them want to attend a workshop.
“Research software minute” videos?
You have to think of buyer personas - backwards design all of your material. Don’t make anything unless you know who it is for, and then make sure it is suitable for that person. Know their goal, how they speak, and where they are (what content do they consume?).
CodeRefinery buyer personas could include:
Learners
team leaders
Group leaders or university staff who can recommend their audience to attend a workshop
Prospective instructors and helpers
Funders and high-level leadership
5 The Content‐Rich Website
Websites matter - people will go there and check it out. Blogs are good, they last longer than any single social media operator and provide long-term web traffic. Websites (and everything) need specific skills and a manager. The website needs a personality and voice.
CodeRefinery should make sure that there is are clear target pages or sections for each of our target personas below. We should make sure we don’t use jargon that we would use, or have the website organized by our own operations as opposed to learner personas. We should also make sure the website is accessible and mobile-friendly.
6 Marketing and PR in Real Time
Following social media in real time can let you know what people think. This can be an even better feedback method than surveys, etc. By responding in real time (this can take effort), you can have conversations there (in the open) which is also very good for outreach.
CodeRefinery could consider monitoring more of social media. TODO: how to do this?
7 Artificial Intelligence and Machine Learning for Marketing and PR
We know about AI and so on. We also know it’s not magic. There were discussions about using AI to generate some content, such as tweets from web pages.
I didn’t see much useful for CodeRefinery here, however some ideas (run our webpages through a text summarizer to get the most important sentences to help us make tweets) might be useful.
8 You Are What You Publish: Building Your Marketing and PR Plan
This is the chapter that puts everything above together, before it goes off into details of the implementation next.
Understand what we want. Until a goal is clear, it is hard to justify the effort (and also, I guess ask for others help do it). (CR: we could say “better science” but it can also mean things like “attend workshops” or “ensure funding for the project”)
More registrations?
More followers?
More views of videos?
More funding?
More team leaders?
List the buyer personas relevant to us. (See chapter 3 for the list)
Create a persona around each of these buyers. (CR: see chapter 3 above for the details).
What are their goals?
What do we want them to do?
What content do they consume?
How do they make their buying choices? (CR: how do you decide how to spend your time?)
How do they speak, talk, and read?
Subscribe to and follow the media they follow.
Develop (free) content that interests each of these buyers.
Develop a measuring plan. Think about how we can measure success, both in immediate engagement and making the decision we want (what we actually want).
9 Growing Your Business: How Marketing and PR Drive Sales
Salespeople don’t mediate between buyers and companies anymore. Instead, people can find so much information themselves, and make purchases self-service. Websites and other material have to be target to buyers (= potential learners) who are deciding if they want to purchase (= attend a course). Websites and material should have a personality (= our website shouldn’t be written as boring as a scientific paper). It’s OK to do fun things. Social aspects to the site is good - e.g. comments section, social media share buttons.
Begin with informational content (not necessarily about you).
Nudge towards what you want (= attend a course, etc.)
Make it easy to close the deal. (CR: clear “notify me” mailing list link on every relevant page. Maybe even make sure we have continually open registration for the next workshop - each workshop is ready for registration when the previous one ends. When we have multiple types of workshops, includeable html snippets that has links to register for every upcoming workshop?)
Don’t underestimate the value of figurehead leaders (~=CEOs) being social - don’t just delegate it to separate marketers.
Is the analogy of salespeople even relevant for CodeRefinery? Probably not, but maybe we could say that official requirement, recommended courses, university staff aren’t so important. People will check our websites and other material to see if they want to attend.
Every website, lesson, and so on has to have very clear information targeted to a possible reader right at the beginning, so that a potential learner might see “is this git lesson right for me?” and they will find “yes”.
Our website should be current.
10 Strategies for Creating Awesome Content
This section has different strategies and types of content. Types of content include: blogs, audio, video, photos, infographics, charts, email newsletters, presentations, long-form written content, research reports, virtual events, e-books, white papers, apps.
Think about how you make the content: don’t just write about yourself. Consider the problems your buyers face and make content that solves those problems. Write for your personas. Advertise what you do. Think what could possibly go viral. Don’t forget that it should be accessible.
CodeRefinery: in addition to the above, we should take part in other events, for example show up at Open Science days and give presentations, various awareness weeks (in person or online?), conference hashtags, etc.
11 How to Write for Your Buyers
Write like your buyers talk (we’ve said this before), and don’t use pointless jargon or meaningless words to make you sound smarter. Humor is OK. Think like a journalist (especially for some content types).
13 Blogging to Reach Your Buyers
Blogs are very important - and unlike social networks, they stay under your control long-term, and drive search traffic straight to you. Consider who you want to reach - potential learners? existing learners? other thought leaders? Blog about things that they are interested in and you are passionate about.
Don’t forget to monitor other blogs from people who do similar things, to keep up to date with what is going on. Comment on other blogs and link back to you. Invite other bloggers to visit you and blog about their experiences - this is good for both of you.
CodeRefinery probably knows that it should blog more. Some ideas about what to blog about are in previous sections. We should make it easier to share posts, and would we even want to try for a commenting feature (might be too much, though…).
14 An Image Is Worth a Thousand Words
15 Video and Your Buyers
17 How to Use News Releases to Reach Buyers Directly
18 Your Newsroom: A Front Door for Much More Than the Media
19 The New Rules for Reaching the Media
20 Newsjacking Your Way into the Media
(I haven’t fully read this chapter yet)
The idea here is that when something interesting to your audience and relevant to you comes up in the news, react to it / contribute something to it, perhaps preferably in a way that can be re-shared. Or in a way that other journalists. Be careful, don’t do this dis-respectfully or spammily.
In CodeRefinery, different things in the science news could be relevant to react to.
21 Search Engine Marketing
22 Make It Happen
Download this guide as single-page HTML, pdf, or epub.
All material within this repository is licensed CC-BY.
Social
Attend with someone! Register together and try to be in their same group. You could even reserve a room and work together. This will create a network of learning and practice that will last much longer.
If you can attend a group, that is even better. You can bring your own team leader to guide you (if the workshop works this way). Research shows that groups that have multiple adopters have much more uptake of new skills.