Open Broadcaster Software theory
This page describes the theory around OBS. For practical steps to run a course, see Broadcaster.
Open Broadcaster Software is an amazing open-source audio/video production tool. It’s probably not professional grade, but is used in serious events and will make a non-professional feel professional. The main point is that, instead of being limited to what your meeting software can do, you can:
create more advanced mixes of screens/video/etc, without having to do post-processing.
do more with the (local recording, streaming)
do this all better, for example, exclude the audience speaking from the recording.
It is a GUI application, so is not that hard to figure out, but there are a lot of initial concepts. This page isn’t a comprehensive tutorial, but will introduce the basic concepts and what you can get out of it, and you can either figure out the rest or read other tutorials.
Vision
When teaching online, we are usually limited by our online meeting software. This forces us to make certain trade-offs to fit the limitations of the software, so that we can’t reach our full potential. By using more advanced technology, we can do more: have interactive sessions while also recording and preserving privacy. For more information, see the online teaching guide.
Basics
Basic audio/video glossary
- Open Broadcasting Software (OBS)
OBS, whose current implementation is known OBS Studio. It is a multi-platform audio/video mixer, recorder, and streamer. It doesn’t do any editing, but you can flexibly mix stuff when producing for a one-shot product.
- streaming
Media which is delivered to the user continuously. The term implies over the Internet.
- livestreaming
Streaming of source that is live, delivered in near real-time. Lately, it is popularized by livestreaming games and other activities, which provides us a lot of accessible tools to use.
Livestreaming tools have opened a significant way for anyone to be able to interact in real-time with a large audience online.
- recording
Saving the streaming data locally for later use. And other stuff, you probably know this.
- Twitch
A popular livestreaming site. Popular with gamers, but has all kinds of live-streaming events.
- codec
COding and DECoding. As a noun, the algorithm used to encode and decode sound or video. There are many different codecs, with different properties of compression, CPU usage, etc. The codec is independent of the program actually used to encode/decode, and also (somewhat, not entirely) independent of the container format.
- container format
File format that contains the audio/video data. There are different formats, and the container format is independent of the codec of the material inside (but not all codecs work in all containers). There are containers for both streaming and recorded media.
- encoder
The program that compresses raw video to the codec for distribution. Of course, there are also decoders. You need the right decoder for each codec, but most things you would use these days are widespread.
- bitrate
Amount of data of the media stream over time. Usually measured in Megabits (not bytes, also note the actual unit is Megabit/second). As an example, Netflix on mainstream “high” quality is about 5 Mbit, and Twitch recommends ~6 Mbit at most. Netflix on low quality is about .7 Mbit, but of course all these are for movies, not relatively static screenshares.
The more movement in a scene, the more bitrate required to encode that at a constant quality.
- constant bitrate (CBR)
Encoding method where the bitrate does not vary over time. There is only a small encoding buffer to handle times with a large amount of movement.
Twitch and other live streaming sites recommend CBR because of the way the Internet works. With a live stream, a constant stream of data is needed. Internet congestion control protocols can keep a constant stream going when the stream is constant. If there is a sudden increase in instantaneous bitrate (with VBR and a section with lots of movement), congestion control not be able to keep up and buffers empty, causing lag.
Similar considerations apply to other playback modes, such as embedded devices with limited CPU power, thus the idea of encoding “targets” (profiles optimized for certain classes of devices). Mainstream personal computers tend to have enough power to decode anything, so this isn’t a major consideration.
- variable bitrate (VBR)
Encoding method where instantaneous bitrate varies depending on how much information is needed at each instantaneous point of time, to encode the complexity of the current scene. In x264, this is usually done as “CRF”.
- latency
Time delay between two events. In a livestream, time delay between the performer’s actions and the audience seeing it. This is caused by countless buffers: encoding buffer, network buffers, network transmission time, decoding buffer, etc. Lower latency increases performance demands on the hardware and network, so you need to strike a balance.
On Twitch, “low latency mode” gives you 10-15 seconds of latency.
- x264
A common open-source encoder. Used as an internal encodign backend for many different programs.
- x264 → crf
In x264, a variable bitrate encoding mode (constant rate factor). Values are between 0 and 51, but reasonable values are low 20s. For example, 23 is the default and looks good for all practical purposes.
- Real-time messaging protocol (RTMP)
A common protocol for live streaming. It is proprietary, but was later opened and is now one of the main standards.
- HTTP Live Streaming (HLS)
The other common streaming protocol.
User interface basics
OBS is a graphical program. Once you start it up, you see various user interface features:
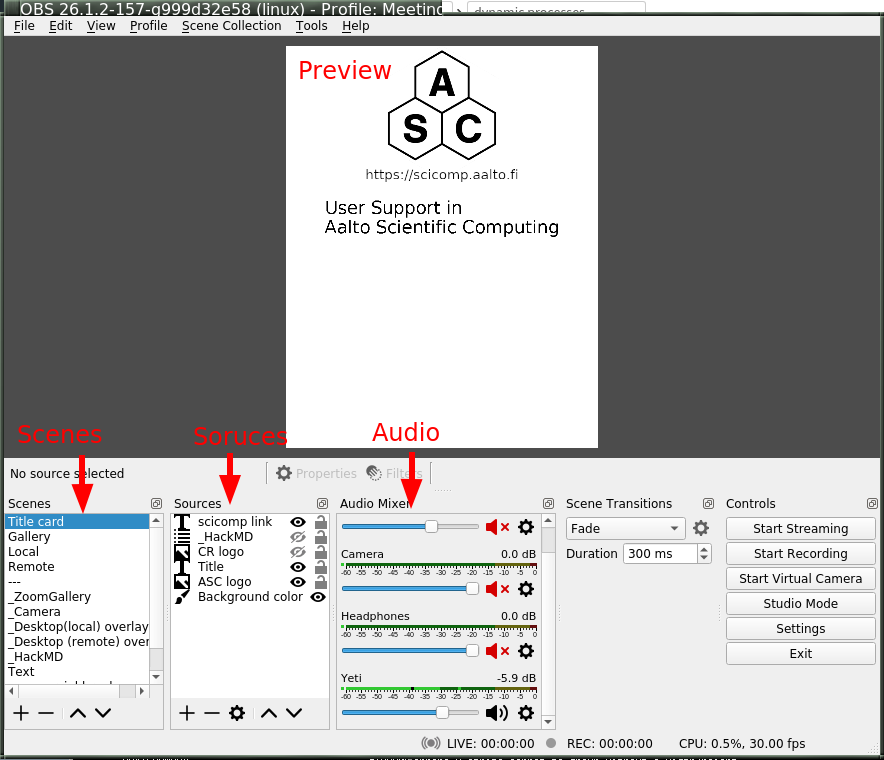
Basic OBS control layout
Of primary note are the following concepts:
- Preview area
Shows what is currently being broadcasted or recorded, or will be if you turn it on. There is also a separate “Studio mode” with a preview area, and live area. The preview area is used to prepare the stream, you can make it live when you want.
- Scenes
A certain layout that can be broadcasted. On the lower left is your scene collection, and you can add, delete, reorder, and rename scenes. By clicking on a scene, you switch to it and it begins broadcasting/recording.
- Sources
An image source which can be composed together in a scene. Scenes can be added, deleted, recorded. Via the preview area, sources can be graphically moved around to your liking. There is a comprehensive set of positional and image effect transforms you can make.
Sources can have filters applied to them, which do some sort of video transformation (for example, background removal). There are also transformations, which affect the position in the scene. Put together, you can do almost anything you would like.
- Audio sources
You can take audio input from various sources: mainly, microphones or as a monitor of a computer audio device (to, for example, play sound). Audio sources are configured in settings, but can be muted/have volume adjusted in the respective area of the screen.
Audio sources also have filters.
- Control buttons
There are buttons to start/stop recording/streaming. The output locations are configured in the settings.
Configuration
Here, we will go over the main parts of configuration. We won’t say everything, since this is graphical program and you can mostly click around and find your own customization you would like.
Because of the popularity of streaming, it is easy to find more tutorials and recommendations for anything here. Add “streaming” or “OBS” to your search.
Basic configuration
These options are found in the “Settings” dialog. These are just generally suggested defaults and when you might want to tone them.
- File → Settings → Stream
Here, you would configure the streaming service, if any.
- File → Settings → Output
Here, you configure streaming/recording output parameters.
If you use Simple, you pretty much can’t go wrong. If you are mainly screensharing and don’t have much action video, you can make the bitrate much lower, for example 1500 Kbps. The slower “encoder preset” is, the more CPU power that will be spent to get that quality, so the less space it will use. The better your CPU is, the slower you can make it; “fast” to “slow” are reasonable.
If you use advanced you have more options:
Streaming: Rate control=CBR, 1500 Kbps, other options don’t matter so much, defaults should be fine. You can search for recommendations online, but realize that most others stream high-action games so their settings are much higher than you need.
Recording: Recording format, mkv (mp4 is completely unusable if the recording dies, mkv can be uploaded to youtube if it has a supported coder inside of it). Encoder=x264, Rate control=CRF, CRF=22, Keyframe interval=auto, CPU preset=medium (or slower, for better CPUs) (slower=use more CPU to do better encoding, either higher quality or lower bitrate. Veryfast–Slow is a good range), Profile=main, Tune=None
If you use the streaming encoder for the recording, then it will only have to encode it once and it will save CPU power.
- File → Settings → Video
Here, you set the base size of the picture you will be using. You could do FullHD at 1920x1080. For vertical recording, we recommend you do 840x1080. Use your chosen value for both Base and Output resolutions. 30 FPS.
When setting your video size, traditionally people tell you to be as large as possible (to attract viewers). However, this guide is focused on teaching and learning, and for that a) we want our content to be as accessible as possible. There is no need for as many pixels as possible, as we often say “present from your smallest screen”, and you can do that by artificially restricting yourself. b) We have found a vertical screen works well: a learner can have the video/stream taking up half of their screen, and the other half available for doing their own work.
Click around through the other menus in settings and see if there is anything to configure to your own needs.
Scene configuration
After the above, you can set up scenes basically however you would like. However, as a starting point I propose these scenes to get you started (and I propose we standardize on these names, so that we can make some uniform scripting tools):
Title, the logos and titles of the event.
Gallery, a gallery of the people presenting (or the one). When presenting from a Zoom meeting, this is a capture of the gallery view in dual-monitor mode.
Screenshare is a screenshare by someone remote. If you are capturing from a Zoom meeting, it is the capture of the second window of the dual-monitor mode.
BroadcasterScreen is a local screenshare, that you get by capturing your own screen.
Notes is some HackMD or other material you might want to show during discussion periods or breaks.
Common types of sources (scene elements) include:
Static image (e.g. logo or background)
Desktop capture, for your local desktop. You can crop it (in the source config) to share only a portion of your desktop.
Single-window capture. Note that this is smarter than Zoom, since it can capture the full window even if is not on top.
Text (which works, but is not very powerful)
Solid colors
Other scenes. You can make one scene, then insert it into other scenes to avoid duplication of scene elements scene elements.
The sources themselves can be moved around graphically, which is good for setting things up. When there are more demanding needs, the source transformation can be edited for more precise control (right click on source in preview → edit transformation). There are source filters, which can do video effects such as removing a color. Some sources can be cropped in the source-specific config as well.
Audio configuration
Audio configuration is simpler than video configuration, since there are fewer different sources. On the other hand, it is harder to see what is going on (no preview) so it is harder to adjust it perfectly, and easier to cause problems like loops.
The main concept is that your computer may have different input and output sound devices (“cards”). For example, I can output sound from some application on my monitor’s speakers, while sound from other applications on the headphones at the same time. Find your computer’s way to see and configure what is going on under the hood.
There are two types of audio inputs:
Microphones, obviously recording from a microphone.
Monitors (as in, monitor a sound card), recording what is currently being played on another sound card. This is what is used to capture audio from a remote meeting, such as Zoom.
You set the active audio input in the application settings. The volumes of these can be independently adjusted - you want typical volume to be in the yellow zone. Advice for various operating systems include:
Linux using PulseAudio:
pavucontrol(GUI) orpulsemixer(terminal)Windows: ???
MacOS: ???
Under “advanced audio properties” (a menu item, also available from the gear icon in the audio area) you have several more options.
You can add various filters, such as noise reduction.
You can group audio sources into various audio tracks, and the stream/recordings can use different tracks. For example, a person may stream with music but leave that out of the recorded video. Or, you might record a video with two different audio tracks, one just the presenter and one with presenter + audience.
You can monitor the audio, which plays what is being recorded back over the headphones and speakers for you to check. Make sure you don’t make any loops!
Audio configuration is a big deal. You can look at these other guides:
???
High-quality audio is quite important. I’ve spent far too long playing with it, and my conclusion is that I don’t know enough to make it better than what I have now. What I know is in the “instructor audio” page linked above. I propose a central recommendation: talk about audio quality. Start meetings early and test it. Communicate about problems early, don’t ignore and think it’s “good enough for now”.
Recording and streaming
Once you have done the above, you can record and stream by clicking the buttons.
One piece of advice: always keep the recording going, and then stop/restart it when you need to cut. It’s easier to delete the unnecessary segments than realize you forgot to push “record”.
Projector and loopback output
Beyond recording and streaming, there are several more ways to use the output that can feed into other applications.
With projectors you can display the scene locally on another monitor or window.
The fullscreen projector displays the scene to a monitor. As the name says, this could be used to send it to an external projector or capture card via HDMI. Or even preview locally, or screenshared in an online meeting.
The windowed projector does similar, but makes a new window that can be moved and resized. This can be captured as a single-window screenshare in an online meeting. Or it can be a smaller preview of the scene if the main OBS window is too large for your space.
The loopback output creates a virtual camera device. This appears to other applications as a camera, just like the camera that captures your video. Other applications can use this as the input just like another webcam. So, you could make a fancy scene that is used instead of your normal camera’s picture. Or, in Zoom you can share screen from “second camera” - which would use this scene. (Note in Zoom it will interpret it as a landscape picture, regardless of what aspect ration you actually use. Thus, this isn’t very suitable for vertical screen sharing.)
Example configurations
Recording your own demo
Scenes: Title, Gallery, BroadcasterScreen. Variable bitrate recording.
Online teaching event
Scenes:
Title
Gallery - contains galleryCapture
BroadcasterScreen - capture of your screen, when you need to teach. Has galleryCapture in top-right corner
Screenshare: capture of Zoom second window (which has been adjusted to be same resolution as your base canvas size). Also has galleryCapture in top-right corner.
Notes: contains HackMD + galleryCapture
galleryCapture - contains the Zoom gallery capture. This gets inserted into the other scenes above.
Audio:
Microphone capture
Monitor of sound card which has the Zoom output
Outputs:
Recorded locally. Start and restart recording after every transition that you would want to publish separately. (Better to cut more than less, to have logically organized shorter segments. Also, always keep it recording, in case you forget to turn it back on!).
Stream to your preferred site.
Use windowed projector or Zoom capture to send the output directly to a Zoom meeting. But, that requires careful audio routing.