Inspecting history
Objectives
Be able find a line of code, find out why it was introduced and when.
Be able to quickly find the commit that changed a behavior.
Instructor note
30 min teaching/type-along
20 min exercise
Command line, GitHub, and VS Code
As usual, we offer ways to do this with the command line, VS Code, and GitHub.
Command line is most powerful and relatively easy with this. You may also use it along with other things. If you haven’t tried it yet, we’d recommend you to give it a try.
The GitHub web interface allows many things to be done, but not everything.
VS Code allows some of these, but for some it’s easier to open the VS Code terminal and run Git there.
Our toolbox for history inspection
Instructor note
First the instructor demonstrates few commands on a real life example repository https://github.com/networkx/networkx (mentioned in the amazing site The Programming Historian). Later we will practice these in an archaeology exercise (below).
Warm-up: “Git History” browser
As a warm-up we can try the “Git History” browser on the README.rst file of the networkx repository:
Visit and browse https://github.githistory.xyz/networkx/networkx/blob/main/README.rst (use left/right keys).
You can try this on some of your GitHub repositories, too!
Searching text patterns in the repository
With git grep you can find all lines in a repository which contain some string or regular expression.
This is useful to find out where in the code some variable is used or
some error message printed.
The Git command is as described above:
$ git grep TEXT
$ git grep "some text with spaces"
In the networkx repository you can try:
$ git clone https://github.com/networkx/networkx
Cloning into 'networkx'...

$ cd networkx

$ git grep -i fixme
doc/developer/release.rst:        # FIXME - use eol_banner.html
networkx/algorithms/isomorphism/tests/test_common.py:        # FIXME: check why fails ismags but not vf2
networkx/algorithms/shortest_paths/tests/test_weighted.py:        # FIXME nx.goldberg_radzik(D, 1)
While git grep searches the current state of the repository,
it is also possible to search through all changes with git log -S sometext
which can be useful to find where something got removed.
We can try the same example in the browser: https://github.com/search?q=repo%3Anetworkx%2Fnetworkx fixme&type=code
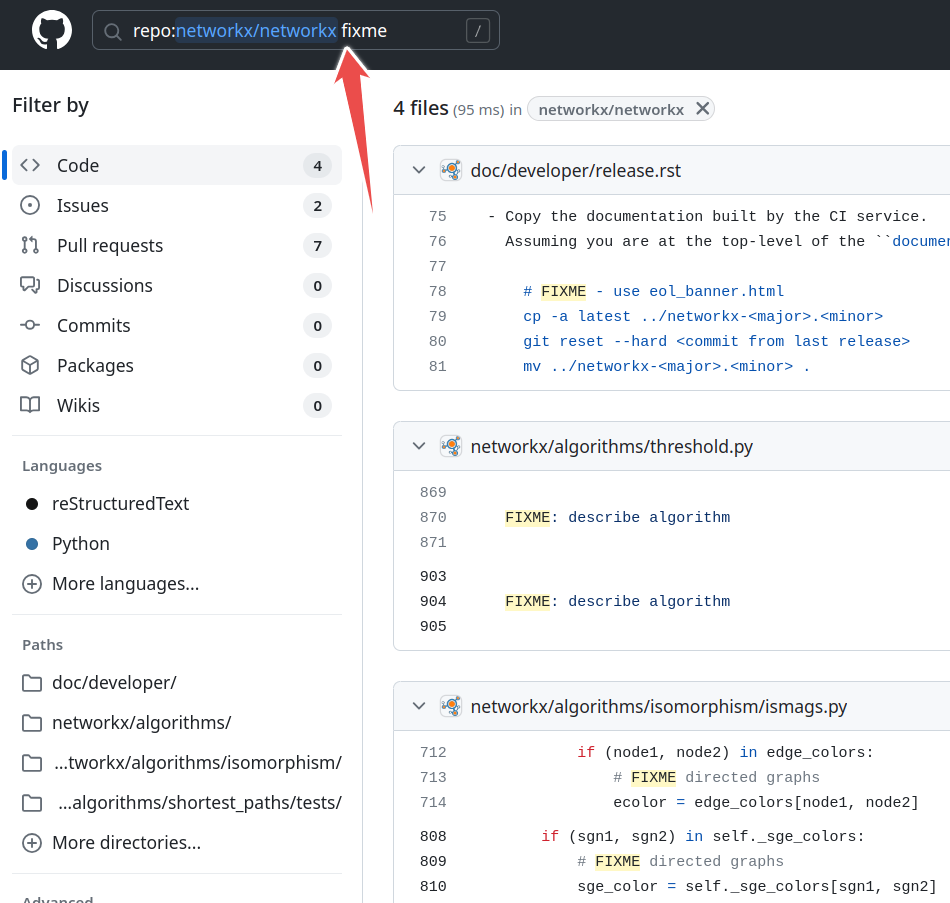
Searching for “fixme” in a GitHub repository.
Our example repository is https://github.com/networkx/networkx. From a new VS Code window, select “Clone Git repository” and enter that URL.
Searching with the magnifying glass from the left sidebar is
equivalent to git grep.
Edit → Find in files.
Use the command line method for more power.
Inspecting individual commits
We have seen this one before already. Using git show we can inspect an individual commit if
we know its hash:
$ git show HASH
For instance:
$ git show 759d589bdfa61aff99e0535938f14f67b01c83f7
commit 759d589bdfa61aff99e0535938f14f67b01c83f7
Author: Sanghack Lee <sanghack.lee@gmail.com>
Date:   Sun Mar 8 22:01:38 2020 -0400

    Fix return values when drawing empty nodes and edges  #3833 (#3854)

diff --git a/networkx/drawing/nx_pylab.py b/networkx/drawing/nx_pylab.py
index 4b2f34bed..1421b055b 100644
--- a/networkx/drawing/nx_pylab.py
+++ b/networkx/drawing/nx_pylab.py
...
We can try the same example in the browser: https://github.com/networkx/networkx/commit/759d589bdfa61aff99e0535938f14f67b01c83f7
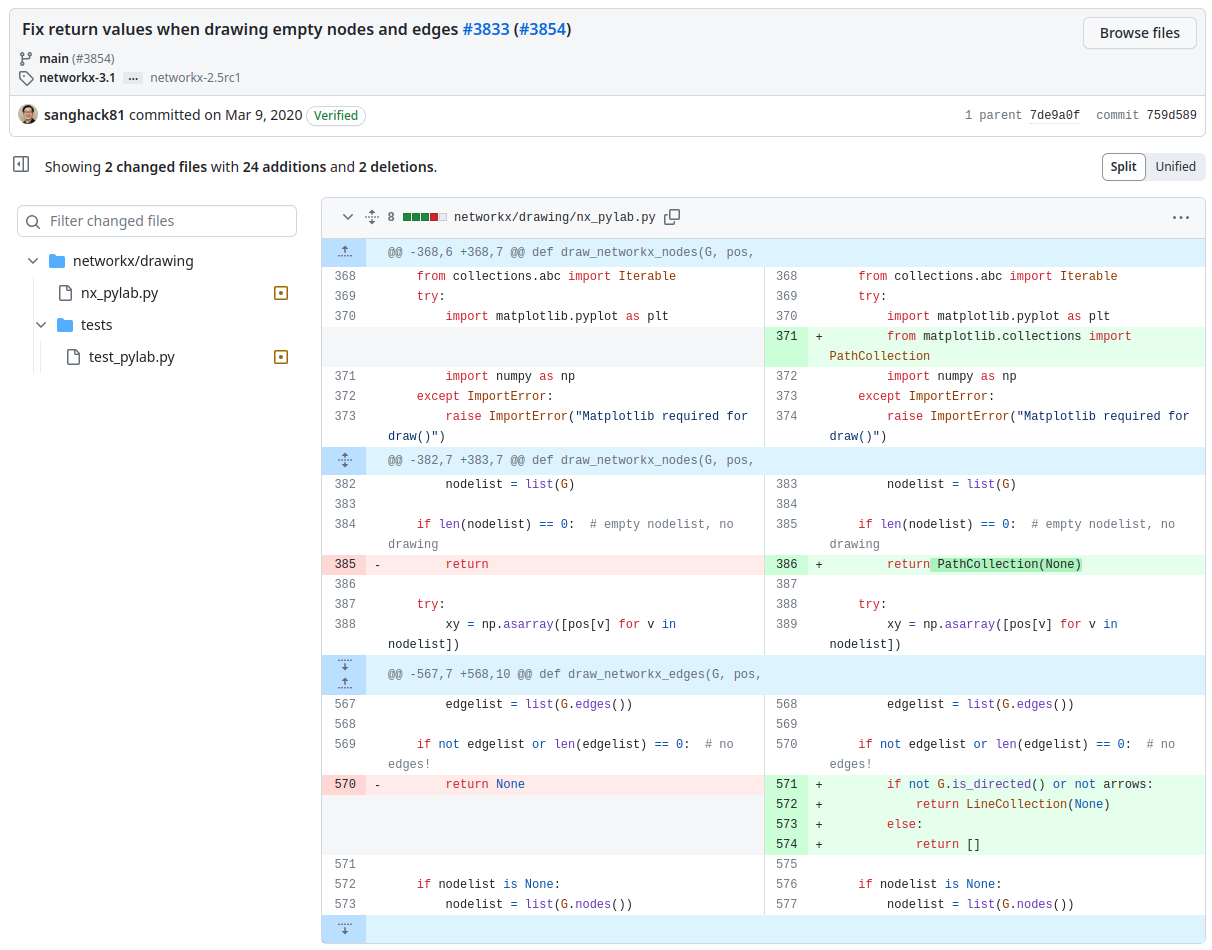
Inspecting an individual commit on GitHub.
We don’t know of a built-in way to see every single Git commit in order (extensions allow this). You can open the terminal and run the command line option.
But, if you open single files, a “Timeline” view under the explorer shows changes to that file. You can click on a change to see the details.
The graph view lets you select certain commits for viewing. The search box lets you search for a certain commit by hash.
Line-by-line code annotation with metadata
With git annotate you can see line by line who and when the line was
modified last. It also prints the precise hash of the last change which
modified each line. Incredibly useful for reproducibility.
$ git annotate FILE
Example:
$ git annotate networkx/convert_matrix.py
If you annotate in a terminal and the file is longer than the screen, Git by default uses the program less to
scroll the output.
Use /sometext <ENTER> to find “sometext” and you can cycle through the results with n (next) and N (last).
You can also use page up/down to scroll. You can quit with q.
We can try the same example in the browser: https://github.com/networkx/networkx/blame/main/networkx/convert_matrix.py
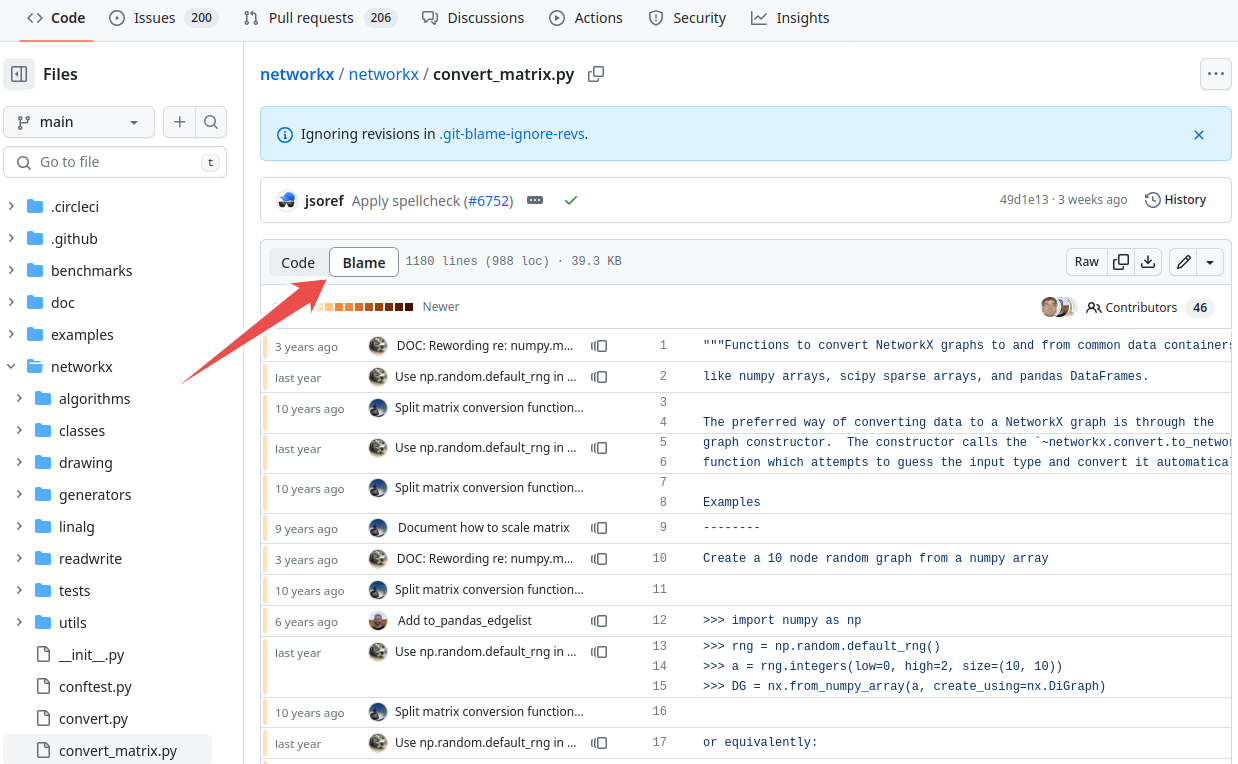
Screenshot of file annotation on GitHub.
It seems this needs an extension. We’d recommend trying the command line method for now.
Use the command line method (from what we can tell).
Discuss how these relatively trivial changes affect the annotation
Wrapping long lines of text/code into shorter lines
Auto-formatting tools such as
blackEditors that automatically remove trailing whitespace
Inspecting code in the past
We can create branches pointing to a commit in the past. This is the recommended mechanism to inspect old code:
$ git switch --create BRANCHNAME HASH
Example (lines starting with “#” are only comments):
# create branch called "older-code" from hash 347e6292419b
$ git switch --create older-code 347e6292419bd0e4bff077fe971f983932d7a0e9

# now you can navigate and inspect the code as it was back then
# ...

# after we are done we can switch back to "main"
$ git switch main

# if we like we can delete the "older-code" branch
$ git branch -d older-code
On old Git versions which do not know the switch command (before 2.23), you
need to use this instead:
$ git checkout -b BRANCHNAME SOMEHASH
We now know how to visit a specific commit: https://github.com/networkx/networkx/commit/347e629
Once we are there we can “Browse files” at that point in history.
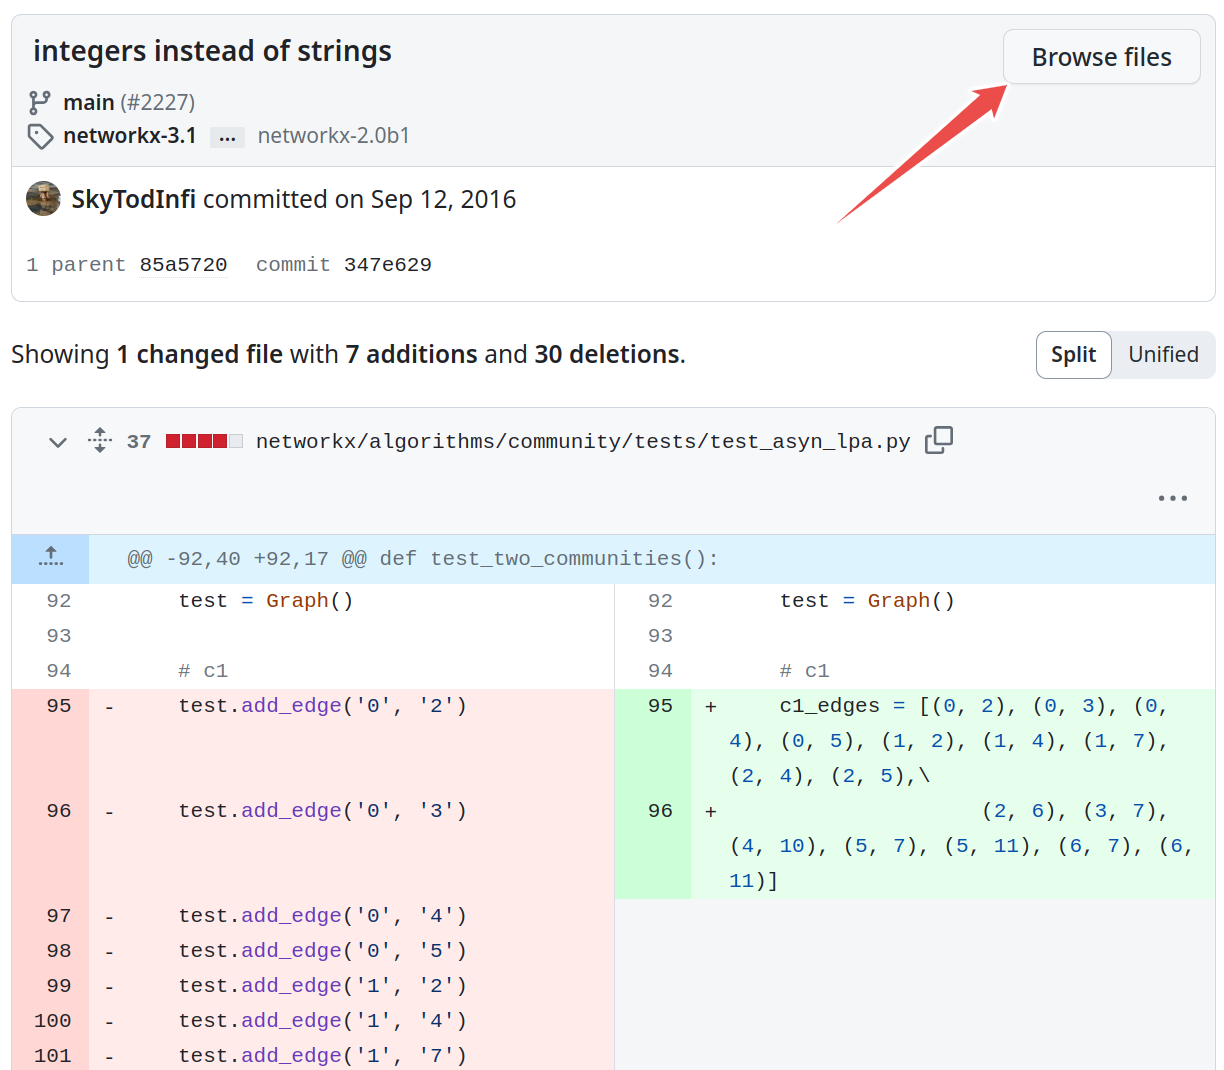
Browsing code in the past on GitHub.
Switch to “Source Control”, then the “…” menu, then “Branch”, then “Create new branch from…” and now you can type a commit identifier (hash).
Make sure you change back to the main branch when you are done.
It seems you can only create branches from the present (at least without extensions). Use the command line method.
Exercise
Exercise: Explore basic archaeology commands (20 min)
Let us explore the value of these commands in an exercise. Future exercises do not depend on this, so it is OK if you do not complete it fully.
Exercise steps:
Make sure you are not inside another Git repository when running this exercise. If you are, first step “outside” of it. We want to avoid creating a Git repository inside another Git repository.
You can check if you are inside a Git repository with:
$ git status

fatal: not a git repository (or any of the parent directories): .git
You want to see the above message which tells us that this is not a Git repository.
This is not a problem in the GitHub web interface since we are not creating a new local repository.
Warning: many of these exercise tasks aren’t possible in the VS Code interface without extensions. You can use VS Code to clone the project, but be prepared to start the terminal to do the main tasks.
“File” → “New Window”.
Warning: many of these exercise tasks aren’t possible in the RStudio interface. You can use RStudio to clone the project, but be prepared to start the terminal to do the main tasks.
File → New Project.
Clone this repository: https://github.com/networkx/networkx.git.
$ git clone https://github.com/networkx/networkx.git
Nothing to clone. We will try to inspect the repository directly on GitHub.
From a new VS Code window, select “Clone Git repository” and enter that URL.
From the new project window, choose Version Control → Git → and enter the URL
Then let us all make sure we are working on a well-defined version of the repository.
Step into the new directory and create an exercise branch from the networkx-2.6.3 tag/release:
$ cd networkx
$ git switch --create exercise networkx-2.6.3
On old Git versions which do not know the
switchcommand (before 2.23), you need to use this instead:$ git checkout -b exercise networkx-2.6.3
We can visit the version directly: https://github.com/networkx/networkx/tree/networkx-2.6.3
Switch to “Source Control”, then the “…” menu, then “Branch”, then “Create new branch from…” and select “networkx-2.6.3”.
Use the command line method (but you don’t need to
cd networkx, the RStudio terminal starts in the right place.) So, run this:$ git switch --create exercise networkx-2.6.3
(and if it doesn’t work, check Command Line for the command for older git)
Then using the above toolbox try to:
Find the code line which contains
"Logic error in degree_correlation".Find out when this line was last modified or added. Find the actual commit which modified that line.
Inspect the commit. What is the commit change? What is the commit metadata?
Create a branch pointing to the past when that commit was created to be able to browse and use the code as it was back then.
How would you bring the code to the version of the code right before that line was last modified?
Solution
We use
git grep:$ git grep "Logic error in degree_correlation"
This gives the output:
networkx/algorithms/threshold.py: print("Logic error in degree_correlation", i, rdi)
Maybe you also want to know the line number:
$ git grep -n "Logic error in degree_correlation"
We use
git annotate:$ git annotate networkx/algorithms/threshold.py
Then search for “Logic error” by typing “/Logic error” followed by Enter. The last commit that modified it was
90544b4fa(unless that line changed since).We use
git show:$ git show 90544b4fa
Create a branch pointing to that commit (here we called the branch “past-code”):
$ git branch past-code 90544b4fa
This is a compact way to access the first parent of
90544b4fa(here we called the branch “just-before”):$ git switch --create just-before 90544b4fa~1
On top of https://github.com/networkx/networkx click on the magnifying glass and search for “Logic error in degree_correlation”. This tells us that the file
networkx/algorithms/threshold.pycontains this line and you can click on the file. This brings you to https://github.com/networkx/networkx/blob/409979eff35f02eff54f4eea3731736bd431dc2e/networkx/algorithms/threshold.py#L550.Click on the “Blame” button. Left next to the highlighted line you see the commit which modified it last.
You can click on the commit (open in new browser tab) which brings you to https://github.com/networkx/networkx/commit/90544b4fa5a7397a86e69ebf5778f4a0f6eafe1e.
Let’s skip creating the branch on GitHub. Instead, we can browse the project at this version: https://github.com/networkx/networkx/tree/90544b4.
Go back to the “Blame” view for the file
networkx/algorithms/threshold.py: https://github.com/networkx/networkx/blame/409979eff35f02eff54f4eea3731736bd431dc2e/networkx/algorithms/threshold.py#L550. Navigate to the symbol “Blame prior to change …” which you find next to the commit message that modified this line.
Finding out when something broke/changed with git bisect
This section only works with the command line.
“But I am sure it used to work! Strange.” - Sometimes you realize that something broke. You know that it used to work. You do not know when precisely it broke.
How would you solve this?
Before we go on first discuss how you would solve this problem: You know that it worked 500 commits ago but it does not work now.
How would you find the commit which changed it?
Why could it be useful to know the commit that changed it?
We will probably arrive at a solution which is similar to git bisect:
First find out a commit in past when it worked.
$ git bisect start
$ git bisect good f0ea950  # this is a commit that worked
$ git bisect bad main      # last commit is broken
Now compile and/or run and/or test and decide whether “good” or “bad”.
This is how you can tell Git that this was a working commit:
$ git bisect good
And this is how you can tell Git that this was not a working commit:
$ git bisect bad
Then bisect/iterate your way until you find the commit that broke it.
If you want to go back to start, type
git bisect reset.This can even be automatized with
git bisect run SCRIPT. For this you write a script that returns zero/non-zero (success/failure).
Optional exercise: Git bisect
This only works with the command line.
(optional) Use git bisect to find the bad commit
In this exercise, we use git bisect on an example repository. It
is OK if you do not complete this exercise fully.
Begin by cloning https://github.com/coderefinery/git-bisect-exercise.
Motivation
The motivation for this exercise is to be able to do archaeology with Git on a source code where the bug is difficult to see visually. Finding the offending commit is often more than half the debugging.
Background
The script get_pi.py approximates pi using terms of the Nilakantha series. It
should produce 3.14 but it does not. The script broke at some point and
produces 3.57 using the last commit:
$ python get_pi.py

3.57
At some point within the 500 first commits, an error was introduced. The only thing we know is that the first commit worked correctly.
Your task
Clone this repository and use
git bisectto find the commit which broke the computation (solution - spoiler alert!).Once you have found the offending commit, also practice navigating to the last good commit.
Bonus exercise: Write a script that checks for a correct result and use
git bisect runto find the offending commit automatically (solution - spoiler alert!).
Hints
Finding the first commit:
$ git log --oneline | tail -n 1
How to navigate to the parent of a commit with hash SOMEHASH:
$ git switch --create BRANCHNAME SOMEHASH~1
Instead of a tilde you can also use this:
$ git switch --create BRANCHNAME SOMEHASH^
Summary
git log/grep/annotate/show/bisect is a powerful combination when doing archaeology in a project on the command line.
git switch --create NAME HASHis the recommended mechanism to inspect old code on the command line.Most of these commands can be used in the GitHub web interface (except
git bisect).