List of exercises
This is a list of all exercises and solutions in this lesson, mainly as a reference for helpers and instructors. This list is automatically generated from all of the other pages in the lesson. Any single teaching event will probably cover only a subset of these, depending on their interests.
Motivation
Solution
Giving a version to a collaborator and merging changes later with own changes sounds like lots of work.
What if you discover a bug and want to know since when the bug existed?
Copy and browse an existing project
Exercise: Browsing an existing project (25 min)
Browse the recipe-book project (introduced above) and explore commits and branches. Take notes and prepare questions. The hints are for the GitHub path in the browser.
Browse the commit history: Are commit messages understandable? (Hint: “Commit history”, the timeline symbol, above the file list)
Compare the commit history with the network graph (“Insights” -> “Network”). Can you find the branches?
How can you find out when a recipe was last modified?
How many changes did the Guacamole recipe receive (you find it under “sides”)? Try to click on some of the commits to see what changed. (Hint: “History” in the view of a single file)
Which recipes include the ingredient “salt”? (Hint: the GitHub search. From the repository view, it should offer the filter “repo:USER/recipe-book” by default. What if you add a search term?)
In the Guacamole recipe, find out who modified each line last and when (click on file, then click “Blame” button). Find out who added the cilantro and in which commit. (Hint: “Blame” view in the file view)
Can you use these recipes yourself? Are you allowed to share modifications? (Hint: look for a license file)
Browse issues and pull requests in the upstream repository (the repository you forked from). Any idea what these might be good for? (Hint: tabs in the repository view)
Recording changes
Exercise: Practice creating commits and branches (20 min)
Make sure that you now work on your fork of the recipe-book repository (
USER/recipe-book, notcr-workshop-exercises/recipe-book)First create a new branch and then add a recipe to the branch and commit the change.
In a new commit, modify the recipe you just added.
Switch to the
mainbranch and modify a recipe there.Browse the network and locate the commits that you just created (“Insights” -> “Network”).
Compare the branch that you created with the
mainbranch. Can you find an easy way to see the differences?Can you find a way to compare versions between two arbitrary commits in the repository?
Try to rename the branch that you created and then browse the network again.
Try to create a tag for one of the commits that you created (on GitHub, create a “release”).
Merging changes and contributing to the project
Exercise: Merging branches with pull requests (20 min)
We assume that in the previous exercise you have created a new branch
with a recipe. In our previous example, it is called new-recipe.
If not, create the branch first and add a recipe to your new branch, see
Recording changes.
We provide basic hints. You should refer to the solution as needed.
Navigate to your branch from the previous episode (hint: the same branch view we used last time).
Begin the pull request process (hint: There is a “Contribute” button in the branch view).
Add or modify the pull request title and description, and verify the other data. In the pull request verify the target repository and the target branch. Make sure that you are merging within your own repository. GitHub: By default, it will offer to make the change to the upstream repository,
cr-workshop-exercises. You should change this, you shouldn’t contribute your test recipe upstream yet. Where it saysbase repository, select your own user’s repository.Create the pull request by clicking “Create pull request”. Browse the network view to see if anything has changed yet.
Merge the pull request, or if you are not on GitHub you can merge the branch locally. Browse the network again. What has changed?
Find out which branches are merged and thus safe to delete. Then remove them and verify that the commits are still there, only the branch labels are gone (hint: you can delete branches that have been merged into
main).Optional: Try to create a new branch with a new change, then open a pull request but towards the central repository. We will later merge few of those. (Hint: this is mostly the same as above, for the GitHub path. But, you set the base repository as CodeRefinery. You might need to compare across forks.)
Exercise
Switch to the
mainbranch that you want to merge the other branch into. (Note that this is the other way around from the GitHub path).
Then:
Merge the other branch into
main(which is then your current branch).Find out which branches are merged and thus safe to delete. Then remove them and verify that the commits are still there, only the branch labels are gone. (Hint: you can delete branches that have been merged into
main).(optional, advanced) Try to create a new branch, and make a GitHub pull request with your recipe, and contribute it to our upstream repository. This is very complex right now since your change has to get to GitHub, and we haven’t shown that yet. We don’t give a solution for this.
Cloning a Git repository and working locally
Exercise: Cloning a Git repository and working locally (25 min)
Configure Git command line and editor if you haven’t done that already.
Decide which repository you want to clone: your fork or the original repository? Both will work for this exercise. Then, clone the recipe book.
Create a new branch.
Make a commit on your new branch.
Switch back to the
mainbranch and create one or two commits there.Merge the new branch into
main.Compare the graph locally and on GitHub and observe that the changes only exist locally on your computer.
Where are the remote branches? Practice how you can see all remote branches also locally and how you can fetch them and make local changes to them.
Inspecting history
Exercise: Explore basic archaeology commands (20 min)
Let us explore the value of these commands in an exercise. Future exercises do not depend on this, so it is OK if you do not complete it fully.
Exercise steps:
Make sure you are not inside another Git repository when running this exercise. If you are, first step “outside” of it. We want to avoid creating a Git repository inside another Git repository.
You can check if you are inside a Git repository with:
$ git status

fatal: not a git repository (or any of the parent directories): .git
You want to see the above message which tells us that this is not a Git repository.
This is not a problem in the GitHub web interface since we are not creating a new local repository.
Warning: many of these exercise tasks aren’t possible in the VS Code interface without extensions. You can use VS Code to clone the project, but be prepared to start the terminal to do the main tasks.
“File” → “New Window”.
Warning: many of these exercise tasks aren’t possible in the RStudio interface. You can use RStudio to clone the project, but be prepared to start the terminal to do the main tasks.
File → New Project.
Clone this repository: https://github.com/networkx/networkx.git.
$ git clone https://github.com/networkx/networkx.git
Nothing to clone. We will try to inspect the repository directly on GitHub.
From a new VS Code window, select “Clone Git repository” and enter that URL.
From the new project window, choose Version Control → Git → and enter the URL
Then let us all make sure we are working on a well-defined version of the repository.
Step into the new directory and create an exercise branch from the networkx-2.6.3 tag/release:
$ cd networkx
$ git switch --create exercise networkx-2.6.3
On old Git versions which do not know the
switchcommand (before 2.23), you need to use this instead:$ git checkout -b exercise networkx-2.6.3
We can visit the version directly: https://github.com/networkx/networkx/tree/networkx-2.6.3
Switch to “Source Control”, then the “…” menu, then “Branch”, then “Create new branch from…” and select “networkx-2.6.3”.
Use the command line method (but you don’t need to
cd networkx, the RStudio terminal starts in the right place.) So, run this:$ git switch --create exercise networkx-2.6.3
(and if it doesn’t work, check Command Line for the command for older git)
Then using the above toolbox try to:
Find the code line which contains
"Logic error in degree_correlation".Find out when this line was last modified or added. Find the actual commit which modified that line.
Inspect the commit. What is the commit change? What is the commit metadata?
Create a branch pointing to the past when that commit was created to be able to browse and use the code as it was back then.
How would you bring the code to the version of the code right before that line was last modified?
Solution
We use
git grep:$ git grep "Logic error in degree_correlation"
This gives the output:
networkx/algorithms/threshold.py: print("Logic error in degree_correlation", i, rdi)
Maybe you also want to know the line number:
$ git grep -n "Logic error in degree_correlation"
We use
git annotate:$ git annotate networkx/algorithms/threshold.py
Then search for “Logic error” by typing “/Logic error” followed by Enter. The last commit that modified it was
90544b4fa(unless that line changed since).We use
git show:$ git show 90544b4fa
Create a branch pointing to that commit (here we called the branch “past-code”):
$ git branch past-code 90544b4fa
This is a compact way to access the first parent of
90544b4fa(here we called the branch “just-before”):$ git switch --create just-before 90544b4fa~1
On top of https://github.com/networkx/networkx click on the magnifying glass and search for “Logic error in degree_correlation”. This tells us that the file
networkx/algorithms/threshold.pycontains this line and you can click on the file. This brings you to https://github.com/networkx/networkx/blob/409979eff35f02eff54f4eea3731736bd431dc2e/networkx/algorithms/threshold.py#L550.Click on the “Blame” button. Left next to the highlighted line you see the commit which modified it last.
You can click on the commit (open in new browser tab) which brings you to https://github.com/networkx/networkx/commit/90544b4fa5a7397a86e69ebf5778f4a0f6eafe1e.
Let’s skip creating the branch on GitHub. Instead, we can browse the project at this version: https://github.com/networkx/networkx/tree/90544b4.
Go back to the “Blame” view for the file
networkx/algorithms/threshold.py: https://github.com/networkx/networkx/blame/409979eff35f02eff54f4eea3731736bd431dc2e/networkx/algorithms/threshold.py#L550. Navigate to the symbol “Blame prior to change …” which you find next to the commit message that modified this line.
(optional) Use git bisect to find the bad commit
In this exercise, we use git bisect on an example repository. It
is OK if you do not complete this exercise fully.
Begin by cloning https://github.com/coderefinery/git-bisect-exercise.
Motivation
The motivation for this exercise is to be able to do archaeology with Git on a source code where the bug is difficult to see visually. Finding the offending commit is often more than half the debugging.
Background
The script get_pi.py approximates pi using terms of the Nilakantha series. It
should produce 3.14 but it does not. The script broke at some point and
produces 3.57 using the last commit:
$ python get_pi.py

3.57
At some point within the 500 first commits, an error was introduced. The only thing we know is that the first commit worked correctly.
Your task
Clone this repository and use
git bisectto find the commit which broke the computation (solution - spoiler alert!).Once you have found the offending commit, also practice navigating to the last good commit.
Bonus exercise: Write a script that checks for a correct result and use
git bisect runto find the offending commit automatically (solution - spoiler alert!).
Hints
Finding the first commit:
$ git log --oneline | tail -n 1
How to navigate to the parent of a commit with hash SOMEHASH:
$ git switch --create BRANCHNAME SOMEHASH~1
Instead of a tilde you can also use this:
$ git switch --create BRANCHNAME SOMEHASH^
How to turn your project to a Git repo and share it
Exercise: Turn your project to a Git repo and share it (25 min)
Create a new directory called myproject with one or few files in it. This represents our own project. It is not yet a Git repository. You can try that with your own project or use a simple placeholder example.
Turn this new directory into a Git repository.
Share this repository on GitHub (or GitLab, since it really works the same).
We offer three different paths of how to do this exercise.
Via GitHub web interface: easy and can be a good starting point if you are completely new to Git.
VS Code is quite easy, since VS Code can offer to create the GitHub repositories for you.
Command line: you need to create the repository on GitHub and link it yourself.
Create an repository on GitHub
First log into GitHub, then follow the screenshots and descriptions below.
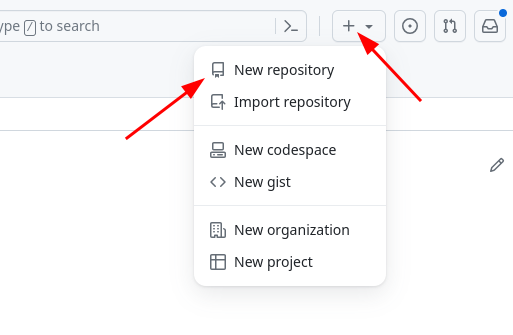
Click on the “plus” symbol on top right, then on “New repository”.
Then:
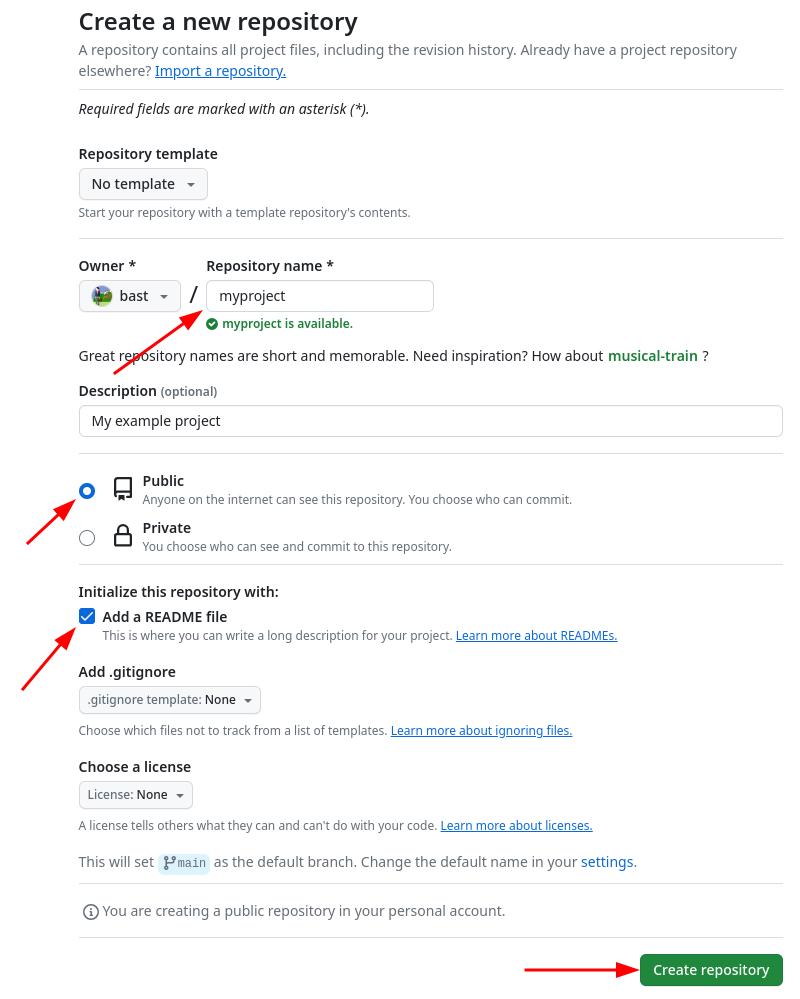
Choose a repository name, add a short description, and in this case make sure to check “Add a README file”. Finally “Create repository”.
Upload your files
Now that the repository is created, you can upload your files:
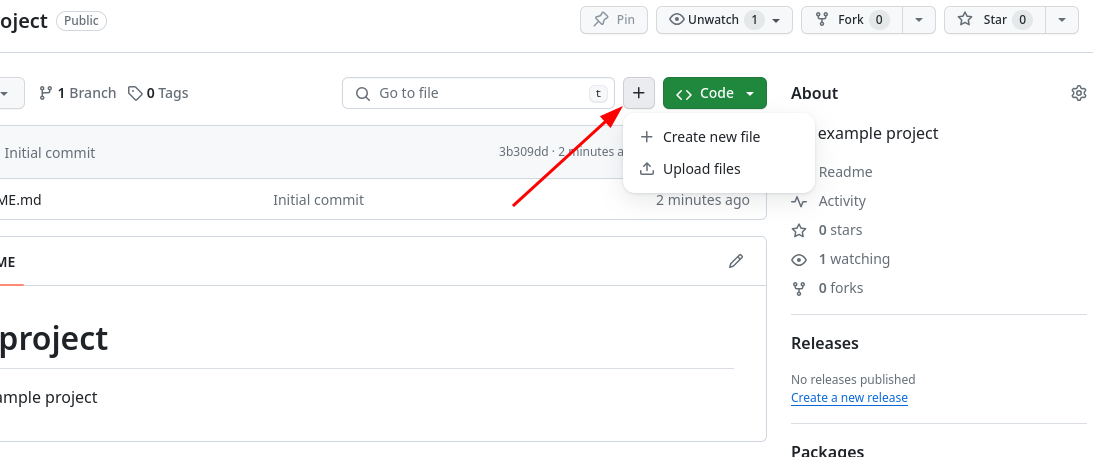
Click on the “+” symbol and then on “Upload files”.
In VS Code it only takes few clicks.
First, open the folder in VS Code. My example project here contains two files. Then click on the source control icon:
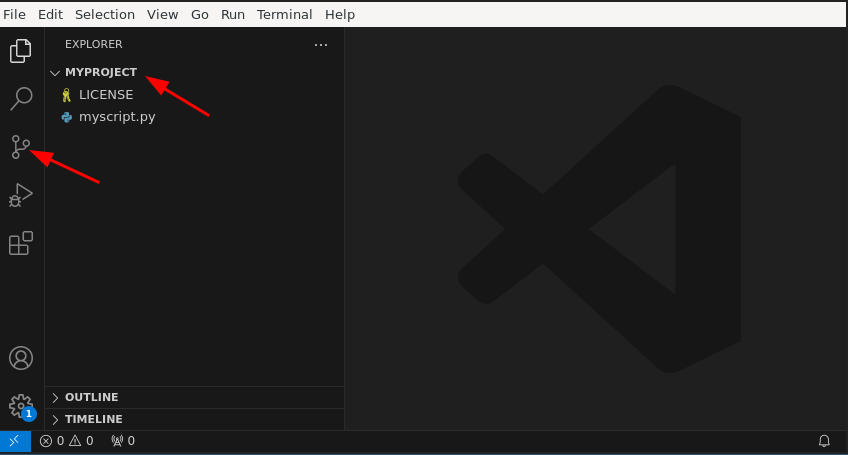
Open the folder in VS Code. Then click on the source control icon.
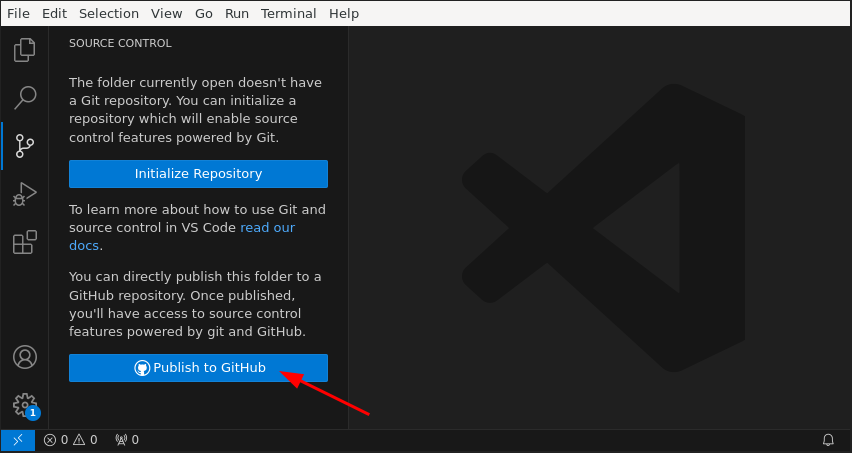
Choose “Publish to GitHub”. In this case I never even clicked on “Initialize Repository”.
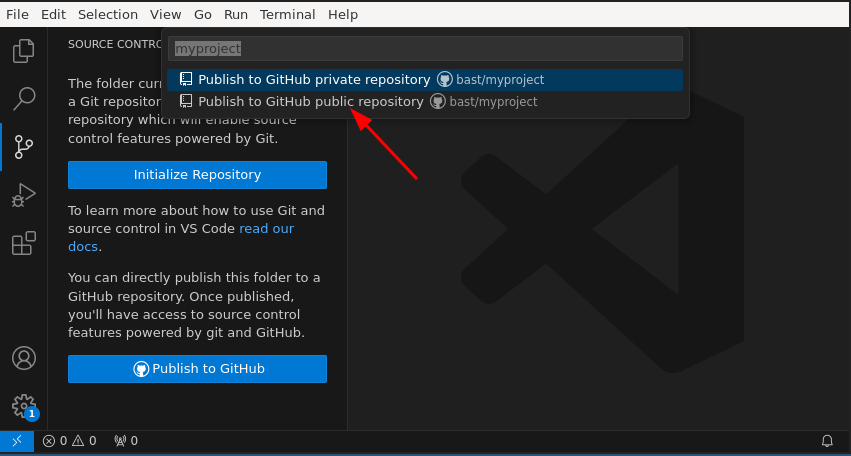
In my case I chose to “Publish to GitHub public repository”. Here you can also rename the repository if needed.
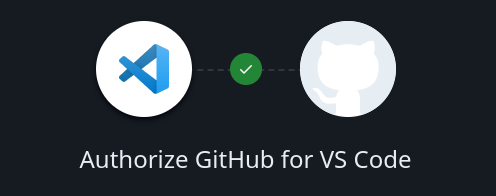
First time you do this you might need to authorize VS Code to access your GitHub account by redirecting you to https://github.com/login/oauth/authorize.
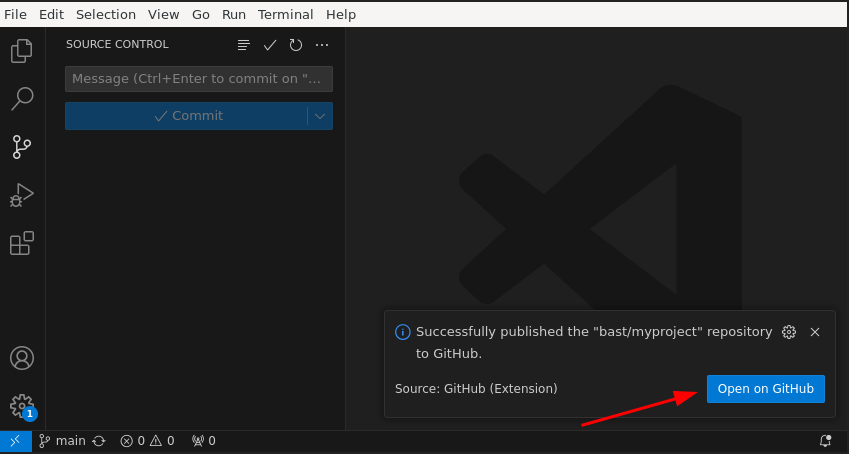
After it is published, click on “Open on GitHub”.
Make sure your Git is configured
We have an own section on this: Configuring Git command line and editor.
Put your project under version control
My example project here consists of two files. Replace this with your own example files:
$ ls -l

.rw------- 19k user  7 Mar 17:36 LICENSE
.rw-------  21 user  7 Mar 17:36 myscript.py
I will first initialize a Git repository in this directory.
If you get an error, try without the -b main (and your default branch will
then be called master, this will happen for Git versions older than
2.28):
$ git init -b main
Now add and commit the two files to the Git repository:
$ git add LICENSE myscript.py
$ git commit -m "putting my project under version control"
If you want to add all files in one go, you can use git add . instead of git add LICENSE myscript.py.
Now you have a Git repository with one commit. Verify this with git log.
But it’s still only on your computer. Let’s put it on GitHub next.
Create an empty repository on GitHub
First log into GitHub, then follow the screenshots and descriptions below.
Click on the “plus” symbol on top right, then on “New repository”.
Then create an empty repository without any files and without any commits:
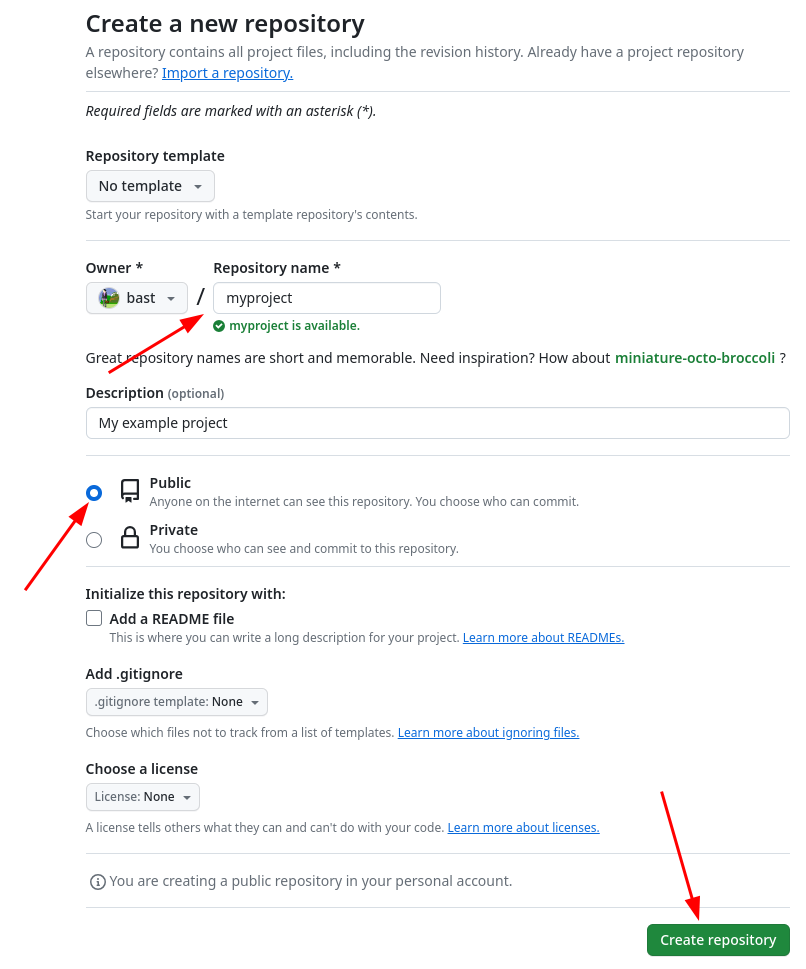
Choose a repository name, add a short description, but please do not check “Add a README file”. For “Add .gitignore” and “Choose a license” also leave as “None”. Finally “Create repository”.
Once you click the green “Create repository”, you will see a page similar to:
What this means is that we have now an empty project with either an HTTPS or an SSH address: click on the HTTPS and SSH buttons to see what happens.
Push an existing repository from your computer to GitHub
We now want to follow the “… or push an existing repository from the command line”:
In your terminal make sure you are still in your myproject directory.
Copy paste the three lines below the red arrow to the terminal and execute those, in my case (you need to replace the “USER” part and possibly also the repository name):
$ git remote add origin git@github.com:USER/myproject.git
$ git remote add origin https://github.com/USER/myproject.git
Then:
$ git branch -M main
$ git push -u origin main
The meaning of the above lines:
Add a remote reference with the name “origin”
Rename current branch to “main”
Push branch “main” to “origin”
You should now see:
Enumerating objects: 4, done.
Counting objects: 100% (4/4), done.
Delta compression using up to 12 threads
Compressing objects: 100% (3/3), done.
Writing objects: 100% (4/4), 6.08 KiB | 6.08 MiB/s, done.
Total 4 (delta 0), reused 0 (delta 0), pack-reused 0
To github.com:USER/myproject.git
 * [new branch]      main -> main
branch 'main' set up to track 'origin/main'.
Reload your GitHub project website and your commits should now be online!
Troubleshooting
error: remote origin already exists
Explanation: You probably ran a
git remote add origin ...command, then changed your mind about HTTPS or SSH and then tried to run the othergit remote add origin ...command but “origin” then already exists.Recovery:
First remove “origin” with
git remote remove originThen run the correct
git remote add origin ...command
remote contains work that you do not have
Explanation: You probably clicked on “Add a README file” and now the repository on GitHub is not empty but contains one commit and locally you have a different history. Git now prevents you from accidentally overwriting the history on GitHub.
Recovery:
Use
git push --forceinstead ofgit push, which will force Git to overwrite the history on GitHubNote that this is a powerful but also possibly dangerous option but here it helps us. If it’s a brand new repo, it probably is fine to do this. For real repositories, don’t do this unless you are very sure what is happening.
This is not fully explained, because a lot of it is similar to the “Command line” method (and an RStudio expert could help us some). The main differences are:
Put your project under version control
Tools → Version control → Project setup → Version control system = Git.
Select “Yes” for “do you want to initialize a new git repository for this project.
Select yes to restart the project with RStudio.
Switch to branch
mainto have you branch named that.
Create an empty repository on GitHub
Same as command line
Push an existing repository from your computer to GitHub
Under the “Create new branch” button → “Add Remote”
Remote name:
originRemote URL: as in command line (remember to select SSH or HTTPS as you have configured your RStudio)
The “Push” (up arrow) button will send changes on your current branch to the remote. The “Pull” (down arrow) will get changes from the remote.
Troubleshooting
Same as command line
Basics
Basic-1: Record changes
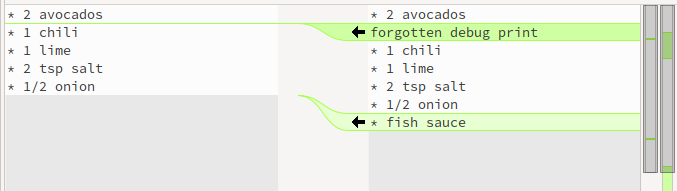
Add 1/2 onion to ingredients.txt and also the instruction
to “enjoy!” to instructions.txt.
After modifying the files, do not stage the changes yet (do not git add
yet).
When you are done editing the files, try git diff:
$ git diff
You will see (can you identify in there the two added lines?):
diff --git a/ingredients.txt b/ingredients.txt
index 4422a31..ba8854f 100644
--- a/ingredients.txt
+++ b/ingredients.txt
@@ -2,3 +2,4 @@
 * 1 chili
 * 1 lime
 * 2 tsp salt
+* 1/2 onion
diff --git a/instructions.txt b/instructions.txt
index 7811273..2b11074 100644
--- a/instructions.txt
+++ b/instructions.txt
@@ -4,3 +4,4 @@
 * squeeze lime
 * add salt
 * and mix well
+* enjoy!
Now first stage and commit each change separately (what happens when we leave out the -m flag?):
$ git add ingredients.txt
$ git commit -m "add half an onion"
$ git add instructions.txt
$ git commit                   # <-- we have left out -m "..."
When you leave out the -m flag, Git should open an editor where you can edit
your commit message. This message will be associated and stored with the
changes you made. This message is your chance to explain what you’ve done and
convince others (and your future self) that the changes you made were
justified. Write a message and save and close the file.
When you are done committing the changes, experiment with these commands:
$ git log
$ git log --stat
$ git log --oneline
We can make modifications to a file by clicking on the file and then the pen symbol:
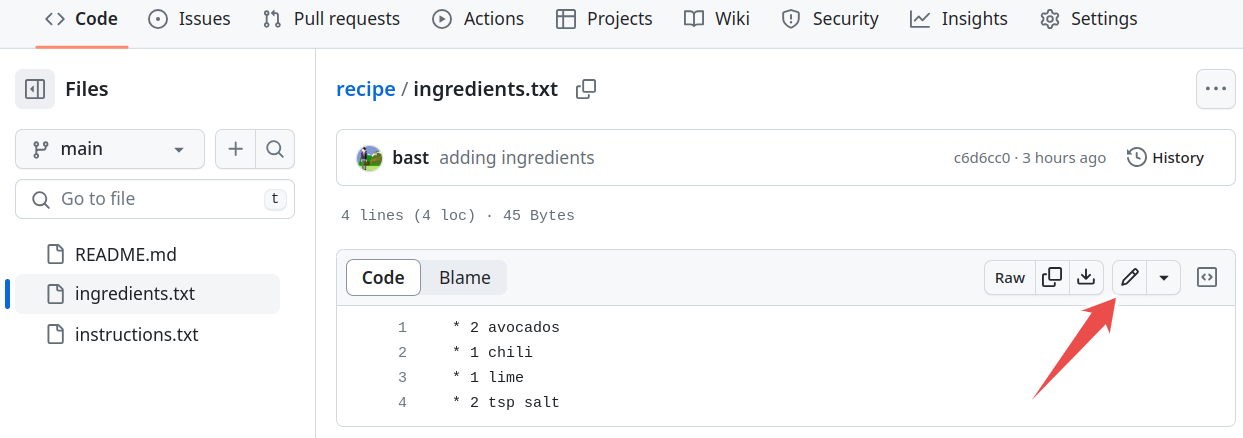
By clicking on the pen symbol we can switch to edit mode.
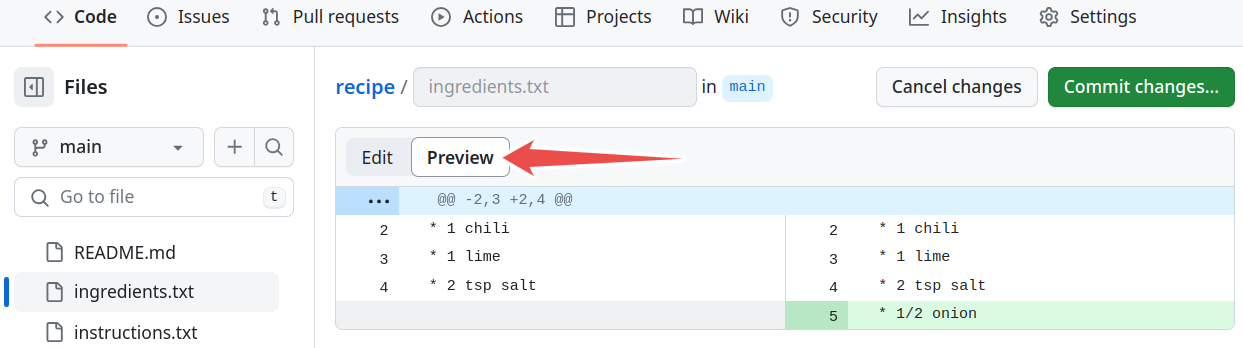
Before committing the change, click on “Preview”.
Our goal is to arrive at two new commits:
“add half an onion” (modifying
ingredients.txt)“don’t forget to enjoy” (modifying
instructions.txt)
When you are done committing the changes, try to browse commit history on GitHub.
(optional) Basic-2: Comparing and showing commits
Have a look at specific commits with
git show HASH.Inspect differences between commit hashes with
git diff HASH1 HASH2.
Have a look at specific commits.
Inspect differences between commits.
Use the screenshots under “Git history and log”.
(optional) Basic-3: Visual diff tools
This exercise is only relevant for the command line. In the browser, the preview is already side-by-side and “visual”.
Make further modifications and experiment with
git difftool(requires installing one of the visual diff tools):
On Windows or Linux:
$ git difftool --tool=meld HASH
On macOS:
$ git difftool --tool=opendiff HASH
Git difftool using meld.
You probably want to use the same visual diff tool every time and you can configure Git for that:
$ git config --global diff.tool meld
(optional) Basic-4: Browser and command line
You have noticed that it is possible to work either in the command line or in the browser. It could help to deepen the understanding trying to do the above steps in both.
If you have managed to do the above in the command line, try now in the browser.
If you got stuck in the command line and move to the browser, try now to trouble-shoot the command line Git.
Basic-5: Test your understanding
Which command(s) below would save the changes of myfile.txt
to an existing local Git repository?
$ git commit -m "my recent changes"
$ git init myfile.txt
$ git commit -m "my recent changes"
$ git add myfile.txt
$ git commit -m "my recent changes"
$ git commit -m myfile.txt "my recent changes"
Solution
Would only create a commit if files have already been staged.
Would try to create a new repository in a folder “myfile.txt”.
Is correct: first add the file to the staging area, then commit.
Would try to commit a file “my recent changes” with the message myfile.txt.
Branching and merging
Branch-1: Create and commit to branches
In this exercise, you will create another new branch and few more commits. We will use this in the next section, to practice merging. The goal of the exercise is to end up with 3 branches.
Change to the branch
main.Create another branch called
less-salt.Note! makes sure you are on main branch when you create the
less-saltbranch.A safer way would be to explicitly mention to create from the main branch as shown below:
$ git branch less-salt main
Switch to the
less-saltbranch.On the
less-saltbranch reduce the amount of salt.Commit your changes to the
less-saltbranch.
Use the same commands as we used above.
We now have three branches (in this case HEAD points to less-salt):
$ git branch

  experiment
* less-salt
  main

$ git graph

* bf28166 (HEAD -> less-salt) reduce amount of salt
| * bcb8b78 (experiment) maybe little bit less cilantro
| * f6ec7b7 let us try with some cilantro
|/
* e7cf023 (main) don't forget to enjoy
* 79161b6 add half an onion
* a3394e3 adding README
* 3696246 adding instructions
* f146d25 adding ingredients
Here is a graphical representation of what we have created:

Now switch to
main.In a new commit, improve the
README.mdfile (we added the word “Guacamole”):# Guacamole recipe This is an exercise repository.
Now you should have this situation:
$ git graph

* b4af65b (HEAD -> main) improve the documentation
| * bf28166 (less-salt) reduce amount of salt
|/
| * bcb8b78 (experiment) maybe little bit less cilantro
| * f6ec7b7 let us try with some cilantro
|/
* e7cf023 don't forget to enjoy
* 79161b6 add half an onion
* a3394e3 adding README
* 3696246 adding instructions
* f146d25 adding ingredients

And for comparison this is how it looks on GitHub.
Branch-2: Merge branches
Merge experiment and less-salt back into main following the lesson below
until the point where we start deleting branches.
(optional) Branch-3: Perform a fast-forward merge
Create a new branch from
mainand switch to it.Create a couple of commits on the new branch (for instance edit
README.md):
Now switch to
main.Merge the new branch to
main.Examine the result with
git graph.Have you expected the result? Discuss what you see.
Solution
You will see that in this case no merge commit was created and Git merged the two branches by moving (fast-forwarding) the “main” branch (label) three commits forward.
This was possible since one branch is the ancestor of the other and their developments did not diverge.
A merge that does not require any merge commit is a fast-forward merge.
(optional) Branch-4: Rebase a branch (instead of merge)
As an alternative to merging branches, one can also rebase branches. Rebasing means that the new commits are replayed on top of another branch (instead of creating an explicit merge commit). Note that rebasing changes history and should not be done on public commits!
Create a new branch, and make a couple of commits on it.
Switch back to
main, and make a couple of commits on it.Inspect the situation with
git graph.Now rebase the new branch on top of
mainby first switching to the new branch, and thengit rebase main.Inspect again the situation with
git graph. Notice that the commit hashes have changed - think about why!
Solution
You will notice two things:
History is now linear and does not contain merge commits.
All the commit hashes that were on the branch that got rebased, have changed. This also demonstrates that
git rebaseis a command that alters history. The commit history looks as if the rebased commits were all done after themaincommits.
Branch-5: Test your understanding
Which of the following combos (one or more) creates a new branch and makes a commit to it?
$ git branch new-branch
$ git add file.txt
$ git commit
$ git add file.txt
$ git branch new-branch
$ git switch new-branch
$ git commit
$ git switch --create new-branch
$ git add file.txt
$ git commit
$ git switch new-branch
$ git add file.txt
$ git commit
Solution
Both 2 and 3 would do the job. Note that in 2 we first stage the file, and then create the
branch and commit to it. In 1 we create the branch but do not switch to it, while in 4 we
don’t give the --create flag to git switch to create the new branch.
Conflict resolution
Conflict-1: Create another conflict and resolve
In this exercise, we repeat almost exactly what we did above with a different ingredient.
Create two branches before making any modifications.
Again modify some ingredient on both branches.
Merge one, merge the other and observe a conflict, resolve the conflict and commit the merge.
What happens if you apply the same modification on both branches?
If you create a branch
like-avocados, commit a change, then from this branch create another banchdislike-avocados, commit again, and try to merge both branches intomainyou will not see a conflict. Can you explain, why it is different this time?
Solution
4: No conflict in this case if the change is the same.
5: No conflict in this case since in Git history one change happened after the other. The two changes are related and linked by Git history and one is a Git ancestor of the other. Git will assume that since we applied one change after the other, we meant this. There is nothing to resolve.
(optional) Conflict-2: Resolve a conflict when rebasing a branch
Create two branches where you anticipate a conflict.
Try to merge them and observe that indeed they conflict.
Abort the merge with
git merge --abort.What do you expect will happen if you rebase one branch on top of the other? Do you anticipate a conflict? Try it out.
Solution
Yes, this will conflict. If it conflicts during a merge, it will also conflict
during rebase but the conflict resolution looks slightly different:
You still need to look for conflict markers but you tell Git that you resolved
a conflict with git add and then you continue with git rebase --continue.
Follow instructions that you get from the Git command line.
(optional) Conflict-3: Resolve a conflict using mergetool
Again create a conflict (for instance disagree on the number of avocados).
Stop at this stage:
Auto-merging ingredients.txt
CONFLICT (content): Merge conflict in ingredients.txt
Automatic merge failed; fix conflicts and then commit the result.
Instead of resolving the conflict manually, use a visual tool (requires installing one of the visual diff tools):
$ git mergetool
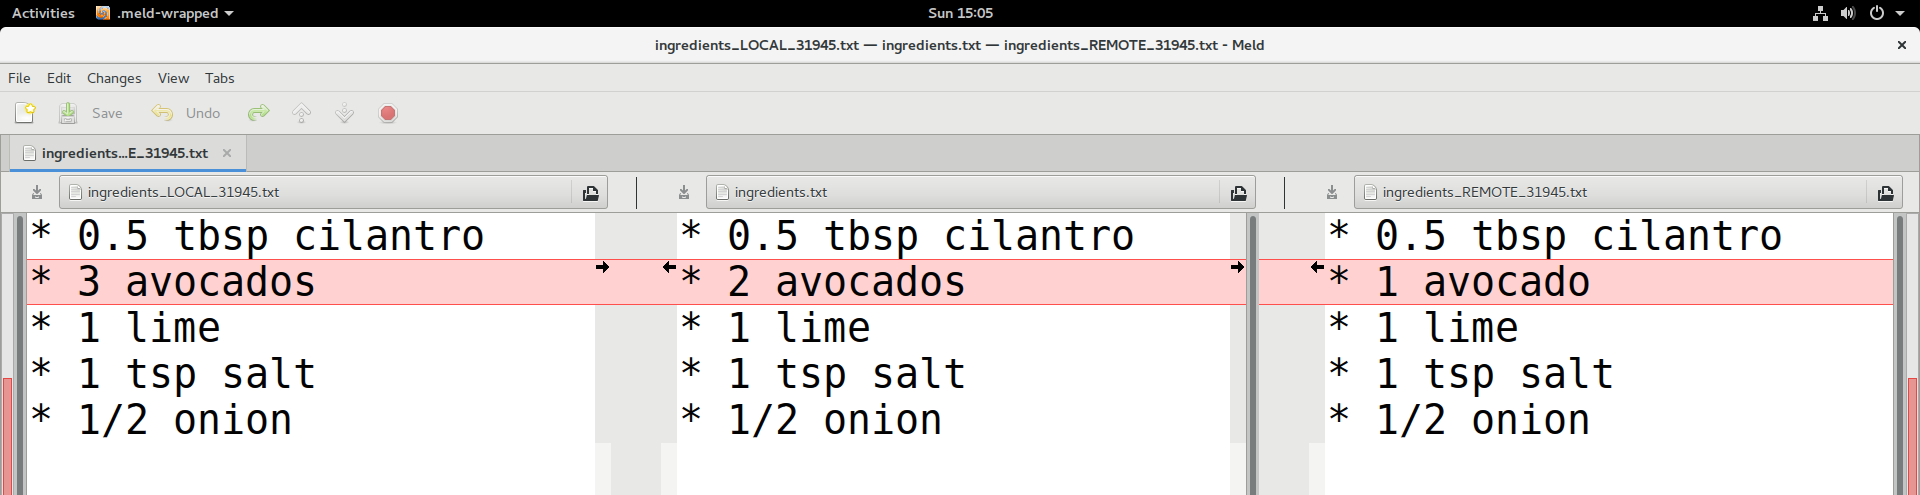
Your current branch is left, the branch you merge is right, result is in the middle.
After you are done, close and commit,
git addis not needed when usinggit mergetool.
If you have not instructed Git to avoid creating backups when using mergetool, then to be on the safe side there will be additional temporary files created. To remove those you can do a git clean after the merging.
To view what will be removed:
$ git clean -n
To remove:
$ git clean -f
To configure Git to avoid creating backups at all:
$ git config --global mergetool.keepBackup false
Using the Git staging area
Staging-1: Perform an interactive commit
One option to help us create nice logical commits is to stage interactively
with git commit --patch:
Make two changes in
instructions.txt, at the top and bottom of the file. Make sure that they are separated by at least several unmodified lines.Run
git commit --patch. Using the keystrokes above, commit one of the changes.Do it again for the other change.
When you’re done, inspect the situation with
git log,git status,git diffandgit diff --staged.When would this be useful?
Solution
This can be useful if you have several modification in a file (or several files) but you decide that it would be beneficial to save them as two (or more) separate commits.
Staging-2: Use the staging area to make a commit in two steps
In your recipe example, make two different changes to
ingredients.txtandinstructions.txtwhich do not go together.Use
git addto stage one of the changes.Use
git statusto see what’s going on, and usegit diffandgit diff --stagedto see the changes.Feel some regret and unstage the staged change.
Undoing and recovering
Undoing-1: Revert a commit
Create a commit (commit A).
Revert the commit with
git revert(commit B).Inspect the history with
git log --oneline.Now try
git showon both the reverted (commit A) and the newly created commit (commit B).
Undoing-2: Modify a previous commit
Make an incomplete change to the recipe or a typo in your change,
git addandgit committhe incomplete/unsatisfactory change.Inspect the unsatisfactory but committed change with
git show. Remember or write down the commit hash.Now complete/fix the change but instead of creating a new commit, add the correction to the previous commit with
git add, followed bygit commit --amend. What changed?
Solution
One thing that has changed now is the commit hash. Modifying the previous commit has changed the history. This is OK to do on commits that other people don’t depend on yet.
Undoing-3: Destroy our experimentation in this episode
After we have experimented with reverts and amending, let us destroy all of that and get our repositories to a similar state.
First, we will look at our history (
git log/git graph) and find the last commitHASHbefore our tests.Then, we will
git reset --hard HASHto that.Then,
git graphagain to see what happened.
$ git log --oneline

d3fc63a (HEAD -> main) Revert "not sure this is a good idea"
e02efcd not sure this is a good idea
b4af65b improve the documentation
e7cf023 don't forget to enjoy
79161b6 add half an onion
a3394e3 adding README
3696246 adding instructions
f146d25 adding ingredients

$ git reset --hard b4af65b

HEAD is now at b4af65b improve the documentation

$ git log --oneline

b4af65b (HEAD -> main) improve the documentation
e7cf023 don't forget to enjoy
79161b6 add half an onion
a3394e3 adding README
3696246 adding instructions
f146d25 adding ingredients
Undoing-4: Test your understanding
What happens if you accidentally remove a tracked file with
git rm, is it gone forever?Is it OK to modify commits that nobody has seen yet?
What situations would justify to modify the Git history and possibly remove commits?
Solution
It is not gone forever since
git rmcreates a new commit. You can revert the commit to get the file back.If you haven’t shared your commits with anyone it can be alright to modify them.
If you have shared your commits with others (e.g. pushed them to GitHub), only extraordinary conditions would justify modifying history. For example to remove sensitive or secret information.
Interrupted work
Interrupted-1: Stash some uncommitted work
Make a change.
Check status/diff, stash the change with
git stash, check status/diff again.Make a separate, unrelated change which doesn’t touch the same lines. Commit this change.
Pop off the stash you saved with
git stash pop, and check status/diff.Optional: Do the same but stash twice. Also check
git stash list. Can you pop the stashes in the opposite order?Advanced: What happens if stashes conflict with other changes? Make a change and stash it. Modify the same line or one right above or below. Pop the stash back. Resolve the conflict. Note there is no extra commit.
Advanced: what does
git graphshow when you have something stashed?
Solution
5: Yes you can. With git stash pop INDEX you can decie which stash
index to pop.
6: In this case Git will ask us to resolve the conflict the same way when resolving conflicts between two branches.
7: It shows an additional commit hash with refs/stash.