Cloning a Git repository and working locally
If you’ve been following the main path, you have just had interacted with repositories on GitHub. This might not be what you usually do, so now we move to working on your own computer.
Objectives
We are able to clone a repository from the web and modify it locally.
We can do the same things we did before (commit, branch, merge), but locally.
We get a feeling for remote repositories (more later).
Instructor note
10 min introduction and setup
25 min exercise
15 min discussion
What is in a Git repository and what are we cloning?
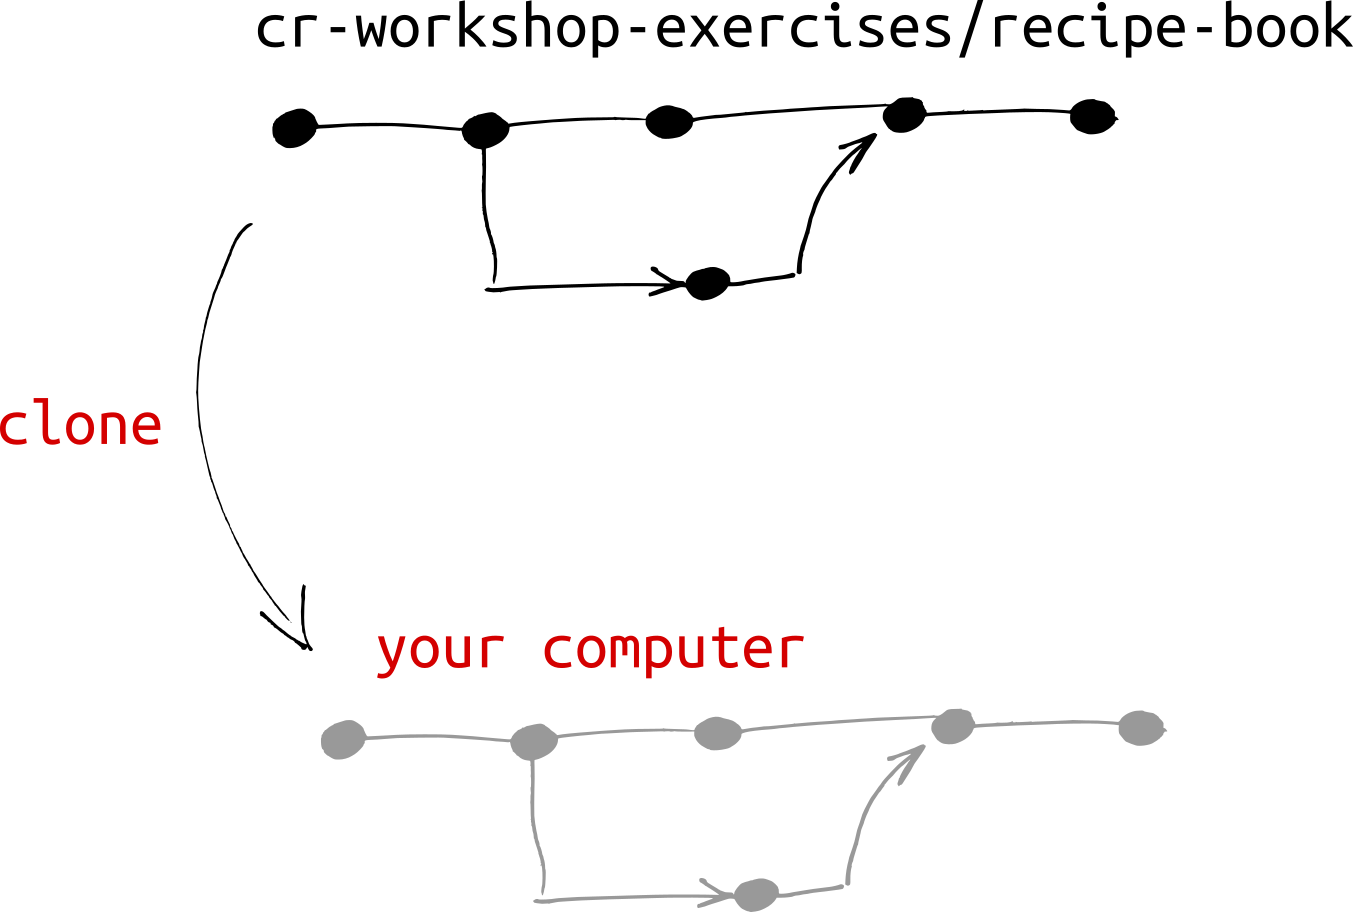
Illustration of cloning a repository to a local computer.
Git repository:
Contains all the files and directories of a project.
Contains the complete history of all changes (commits) to these files and directories.
Each commit is a snapshot of the entire project at a certain point in time and has a unique identifier (“hash”).
Sometimes it contains multiple branches and tags.
All the commits and history of a local repository are stored in a directory called
.gitwhich is located at the root of the repository.
Cloning:
Copying (downloading) the entire repository with all commits, branches, and tags to your computer.
It is a full backup of the repository, including all history.
You can then work on your local clone of the repository.
Changes on local clone will not automatically appear in the repository where we cloned from. We have to actively “push” them there (we will practice this in a later episode: How to turn your project to a Git repo and share it).
Exercise
Work on this by yourself or in your teams. Conceptually this episode should seem familiar, from the browser-based exercises we did yesterday.
We offer the Command Line, VS Code and RStudio paths for this exercise. GitHub isn’t an option in this episode, since that is what we already demonstrated in Recording changes and Merging changes and contributing to the project and since the point of this episode is to work locally.
It is also possible to use the command line (terminal) from inside VS Code or RStudio.
Exercise: Cloning a Git repository and working locally (25 min)
Configure Git command line and editor if you haven’t done that already.
Decide which repository you want to clone: your fork or the original repository? Both will work for this exercise. Then, clone the recipe book.
Create a new branch.
Make a commit on your new branch.
Switch back to the
mainbranch and create one or two commits there.Merge the new branch into
main.Compare the graph locally and on GitHub and observe that the changes only exist locally on your computer.
Where are the remote branches? Practice how you can see all remote branches also locally and how you can fetch them and make local changes to them.
The solution below goes over most of the answer and should be used as your guide (you can’t figure it out just from the exercise instructions).
Solution and walk-through
(1) Configure Git command line and editor
We have an own section for this: Configuring Git command line and editor.
(2) Cloning a repository
Now you need to decide which repository you want to clone. All of these options will work for this exercise since we don’t plan to push changes back (for step 8 it might be easier to use the original repository):
Clone the recipe book from your fork.
Or clone the recipe book from the original repository: https://github.com/cr-workshop-exercises/recipe-book
Or first fork the original repository and then clone your fork.
The examples below assume you are cloning the original repository. If you are cloning your fork, you should
replace cr-workshop-exercises with your GitHub username.
If you are unsure whether you are using SSH or HTTPS, please read Authenticating to GitHub: SSH or HTTPS or VS Code or RStudio?.
$ git clone git@github.com:cr-workshop-exercises/recipe-book.git
$ git clone https://github.com/cr-workshop-exercises/recipe-book.git
This creates a directory called “recipe-book” unless it already exists. You can also specify the target directory on your computer (in this case “my-recipe-book”):
$ git clone git@github.com:cr-workshop-exercises/recipe-book.git my-recipe-book
$ git clone https://github.com/cr-workshop-exercises/recipe-book.git my-recipe-book
Start a new window.
If you have the “Welcome” tab when you start a new window: Under “Start” on the screen, select “Clone Git Repository…”.
Alternatively navigate to the “Source Control” tab on the left sidebar and click on the “Clone Repository” button. You need to have started a brand new window that’s not part of a project.
Paste in this URL: https://github.com/USER/recipe-book (replace USER)
If you are asked whether you want to open the cloned repository or to add it to the current workspace, select “Open”.
The easiest way to clone the repository via RStudio is to create a new project.
Start RStudio if not already open.
Go to “File” → “New Project…”
Choose “Version Control”, and then “Git”
In the “Repository URL” field, paste in this URL:
https://github.com/USER/recipe-book, replaceUSERas needed. You can also get the URL from your browser.You can change the “Project directory name” if you want but that is not mandatory. By default, it will use the repository name from the URL.
Click “Create Project”
(3) Creating branches locally
Create a new branch called another-recipe from main and switch to it:
$ git switch --create another-recipe main
If you leave out the last argument, it will create a branch from the current branch:
$ git switch --create another-recipe
Make sure that you are on the main branch.
Source Control button on left sidebar → Three dots in upper right of source control → Branch → Create Branch.
VS Code automatically switches to the new branch.
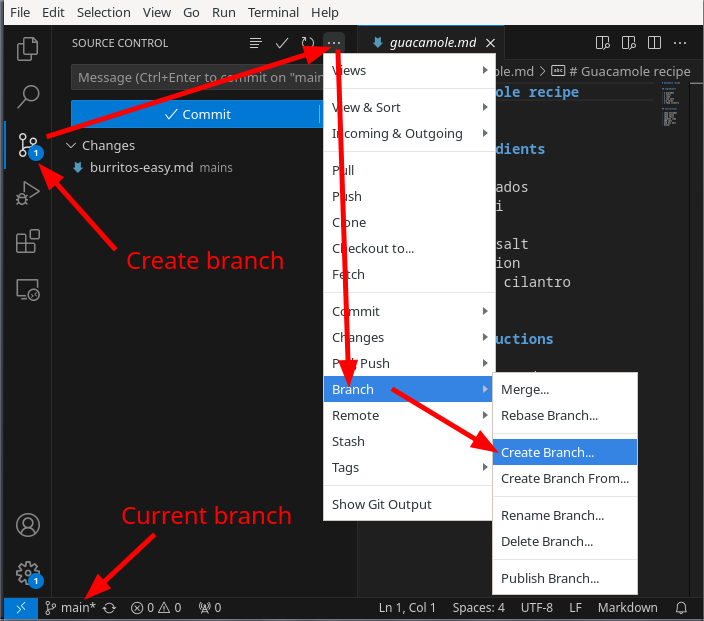
Creating a new branch in VS Code.
In the Git tab of the Environment panel (upper right), click New Branch.
In the pop-up fill in the branch name, e.g. “new-recipe”, untick the box in front of Sync branch with remote to avoid the branch to be pushed to GitHub right away.
Click Create and RStudio will automatically switch to the new branch.
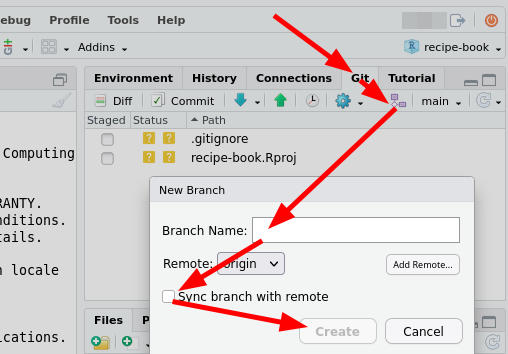
Creating a branch in RStudio
(4) Creating commits locally
Create a new file. After we have created it, we can stage and commit the change:
$ git add new-file.md
$ git commit -m "Short summary of the change"
Make sure to replace “new-file.md” with the actual name of the file you created and to replace “Short summary of the change” with a meaningful commit message.
Create a new file.
In the version control sidebar, click the
+sign to add the file for the next commit.Enter a brief message and click “Commit”.
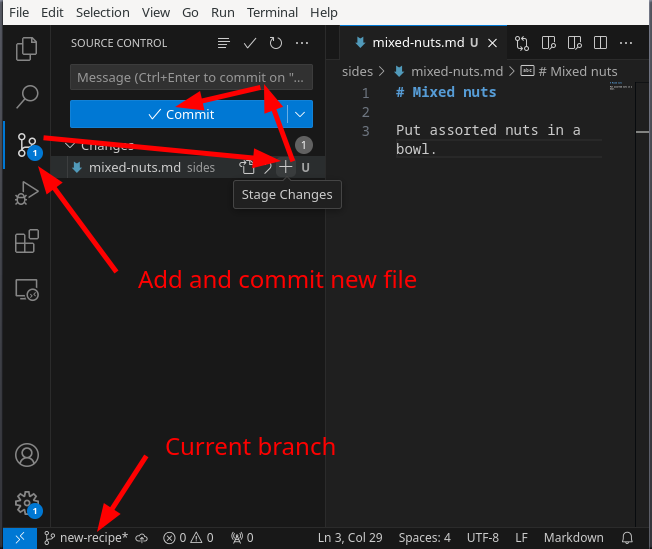
Committing a new file in VS Code.
Create a new file the usual way. Remember to save any changes to your file before committing.
In the Git tab in the Environment panel (upper right) check the box in front of the file you just created, then click Commit in the tab menu-bar to open the Git Changes window.
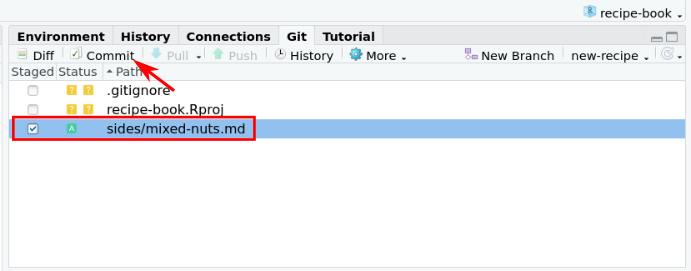
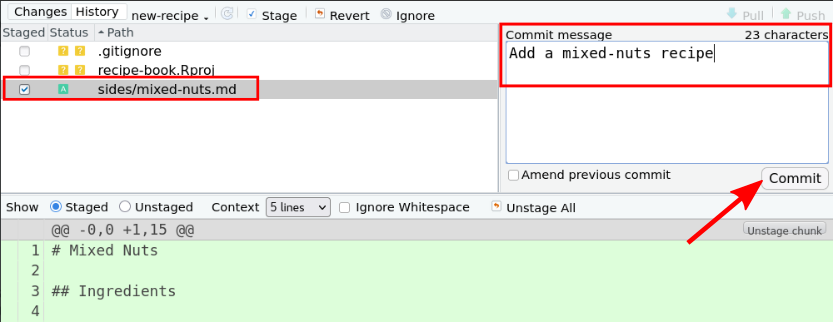
In the Changes window, check that your new file is selected (ticked), write a short commit message, and finally click “Commit”
(5) Switching branches and creating commits
First switch to the main branch:
$ git switch main
Then modify a file. Finally git add and then commit the change:
$ git commit -m "Short summary of the change"
Use the branch selector at the bottom to switch back to the main branch. Repeat the same steps as above.
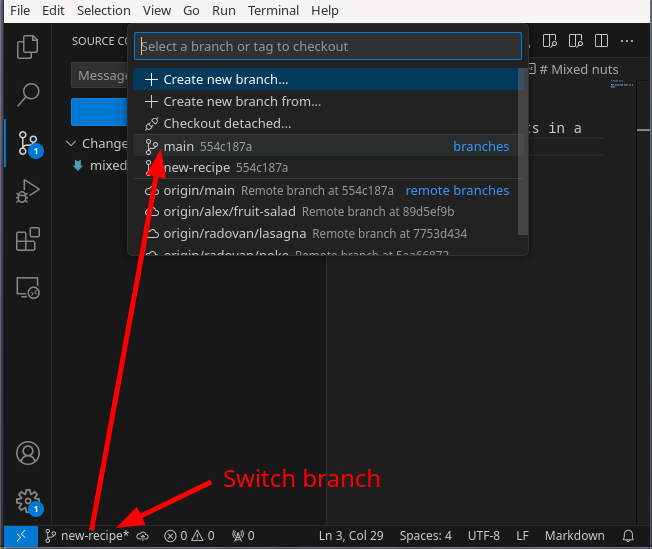
Switching branch via selector at bottom.
In the Git tab of the Environment panel (upper right), click your current branch name, here “new-recipe” and then choose the “main” branch.

Modify another recipe and commit your changes.
(6) Merging branches locally
On the command line, when we merge, we always modify our current branch.
If you are not sure anymore what your current branch is, type:
$ git branch
Another way to find out where we are in Git:
$ git status
In this case we merge the another-recipe branch into our current branch:
$ git merge another-recipe
Just like with the command line, when we merge we modify our current branch. Verify you are on the main branch.
Verify current branch at the bottom.
From the version control sidebar → Three dots → Branch → Merge
In the selector that comes up, choose the branch you want to merge from. The commits on that branch will be added to the current branch.

This doesn’t seem possible in RStudio without an add-in. Luckily, like previously, via the Terminal tab you can use the “Command line” method.
(7) How to compare the graph locally and on GitHub
$ git log --graph --oneline --decorate --all
We recommend to define an alias in Git, to be able to nicely visualize branch structure in the terminal without having to remember a long Git command:
$ git config --global alias.graph "log --all --graph --decorate --oneline"
Then you can just type git graph from there on. We have an own section about
aliases: Aliases and configuration.
Compare this with the graph on GitHub: Insights tab → Network view (just like we have done before). The result is that we should not be able to see the new branch and the new commits on GitHub (since we haven’t pushed it to GitHub yet - it is only local work so far).
This requires an extension. Opening the VS Code terminal lets you use the command line method.
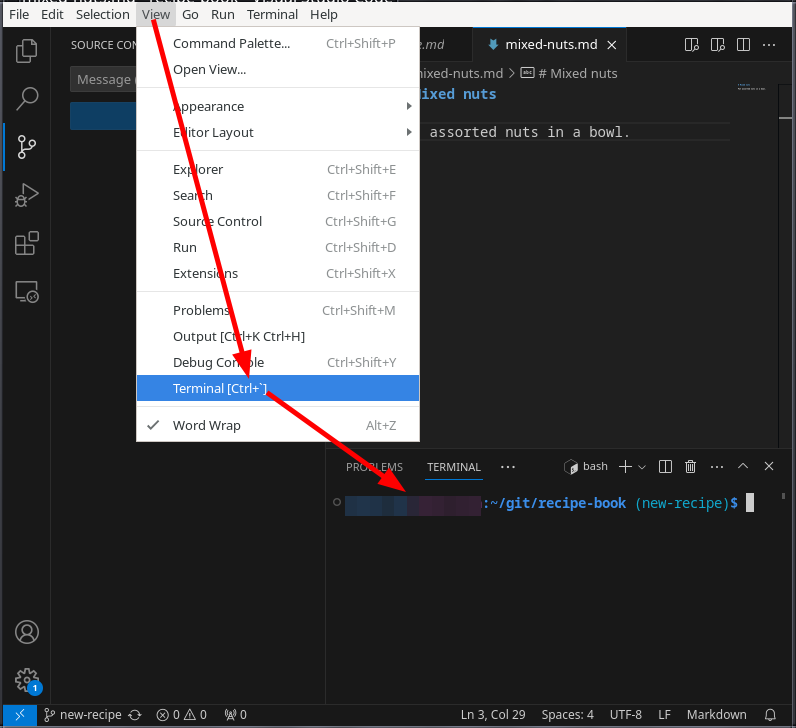
View → Terminal will open a terminal at bottom. This is a normal command line interface and very useful for work. (Note the git-aware prompt that shows the current branch. This requires other setup.)
You can find a graph view in RStudio, but it doesn’t seem you can compare arbitrary commits without an extension. Luckily, the command line method works, as usual.
Open the history window like you did during the previous lesson.
Select “(All branches)” in the branch selector drop-down menu to see all the commits on all branches.
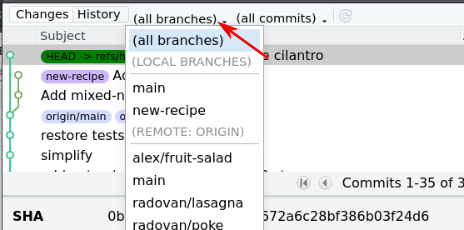
NOTE: If you don’t see the branch selector when you first open the History window, try to switch from the History view to the Changes view and back.
Compare this with the graph on GitHub: Insights tab → Network view (just like we have done before). The result is that we should not be able to see the new branch and the new commits on GitHub (since we haven’t pushed it to GitHub yet - it is only local work so far).
(8) Browsing remote branches and creating local branches from them
With git branch you can list all local branches:
$ git branch

  another-recipe
* main
But where are the remote branches? We expect to see a couple of them.
We can see them by asking for all branches (your output might vary depending on where you cloned from):
$ git branch --all

  another-recipe
* main
  remotes/origin/HEAD -> origin/main
  remotes/origin/alex/fruit-salad
  remotes/origin/main
  remotes/origin/radovan/lasagna
  remotes/origin/radovan/poke
You can create a local branch from a remote branch which will “track” the remote branch.
For instance, to create a local branch alex/fruit-salad from the remote branch origin/alex/fruit-salad
and switch to it, you can do:
$ git switch --create alex/fruit-salad origin/alex/fruit-salad
This shortcut will do the same thing:
$ git switch --track origin/alex/fruit-salad
Or even shorter:
$ git switch alex/fruit-salad
If you want to create a branch and not switch to it, you can use git branch.
$ git branch alex/fruit-salad
To create a local branch from a remote branch:
Source Control button on left sidebar → Three dots in upper right of source control → Branch → “Create Branch From …”.
Then select the remote branch you want to create a local branch from.
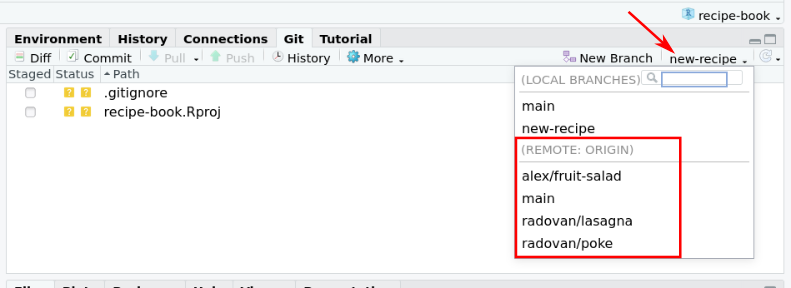
The branch picker also lists branches on remotes. If you click on one of them, it will create a local branch and track it.
Summary
When we clone a repository, we get a full backup of the repository, including all history: all commits, branches, and tags.
Yesterday we learned about branches and commits, and now we created and used them locally.
Creating local branches and commits does not automatically modify the remote repository. To “push” our local changes to the remote repository, we have to actively “push” them there. We will practice this in a later episode: How to turn your project to a Git repo and share it
Remote branches and local branches are not the same thing. If we want to create local commits, we always need to create a local branch first. But the local branch can “track” the remote branch and we can push and pull changes to and from the remote branch.