Branching and merging
Objectives
Be able to create and merge branches.
Know the difference between a branch and a tag.
Instructor note
30 min teaching/type-along
20 min exercise
Motivation for branches
In the previous section we tracked a guacamole recipe with Git.
Up until now our repository had only one branch with one commit coming after the other:

Linear Git repository.
Commits are depicted here as little boxes with abbreviated hashes.
Here the branch
mainpoints to a commit.“HEAD” is the current position (remember the recording head of tape recorders?). When we say
HEAD, we mean those literal letters - this isn’t a placeholder for something else.When we talk about branches, we often mean all parent commits, not only the commit pointed to.
Now we want to do this:
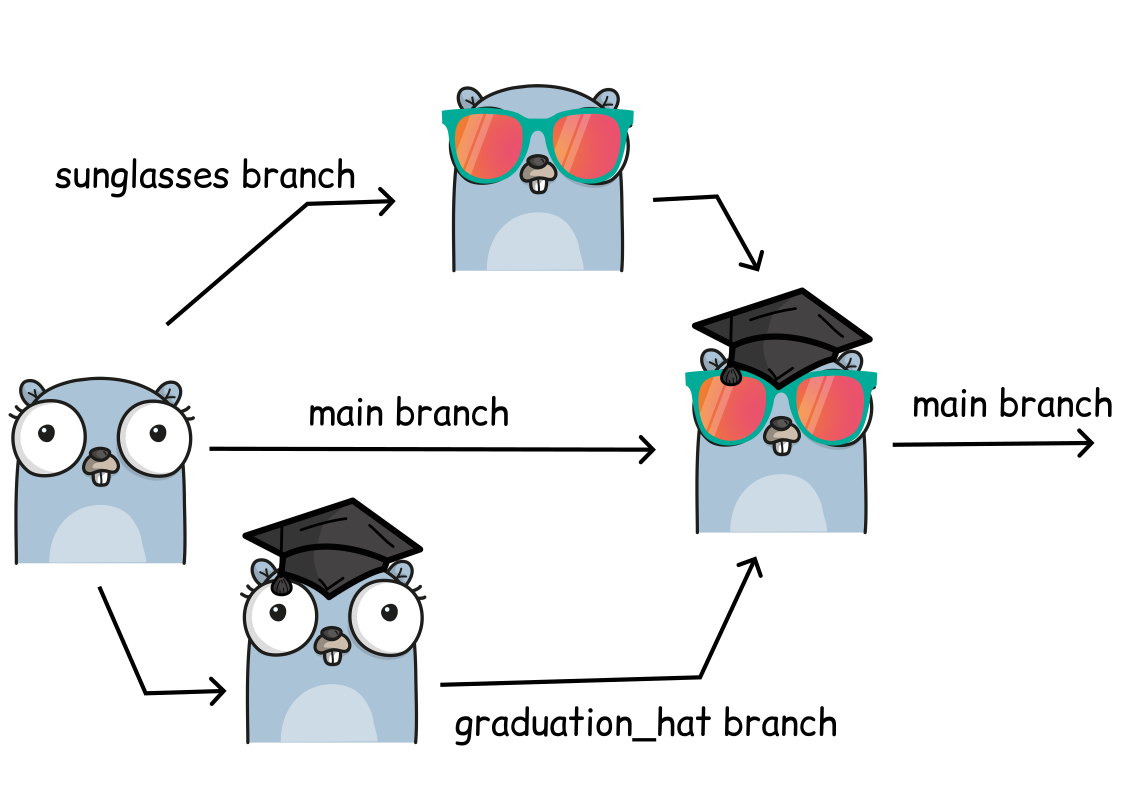
Image created using https://gopherize.me/ (inspiration).
Software development is often not linear:
We typically need at least one version of the code to “work” (to compile, to give expected results, …).
At the same time we work on new features, often several features concurrently. Often they are unfinished.
We need to be able to separate different lines of work really well.
The strength of version control is that it permits the researcher to isolate different tracks of work, which can later be merged to create a composite version that contains all changes:

Isolated tracks of work.
We see branching points and merging points.
Main line development is often called
mainormaster.Other than this convention there is nothing special about
mainormaster, it is a branch like any other.Commits form a directed acyclic graph (we have left out the arrows to avoid confusion about the time arrow).
A group of commits that create a single narrative are called a branch. There are different branching strategies, but it is useful to think that a branch tells the story of a feature, e.g. “fast sequence extraction” or “Python interface” or “fixing bug in matrix inversion algorithm”.
An important alias
We will now define an alias in Git, to be able to nicely visualize branch structure in the terminal without having to remember a long Git command (more details about aliases are given in a later section). This is extensively used in the rest of this and other lessons:
$ git config --global alias.graph "log --all --graph --decorate --oneline"
Instructor note
Instructors, please demonstrate how to set this alias and ensure that all create it. This is very important for this lesson and git-collaborative.
Let us inspect the project history using the git graph alias:
$ git graph

* e7cf023 (HEAD -> main) don't forget to enjoy
* 79161b6 add half an onion
* a3394e3 adding README
* 3696246 adding instructions
* f146d25 adding ingredients
We have a couple commits and only one development line (branch) and this branch is called
main.Commits are states characterized by a 40-character hash (checksum).
git graphprint abbreviations of these checksums.Branches are pointers that point to a commit.
Branch
mainpoints to a commit (in this example it ise7cf023efe382340e5284c278c6ae2c087dd3ff7but on your computer the hash will be different).HEADis another pointer, it points to where we are right now (currentlymain)
In the following we will learn how to create branches, how to switch between them, how to merge branches, and how to remove them afterwards.
Creating and working with branches
Instructor note
We do the following part together. Encourage participants to type along.
It is possible to create and merge branches directly on GitHub
However, we do not have screenshots for that in this episode
But if you prefer to work in the browser, please try it
Please contribute screenshots to this lesson
Let’s create a branch called experiment where we add cilantro to ingredients.txt
(text after “#” are comments and not part of the command).
$ git branch experiment main  # creates branch "experiment" from "main"
$ git switch experiment       # switch to branch "experiment"
$ git branch                  # list all local branches and show on which branch we are
Note
In case git switch does not work, your Git version might be older than from 2019.
On older Git it is git checkout instead of git switch.
Verify that you are on the
experimentbranch (note thatgit graphalso makes it clear what branch you are on:HEAD -> branchname):$ git branch * experiment main
This command shows where we are, it does not create a branch.
Then add 2 tbsp cilantro on top of the
ingredients.txt:* 2 tbsp cilantro * 2 avocados * 1 chili * 1 lime * 2 tsp salt * 1/2 onion
Stage this and commit it with the message “let us try with some cilantro”.
Then reduce the amount of cilantro to 1 tbsp, stage and commit again with “maybe little bit less cilantro”.
We have created two new commits:
$ git graph

* bcb8b78 (HEAD -> experiment) maybe little bit less cilantro
* f6ec7b7 let us try with some cilantro
* e7cf023 (main) don't forget to enjoy
* 79161b6 add half an onion
* a3394e3 adding README
* 3696246 adding instructions
* f146d25 adding ingredients
The branch
experimentis two commits ahead ofmain.We commit our changes to this branch.
Exercise: Create and commit to branches
Branch-1: Create and commit to branches
In this exercise, you will create another new branch and few more commits. We will use this in the next section, to practice merging. The goal of the exercise is to end up with 3 branches.
Change to the branch
main.Create another branch called
less-salt.Note! makes sure you are on main branch when you create the
less-saltbranch.A safer way would be to explicitly mention to create from the main branch as shown below:
$ git branch less-salt main
Switch to the
less-saltbranch.On the
less-saltbranch reduce the amount of salt.Commit your changes to the
less-saltbranch.
Use the same commands as we used above.
We now have three branches (in this case HEAD points to less-salt):
$ git branch

  experiment
* less-salt
  main

$ git graph

* bf28166 (HEAD -> less-salt) reduce amount of salt
| * bcb8b78 (experiment) maybe little bit less cilantro
| * f6ec7b7 let us try with some cilantro
|/
* e7cf023 (main) don't forget to enjoy
* 79161b6 add half an onion
* a3394e3 adding README
* 3696246 adding instructions
* f146d25 adding ingredients
Here is a graphical representation of what we have created:

Now switch to
main.In a new commit, improve the
README.mdfile (we added the word “Guacamole”):# Guacamole recipe This is an exercise repository.
Now you should have this situation:
$ git graph

* b4af65b (HEAD -> main) improve the documentation
| * bf28166 (less-salt) reduce amount of salt
|/
| * bcb8b78 (experiment) maybe little bit less cilantro
| * f6ec7b7 let us try with some cilantro
|/
* e7cf023 don't forget to enjoy
* 79161b6 add half an onion
* a3394e3 adding README
* 3696246 adding instructions
* f146d25 adding ingredients

And for comparison this is how it looks on GitHub.
Exercise: Merging branches
It turned out that our experiment with cilantro was a good idea.
Our goal now is to merge experiment into main.
Branch-2: Merge branches
Merge experiment and less-salt back into main following the lesson below
until the point where we start deleting branches.
If you got stuck in the above exercises or joined later
If you got stuck in the above exercises or joined later, you can apply the commands below. But skip this box if you managed to create branches.
$ cd ..  # step out of the current directory

$ git clone https://github.com/coderefinery/recipe-before-merge.git
$ cd recipe-before-merge

$ git switch experiment
$ git switch less-salt
$ git switch main

$ git remote remove origin

$ git graph
Or call a helper to un-stuck it for you.
First we make sure we are on the branch we wish to merge into:
$ git branch

  experiment
  less-salt
* main
Then we merge experiment into main:
$ git merge experiment

We can verify the result:
$ git graph

*   81fcc0c (HEAD -> main) Merge branch 'experiment'
|\
| * bcb8b78 (experiment) maybe little bit less cilantro
| * f6ec7b7 let us try with some cilantro
* | b4af65b improve the documentation
|/
| * bf28166 (less-salt) reduce amount of salt
|/
* e7cf023 don't forget to enjoy
* 79161b6 add half an onion
* a3394e3 adding README
* 3696246 adding instructions
* f146d25 adding ingredients
What happens internally when you merge two branches is that Git creates a new commit, attempts to incorporate changes from both branches and records the state of all files in the new commit. While a regular commit has one parent, a merge commit has two (or more) parents.
To view the branches that are merged into the current branch we can use the command:
$ git branch --merged

  experiment
* main
We are also happy with the work on the less-salt branch. Let us merge that
one, too, into main:
$ git branch  # make sure you are on main
$ git merge less-salt

Commit graph after merge.
We can verify the result in the terminal:
$ git graph

*   4e03d4b (HEAD -> main) Merge branch 'less-salt'
|\
| * bf28166 (less-salt) reduce amount of salt
* |   81fcc0c Merge branch 'experiment'
|\ \
| * | bcb8b78 (experiment) maybe little bit less cilantro
| * | f6ec7b7 let us try with some cilantro
| |/
* / b4af65b improve the documentation
|/
* e7cf023 don't forget to enjoy
* 79161b6 add half an onion
* a3394e3 adding README
* 3696246 adding instructions
* f146d25 adding ingredients
Observe how Git nicely merged the changed amount of salt and the new ingredient in the same file without us merging it manually:
$ cat ingredients.txt

* 1 tbsp cilantro
* 2 avocados
* 1 chili
* 1 lime
* 1 tsp salt
* 1/2 onion
If the same file is changed in both branches, Git attempts to incorporate both changes into the merged file. If the changes overlap then the user has to manually settle merge conflicts (we will do that later).
Deleting branches safely
Both feature branches are merged:
$ git branch --merged

  experiment
  less-salt
* main
This means we can delete the branches:
$ git branch -d experiment
$ git branch -d less-salt
This is the result:

Commit graph after merged branches were deleted.
We observe that when deleting branches, only the pointers (“sticky notes”) disappeared, not the commits.
Git will not let you delete a branch which has not been reintegrated unless you
insist using git branch -D. Even then your commits will not be lost but you
may have a hard time finding them as there is no branch pointing to them.
Optional exercises with branches
The following exercises are more advanced, absolutely no problem to postpone them to a few months later. If you give them a go, keep in mind that you might run into conflicts, which we will learn to resolve in the next section.
(optional) Branch-3: Perform a fast-forward merge
Create a new branch from
mainand switch to it.Create a couple of commits on the new branch (for instance edit
README.md):
Now switch to
main.Merge the new branch to
main.Examine the result with
git graph.Have you expected the result? Discuss what you see.
Solution
You will see that in this case no merge commit was created and Git merged the two branches by moving (fast-forwarding) the “main” branch (label) three commits forward.
This was possible since one branch is the ancestor of the other and their developments did not diverge.
A merge that does not require any merge commit is a fast-forward merge.
(optional) Branch-4: Rebase a branch (instead of merge)
As an alternative to merging branches, one can also rebase branches. Rebasing means that the new commits are replayed on top of another branch (instead of creating an explicit merge commit). Note that rebasing changes history and should not be done on public commits!
Create a new branch, and make a couple of commits on it.
Switch back to
main, and make a couple of commits on it.Inspect the situation with
git graph.Now rebase the new branch on top of
mainby first switching to the new branch, and thengit rebase main.Inspect again the situation with
git graph. Notice that the commit hashes have changed - think about why!
Solution
You will notice two things:
History is now linear and does not contain merge commits.
All the commit hashes that were on the branch that got rebased, have changed. This also demonstrates that
git rebaseis a command that alters history. The commit history looks as if the rebased commits were all done after themaincommits.
Summary
Let us pause for a moment and recapitulate what we have just learned:
$ git branch               # see where we are
$ git branch NAME          # create branch NAME
$ git switch NAME          # switch to branch NAME
$ git merge NAME           # merge branch NAME (to current branch)
$ git branch -d NAME       # delete branch NAME
$ git branch -D NAME       # delete unmerged branch NAME
Since the following command combo is so frequent:
$ git branch NAME          # create branch NAME
$ git switch NAME          # switch to branch NAME
There is a shortcut for it:
$ git switch --create NAME # create branch NAME and switch to it
Typical workflows
With this there are two typical workflows:
$ git switch --create new-feature  # create branch, switch to it
$ git commit                       # work, work, work, ..., and test
$ git switch main                  # once feature is ready, switch to main
$ git merge new-feature            # merge work to main
$ git branch -d new-feature        # remove branch
Sometimes you have a wild idea which does not work. Or you want some throw-away branch for debugging:
$ git switch --create wild-idea    # create branch, switch to it, work, work, work ...
$ git switch main                  # realize it was a bad idea, back to main
$ git branch -D wild-idea          # it is gone, off to a new idea
Branch-5: Test your understanding
Which of the following combos (one or more) creates a new branch and makes a commit to it?
$ git branch new-branch
$ git add file.txt
$ git commit
$ git add file.txt
$ git branch new-branch
$ git switch new-branch
$ git commit
$ git switch --create new-branch
$ git add file.txt
$ git commit
$ git switch new-branch
$ git add file.txt
$ git commit
Solution
Both 2 and 3 would do the job. Note that in 2 we first stage the file, and then create the
branch and commit to it. In 1 we create the branch but do not switch to it, while in 4 we
don’t give the --create flag to git switch to create the new branch.
Keypoints
A branch is a division unit of work, to be merged with other units of work.
A tag is a pointer to a moment in the history of a project.