Copy and browse an existing project
In this episode, we will look at an existing repository to understand how all the pieces work together. Along the way, we will make a copy (a fork) of the repository for us, which will be used for our own changes in the next episode.
We used to start by directly going and creating a repository from scratch. This was abstract and hard to understand.
Instead, we’ll show you all the cool stuff in a Git repository first, and then start adding files.
We use an example recipe book we created just for this course.
By the end of the course, you’ll know how to contribute your own recipes to it.
Objectives
See a real Git repository and understand what is inside of it.
Understand how version control allows advanced inspection of a repository.
See how Git allows multiple people to collaborate relatively easily.
See the big picture instead of remembering a bunch of commands.
GitHub, VS Code, Command line, and more
We offer four different paths for this exercise:
GitHub (this is the one we will demonstrate on day 1)
VS Code (if you prefer to follow along using an editor; we will return to this on day 2)
RStudio (if you prefer to follow along using an editor; we will return to this on day 2)
Command line (for people comfortable with the command line; you will see more of this on day 2)
In the future we’ll add more paths, for example Jupyter (contributions welcome!).
Creating a copy of the repository by “forking”
A repository is a collection of files in one directory tracked by git. A GitHub repository is GitHub’s copy, which adds things like access control. Each GitHub repository is owned by a user or organization, who controls access.
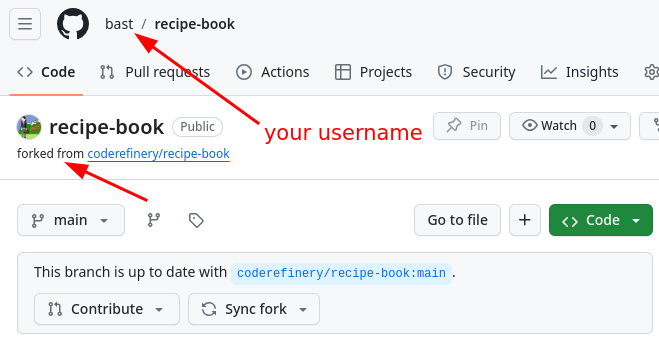
Illustration of forking a repository on GitHub.
First, we need to make our own copy of the exercise repository. This will become important later, when we make our own changes.
Go to the repository view on GitHub:
https://github.com/cr-workshop-exercises/recipe-book: you can use this one if you don’t want your fork and contributions to be visible on the stream or the recording
https://github.com/cr-workshop-exercises/recipe-book-recorded: we will use this one for the demonstration which is streamed and recorded
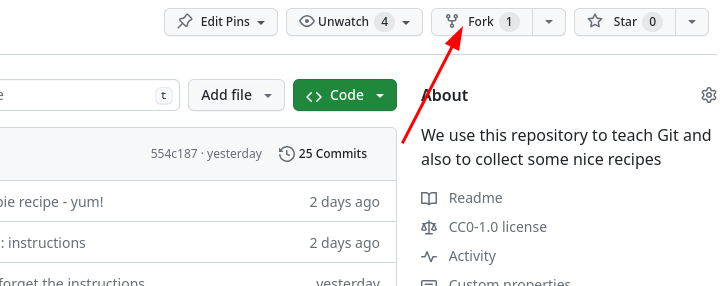
First, on GitHub, click the button that says “Fork”. It is towards the top-right of the screen:
You should shortly be redirected to your copy of the repository USER/recipe-book.
At all times you should be aware of if you are looking at your repository or the CodeRefinery upstream repository.
Your repository: https://github.com/USER/recipe-book
CodeRefinery upstream repository: https://github.com/cr-workshop-exercises/recipe-book
You only need to open your own view, as described above. The browser
URL should look like https://github.com/USER/recipe-book, where
USER is your GitHub username.
You need to have forked the repository as described above.
We need to start by making a copy of this repository locally.
Start VS Code.
If you don’t have the default view (you already have a project open), go to File → New Window.
Under “Start” on the screen, select “Clone Git Repository…”. Alternatively navigate to the “Source Control” tab on the left sidebar and click on the “Clone Repository” button.
Paste in this URL:
https://github.com/USER/recipe-book, whereUSERis your username. You can copy this from the browser.Browse and select the folder in which you want to clone the repository.
Say yes, you want to open this repository.
Select “Yes, I trust the authors” (the other option works too).
This path is advanced and we do not include all command line information: you need to be somewhat comfortable with the command line already.
We need to start by making a copy of this repository locally. You need to have forked the repository as described above.
Start the terminal in which you use Git (terminal application, or Git Bash).
Change to the directory where you would want the repository to be (
cd ~/codefor example, if the~/codedirectory is where you store your files).Run the following command:
git clone https://github.com/USER/recipe-book, whereUSERis your username. You might need to use a SSH clone command instead of HTTPS, depending on your setup.Change to that directory:
cd recipe-book
You need to have forked the repository as described above.
We need to start by making a copy of this repository locally.
Start RStudio.
Go to “File” → “New Project…”
Choose “Version Control”, and then “Git”
In the “Repository URL” field, paste in this URL:
https://github.com/USER/recipe-book, whereUSERis your username. You can copy this from the browser.You can change the “Project directory name” if you want but that is not mandatory. By default, it will use the repository name from the URL.
Click “Create Project”
Exercise
Work on this by yourself or in your team.
Instructor note
Before starting the exercise session show how to fork the repository to own account (above).
Exercise: Browsing an existing project (25 min)
Browse the recipe-book project (introduced above) and explore commits and branches. Take notes and prepare questions. The hints are for the GitHub path in the browser.
Browse the commit history: Are commit messages understandable? (Hint: “Commit history”, the timeline symbol, above the file list)
Compare the commit history with the network graph (“Insights” -> “Network”). Can you find the branches?
How can you find out when a recipe was last modified?
How many changes did the Guacamole recipe receive (you find it under “sides”)? Try to click on some of the commits to see what changed. (Hint: “History” in the view of a single file)
Which recipes include the ingredient “salt”? (Hint: the GitHub search. From the repository view, it should offer the filter “repo:USER/recipe-book” by default. What if you add a search term?)
In the Guacamole recipe, find out who modified each line last and when (click on file, then click “Blame” button). Find out who added the cilantro and in which commit. (Hint: “Blame” view in the file view)
Can you use these recipes yourself? Are you allowed to share modifications? (Hint: look for a license file)
Browse issues and pull requests in the upstream repository (the repository you forked from). Any idea what these might be good for? (Hint: tabs in the repository view)
The solution below goes over most of the answers, and you are encouraged to use it when the hints aren’t enough - this is by design.
Solution and walk-through
(1) Basic browsing
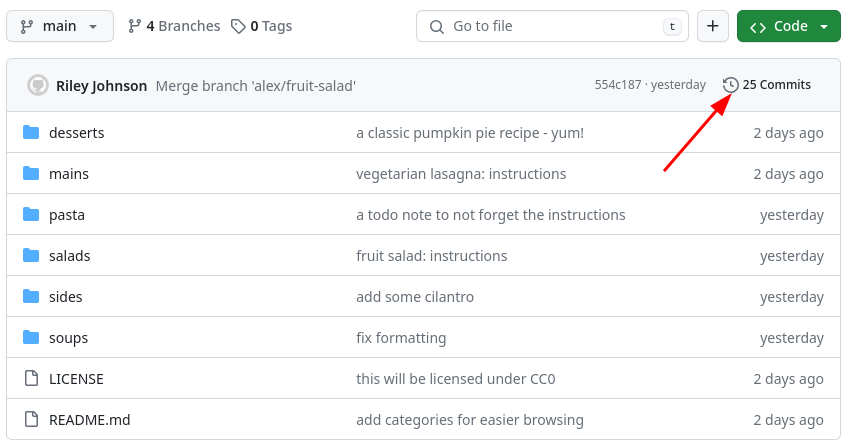
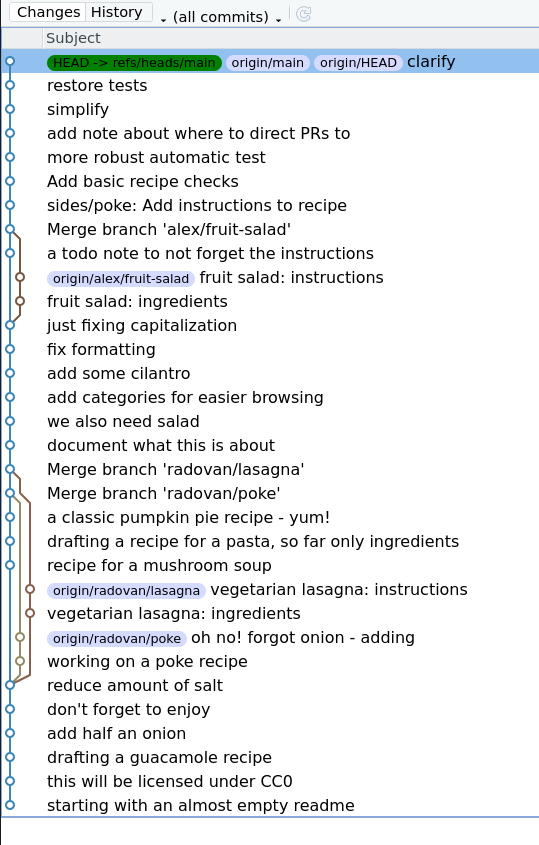
The most basic thing to look at is the history of commits.
This is visible from a button in the repository view. We see every change, when, and who has committed.
Every change has a unique identifier, such as
554c187. This can be used to identify both this change, and the whole project’s version as of that change.Clicking on a change in the view shows more.
Click on the timeline symbol in the repository view:
This can be done from “Timeline”, in the bottom of explorer, but only for a single file.
Run:
$ git log
Try also:
$ git log --oneline
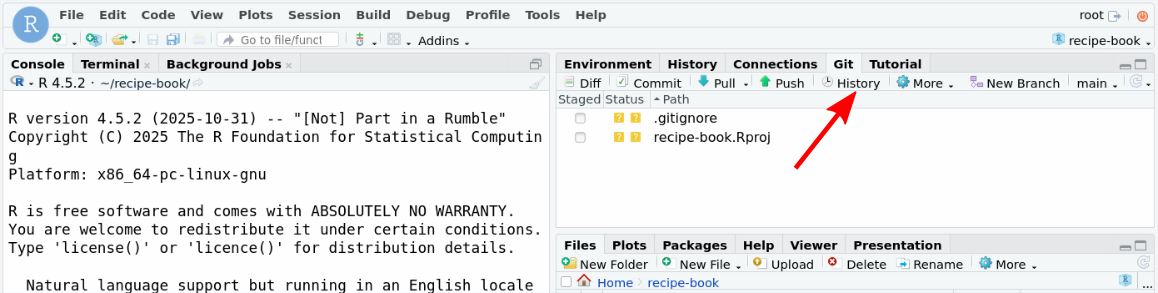
This can be done from “History”, in the top right panel of explorer. This will open a pop-up window from which you can explore the history of commits.
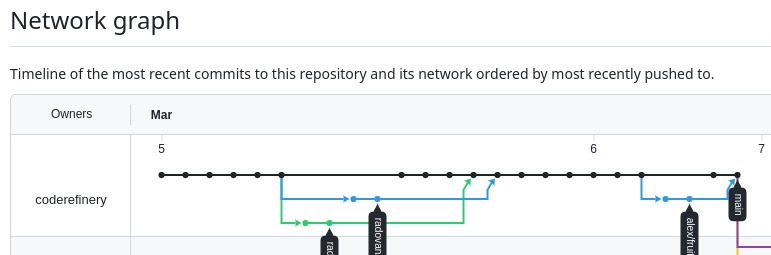
(2) Compare commit history with network graph
The commit history we saw above looks linear: one commit after another. But if we look at the network view, we see some branches and merges. We’ll see how to do these later. This is another one of the basic Git views.
In a new browser tab, open the “Insights” tab, and click on “Network”. You can hover over the commit dots to see the person who committed and how they correspond with the commits in the other view:
We don’t know how to do this without an extension. Try starting a terminal and using the “Command Line” option.
If you defined the git graph alias (shortcut) as in Configuring Git command line and editor, you
can view the network graph with:
$ git graph
If not, you can use the basic command:
$ git log --graph --oneline --decorate --all
This can be viewed in the same “History” tab that we just looked at. The branch network can be seen on the left of the commit list, and individual commits can be clicked to see the person who committed and what changes they did.
(3) When was a recipe last modified?
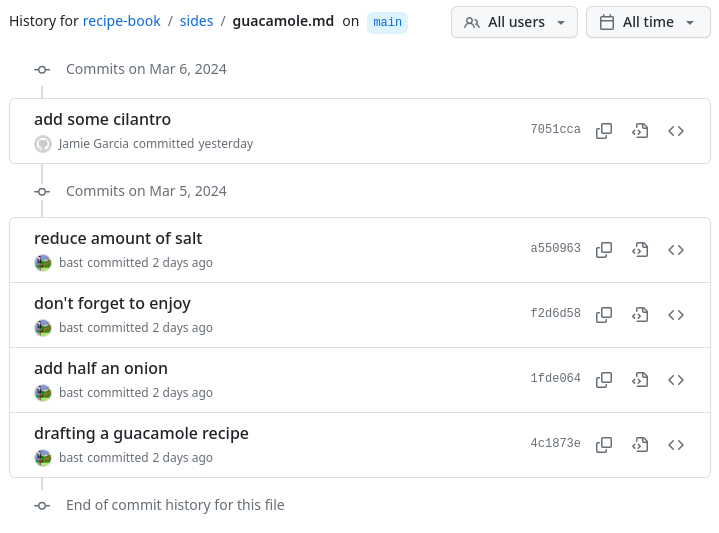
We see the history for the whole repository, but we can also see it for a single file.
Navigate to the file view: Main page → sides directory → guacamole.md. Click the “History” button near the top right:
Open sides/guacamole.md file in the editor. Under the file browser, we see a “Timeline” view there.
The git log command can take a filename and provide the log of only
a single file:
$ git log sides/guacamole.md
Open the file in the main editor window, and navigate to the “Version control” menu (Git icon in the toolbar right below the main menu bar), then select “Log of guacamole.md”
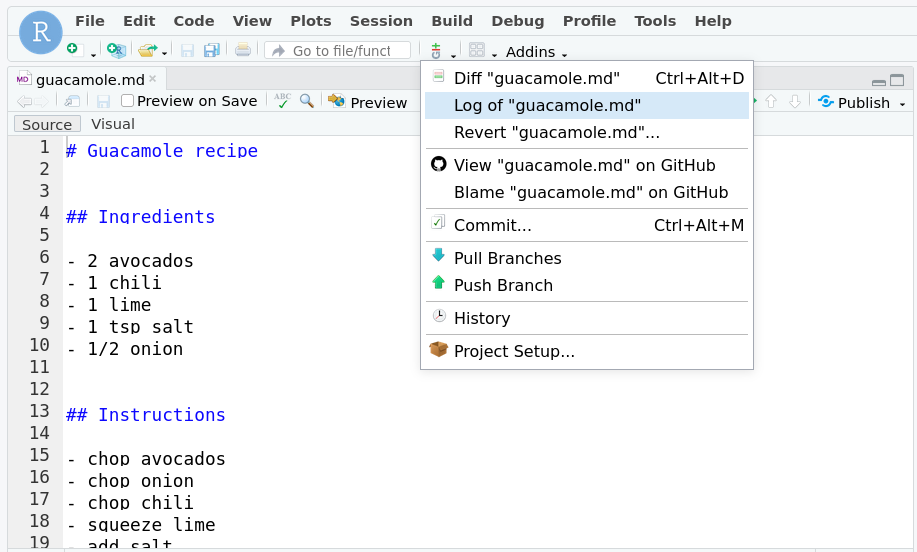
This will open a pop-up window showing all commits that modified the “Guacamole.md” file.

(4) How many changes did the Guacamole recipe receive?
According to the view above, it seems to have five changes (as of 2024-03-07). This could change later on.
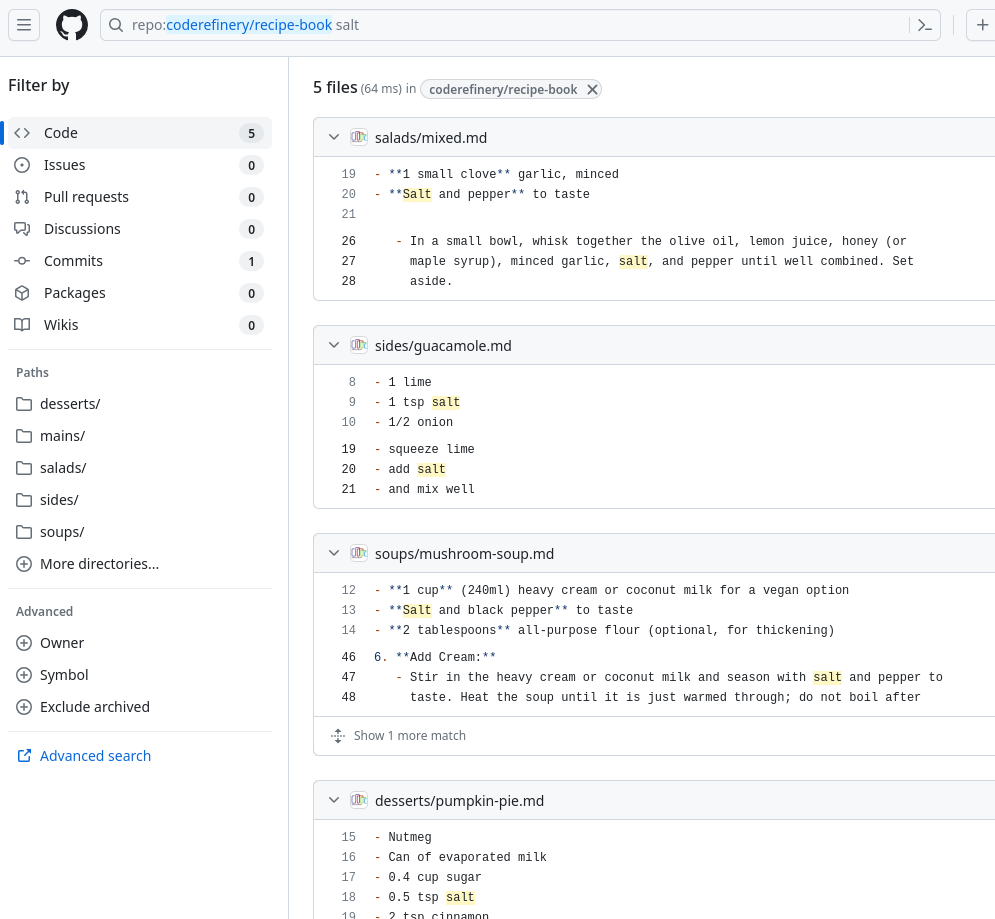
(5) Which recipes include the ingredient “salt”
Version control makes it very easy to find all occurrences of a single word. This is useful for things like finding where functions or variables are defined or used.
We go to the main recipe book view. We click the Search magnifying class at the very top, type “salt”, and click enter. We see every instance, including the context.
Searching in a forked repository will not work instantaneously!
It usually takes a few minutes before one can search for keywords in a forked repository since it first needs to build the search index the very first time we search. Start it, continue with other steps, then come back to this.
If you use the “Search” magnifying class on the left sidebar, and search for “salt” it shows the occurrences in every file. You can click to see the usage in context.
grep is the command line tool that searches for lines matching a term
$ git grep salt          # only the lines
$ git grep -C 3 salt     # three lines of context
$ git grep -i salt       # case insensitive
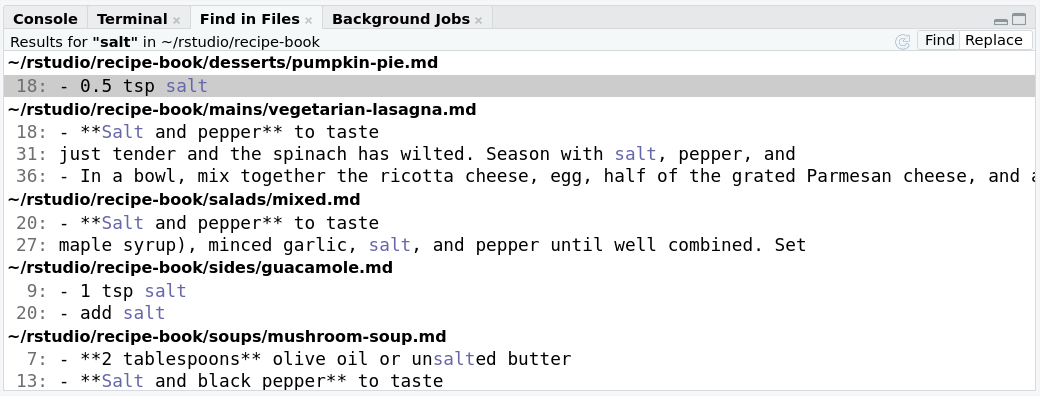
Go to Edit → Find in Files… (ctrl+shift+F) and type salt in the Find field. It will by default search for salt in all files in the recipe-book directory. Press Find button at the bottom of the pop-up window. It will show all occurrences in every file in a Find in Files tab in the Console panel.
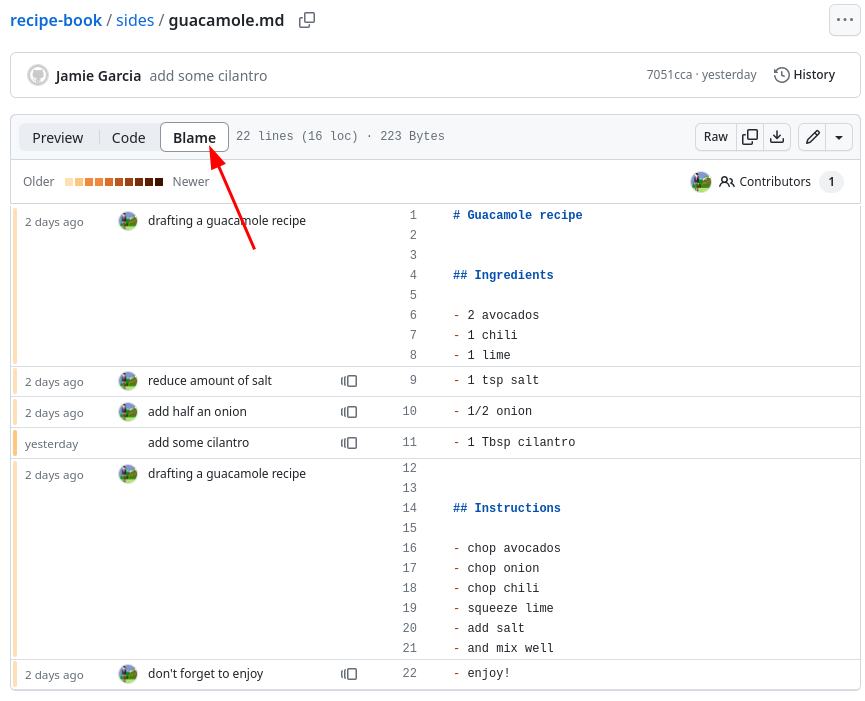
(6) Who modified each line last and when?
This is called the “annotate” or “blame” view. The name “blame” is very unfortunate, but it is the standard term for historical reasons for this functionality and it is not meant to blame anyone.
From a recipe view, change preview to “Blame” towards the top-left. To get the actual commit, click on the commit message.
This requires an extension. We recommend for now you use the command line version, after opening a terminal.
These two commands are similar but have slightly different output.
$ git annotate sides/guacamole.md
$ git blame sides/guacamole.md
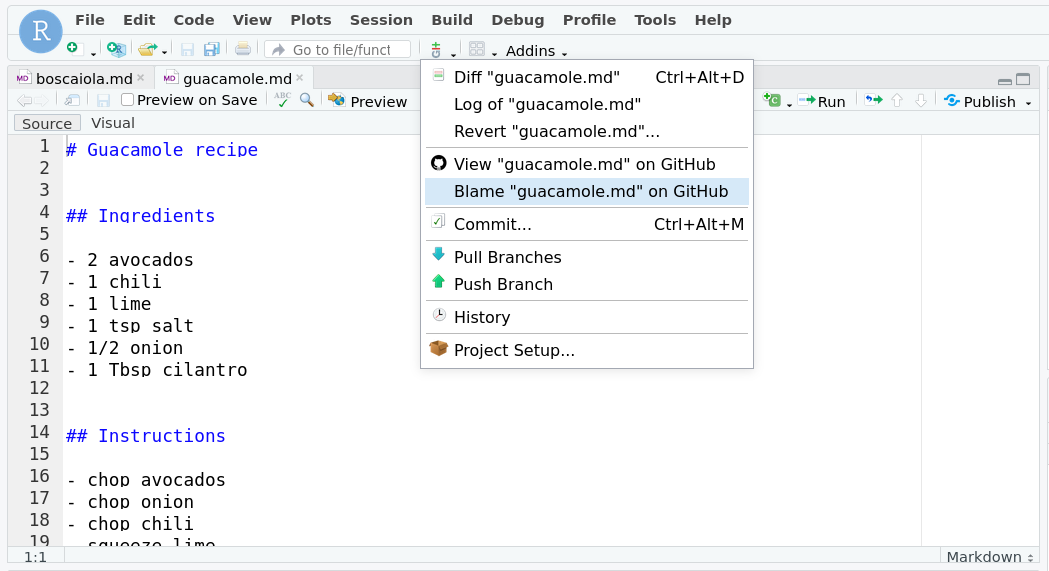
Open the file in the main editor window, and navigate to the “Version control” menu (Git icon in the toolbar right below the main menu bar), then select “Blame “guacamole.md” on GitHub”. This will open a GitHub page in your web-browser with the same view as shown in the GitHub tab.
(7) Can you use these recipes yourself? Are you allowed to share modifications?
Look at the file
LICENSE.It says it is “Creative Commons Zero 1.0”, which is equivalent to public domain. You can use them without conditions.
Note the GitHub view of the file
LICENSEgives a nice summary of what it means. Try it out: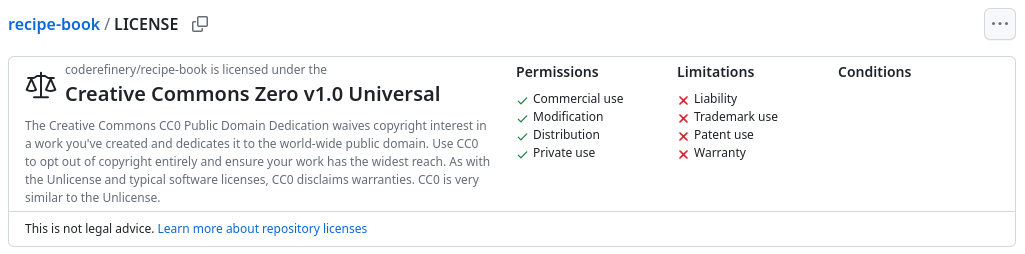
(8) Browse issues and pull requests in the upstream repository
This can only be done through the GitHub view. Go to the main repository cr-workshop-exercises/recipe-book, (not your fork): https://github.com/cr-workshop-exercises/recipe-book. Issues and Pull requests are different for each GitHub copy.
Click on the “Issues” tab. These are notes that people have added, which allow discussion about the project. Often they are used to communicate problems or ideas.
Click on the “Pull requests” tab. This allows anyone to propose changes, but only the repository owners can accept.
Summary
Git allowed us to understand this simple project much better than we could, if it was just a few files on our own computer.
It was easy to share the project with the course.
By forking the repository, we created our own copy. This is important for the next episode, where we will make changes to our copy.