Merging changes and contributing to the project
Git allows us to have different development lines where we can try things out. It also allows different people to work on the same project at the same. This means that we have to somehow combine the changes later. In this part we will practice this: merging.
Objectives
Understand that on GitHub merging is done through a pull request. Think of it as a change proposal.
Create and merge a pull request within your own repository.
Understand (and optionally) do the same across repositories, to contribute to the upstream public repository.
Instructor note
10 min introduction and setup
25 min exercise
15 min discussion
Background
In the last episode, we added a new recipe on a branch. This allows us to test it before it becomes “live”.
Now, we want to bring that change into the “main” branch.
We will find it’s not that hard! But you do have to keep track of the steps and make sure that you are careful about where a change is added.
Exercise
In this exercise, we will show how we can propose changes and merge changes within our own repository. Optionally, you can propose a recipe to the upstream recipe book - which shows the true purpose of this. But this is only a preview and we will practice collaboration much more in the collaborative Git lesson.
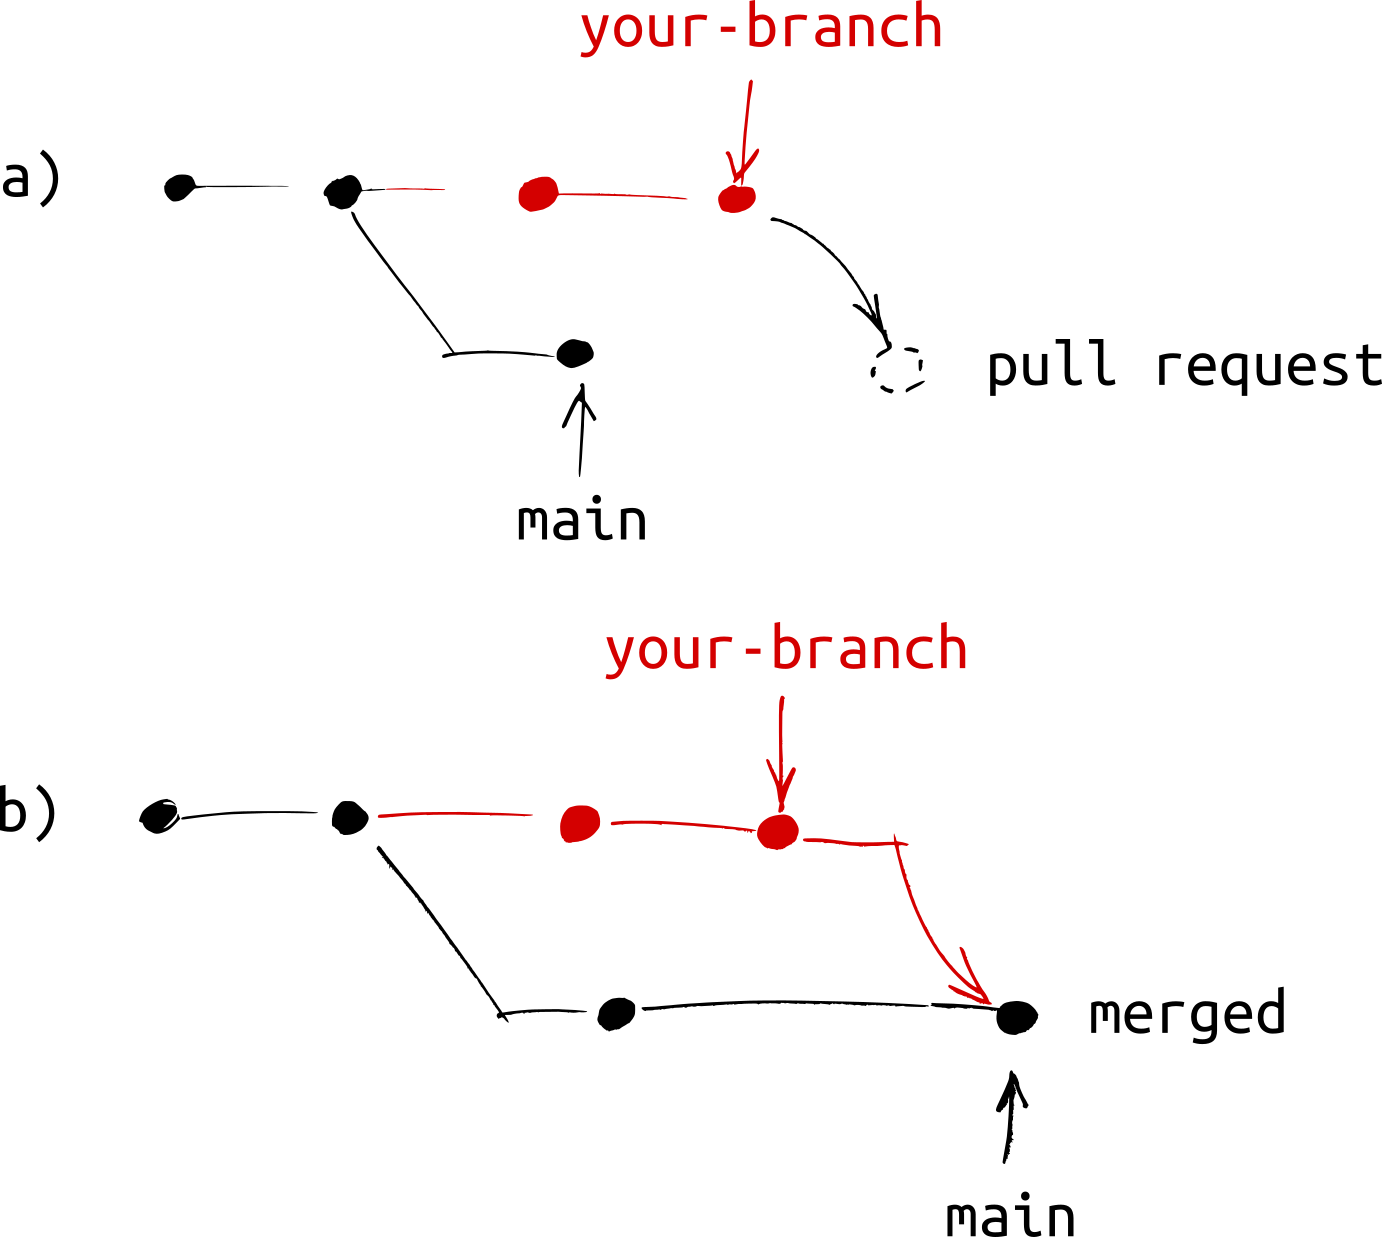
Illustration of what we want to achieve in this exercise.
We offer four different paths of how to do this exercise. For the CodeRefinery workshop day 1, we use and demonstrate the GitHub path only and recommend you do that. The exercise text below has some GitHub-specific notes, but most is possibly with any path.
First, we make something called a pull request, which allows review and commenting before the actual merge.
Exercise: Merging branches with pull requests (20 min)
We assume that in the previous exercise you have created a new branch
with a recipe. In our previous example, it is called new-recipe.
If not, create the branch first and add a recipe to your new branch, see
Recording changes.
We provide basic hints. You should refer to the solution as needed.
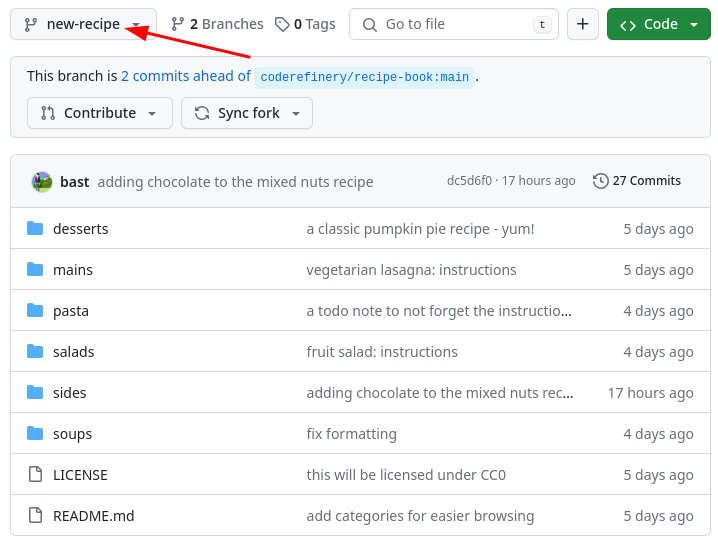
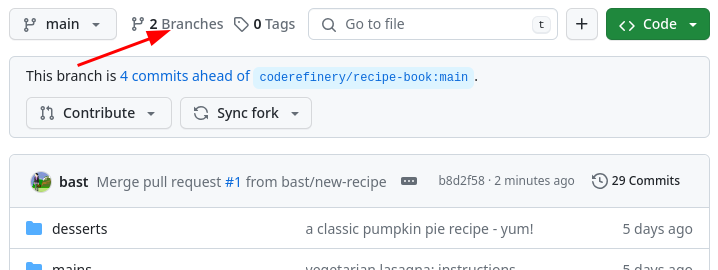
Navigate to your branch from the previous episode (hint: the same branch view we used last time).
Begin the pull request process (hint: There is a “Contribute” button in the branch view).
Add or modify the pull request title and description, and verify the other data. In the pull request verify the target repository and the target branch. Make sure that you are merging within your own repository. GitHub: By default, it will offer to make the change to the upstream repository,
cr-workshop-exercises. You should change this, you shouldn’t contribute your test recipe upstream yet. Where it saysbase repository, select your own user’s repository.Create the pull request by clicking “Create pull request”. Browse the network view to see if anything has changed yet.
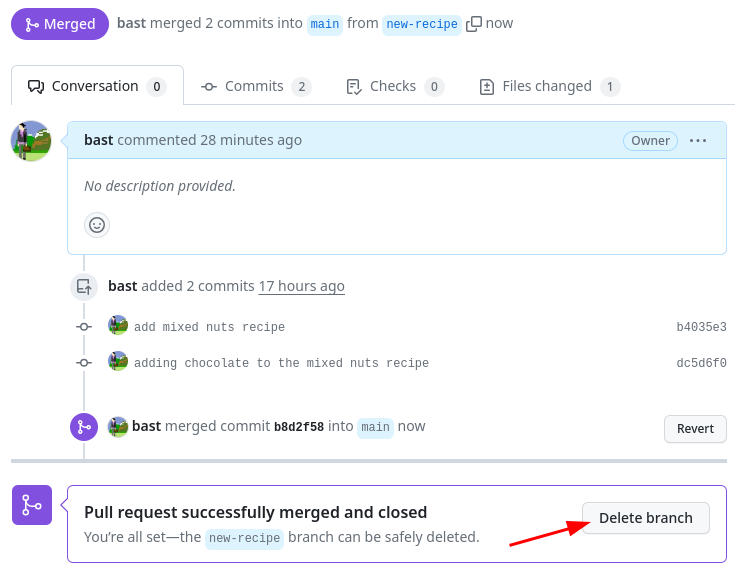
Merge the pull request, or if you are not on GitHub you can merge the branch locally. Browse the network again. What has changed?
Find out which branches are merged and thus safe to delete. Then remove them and verify that the commits are still there, only the branch labels are gone (hint: you can delete branches that have been merged into
main).Optional: Try to create a new branch with a new change, then open a pull request but towards the central repository. We will later merge few of those. (Hint: this is mostly the same as above, for the GitHub path. But, you set the base repository as CodeRefinery. You might need to compare across forks.)
When working locally, it’s easier to merge branches: we can just do the merge, without making a pull request. But we don’t have that step of review and commenting and possibly adjusting.
Exercise
Switch to the
mainbranch that you want to merge the other branch into. (Note that this is the other way around from the GitHub path).
Then:
Merge the other branch into
main(which is then your current branch).Find out which branches are merged and thus safe to delete. Then remove them and verify that the commits are still there, only the branch labels are gone. (Hint: you can delete branches that have been merged into
main).(optional, advanced) Try to create a new branch, and make a GitHub pull request with your recipe, and contribute it to our upstream repository. This is very complex right now since your change has to get to GitHub, and we haven’t shown that yet. We don’t give a solution for this.
The solution below goes over most of the answers, and you are encouraged to use it when the hints aren’t enough - this is by design.
Solution and walk-through
(1) Navigate to your branch
Before making the pull request, or doing a merge, it’s important to make sure that you are on the right branch. Many people have been frustrated because they forgot this!
On GitHub make sure you are on the branch you want to merge from:
Remember, you need to switch to the main branch, the branch we want to merge to.
This is different from the GitHub path.
Remember, you need to switch to the main branch, the branch we want to merge to.
This is different from the GitHub path:
$ git switch main
Remember, you need to switch to the main branch, the branch we want to merge to.
This is different from the GitHub path.
(2) Begin the pull request process
In GitHub, the pull request is the way we propose to merge two branches together. We start the process of making one.

It is possible to open pull requests from the editor, but we don’t cover that here.
If you are working locally, continue to step 5.
It is possible to open pull requests from the command line, but we don’t cover that here.
If you are working locally, continue to step 5.
It is possible to open pull requests from the terminal, but we don’t cover that here.
If you are working locally, continue to step 5.
(3) Fill out and verify the pull request
Check that the pull request is directed to the right repository and branch and that it contains the changes that you meant to merge.
Things to check:
Base repository: this should be your own
Title: make it descriptive
Description: make it informative
Scroll down to see commits: are these the ones you want to merge?
Scroll down to see the changes: are these the ones you want to merge?
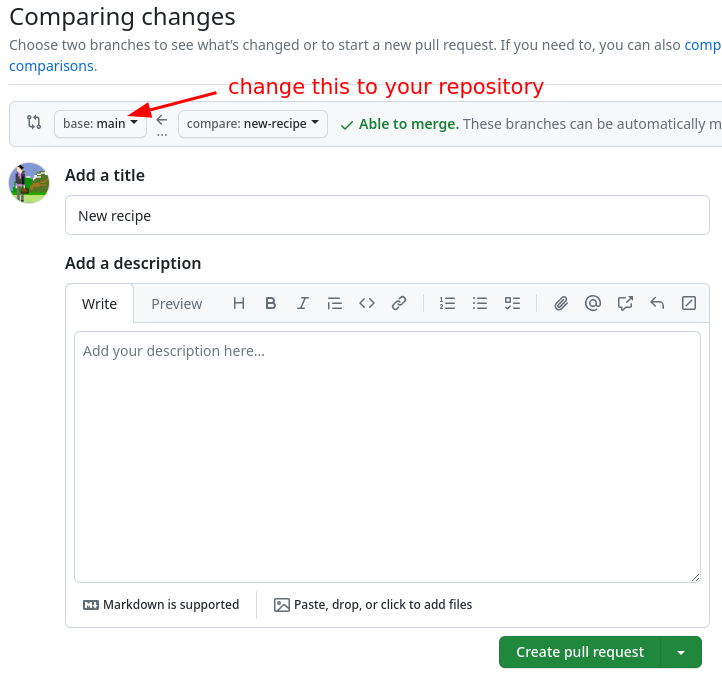
This screenshot only shows the top part. If you scroll down, you can see the commits and the changes. We recommend to do this before clicking on “Create pull request”.
If you are working locally, continue to step 5.
If you are working locally, continue to step 5.
If you are working locally, continue to step 5.
(4) Create the pull request
We actually create the pull request. Don’t forget to navigate to the Network view after opening the pull request. Note that the changes proposed in the pull request are not yet merged.
Click on the green button “Create pull request”.
If you click on the little arrow next to “Create pull request”, you can also see the option to “Create draft pull request”. This will be interesting later when collaborating with others. It allows you to open a pull request that is not ready to be merged yet, but you want to show it to others and get feedback.
It is possible to create pull requests from the editor, but we don’t cover that here.
If you are working locally, continue to step 5.
It is possible to create pull requests from the command line, but we don’t cover that here.
If you are working locally, continue to step 5.
It is possible to create pull requests from the terminal, but we don’t cover that here.
If you are working locally, continue to step 5.
(5) Merge the pull request
Now, we do the actual merging. We see some effects now.
Review it again (commits and changes), and then click “Merge pull request”.
After merging, verify the network view. Also navigate then to your “main” branch and check that your new recipe is there.
Just like with the command line, when we merge we modify our current branch. Verify you are on the main branch.
Verify current branch at the bottom.
From the version control sidebar → Three dots → Branch → Merge
In the selector that comes up, choose the branch you want to merge from. The commits on that branch will be added to the current branch.

On the command line, when we merge, we always modify our current branch.
If you are not sure anymore what your current branch is, type:
$ git branch
… or equally useful to see where we are right now:
$ git status
In this case we merge the new-recipe branch into our current branch:
$ git merge new-recipe
This doesn’t seem possible in RStudio without an add-in. We recommend that you use the Terminal in RStudio and follow the “Command line” path instructions.
(6) Delete merged branches
Before deleting branches, first check whether they are merged.
If you delete an un-merged branch, it will be difficult to find the commits that were on that branch. If you delete a merged branch, the commits are now also part of the branch where we have merged to.
One way to delete the branch is to click on the “Delete branch” button after the pull request is merged:
But what if we forgot? Then navigate to the branch view:
In the overview we can see that it has been merged and we can delete it:

From the Source Control sidebar → the three dots (as before) → Branch → Delete Branch. Select the branch name to delete.
Verify which branches are merged to the current branch:
$ git branch --merged

* main
  new-recipe
This means that it is safe to delete the new-recipe branch:
$ git branch -d new-recipe
Verify then that the branch is gone but that the commits are still there:
$ git branch
$ git log --oneline
This doesn’t seem possible in RStudio without an add-in. We recommend that you use the Terminal in RStudio and follow the “Command line” path instructions.
(7) Contribute to the original repository with a pull request
Remember, this is an advanced step. If you do this, you are donating a recipe to everyone.
Now that you know how to create branches and opening a pull request, try to open a new pull request with a new change but this time the base repository should be the upstream one.
In other words, you now send a pull request across repositories: from your fork to the original repository.
Another thing that is different now is that you might not have permissions to merge the pull request. We can then together review and browse the pull request.
Not described. We will return to this in the collaborative Git lesson.
You would create a new branch locally like above, push it to GitHub to your own user’s repository USER/recipe-book, then go to GitHub and open a pull request to cr-workshop-exercises/recipe-book. Or you do it all through VS Code.
Not described. We will return to this in the collaborative Git lesson.
You would create a new branch locally like above, push it to GitHub to your own user’s repository USER/recipe-book, then go to GitHub and open a pull request to cr-workshop-exercises/recipe-book.
Not described. We will return to this in the collaborative Git lesson.
You would create a new branch locally like above, push it to GitHub to your own user’s repository USER/recipe-book, then go to GitHub and open a pull request to cr-workshop-exercises/recipe-book.
Resolving a conflict (demonstration)
A conflict is when Git asks humans to decide during a merge which of two changes to keep if the same portion of a file has been changed in two different ways on two different branches.
We will practice conflict resolution in the collaborative Git lesson.
Here we will only demonstrate how to create a conflict and how to resolve it, all on GitHub. Once we understand how this works, we will be more confident to resolve conflicts also in the command line.
How to create a conflict (please try this in your own time and just watch now):
Create a new branch from
mainand on it make a change to a file.On
main, make a different change to the same part of the same file.Now try to merge the new branch to
main. You will get a conflict.
How to resolve conflicts:
On GitHub, you can resolve conflicts by clicking on the “Resolve conflicts” button. This will open a text editor where you can choose which changes to keep. Make sure to remove the conflict markers. After resolving the conflict, you can commit the changes and merge the pull request.
Sometimes a conflict is between your change and somebody else’s change. In that case, you might have to discuss with the other person which changes to keep.
How to avoid conflicts:
We will talk about it in the collaborative Git lesson.
Summary
We learned how to merge two branches together.
When is this useful? This is not only useful to combine development lines in your own work. Being able to merge branches also forms a basis for collaboration.
Branches which are merged to other branches are safe to delete, since we only delete the “sticky note” next to a commit, not the commits themselves.